When moving, rotating, or scaling components, you can choose to transform them all relative to a single shared reference point, or along multiple reference frames based on which components are selected.
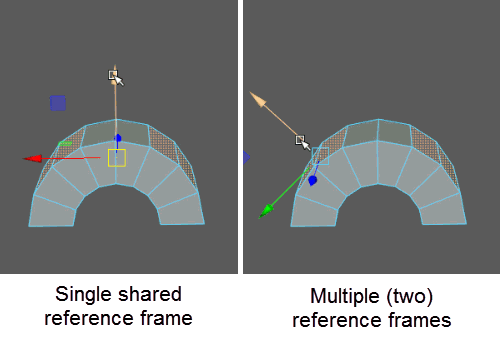
- To transform components relative to a single shared reference frame, use the Move, Rotate, or Scale Tool with Axis Orientation set to World or Local. For more information, see Transform Objects and Components.
- To transform component groups along their local reference frames, use the Move, Rotate, or Scale Tool with Axis Orientation set to Component. For more information, see the section on Component Grouping below.
- To translate each individual component using its own reference frame, Ctrl + middle-drag while using the Move Tool.
Component grouping
Component groups refer to any sets of adjacent components within the current selection.
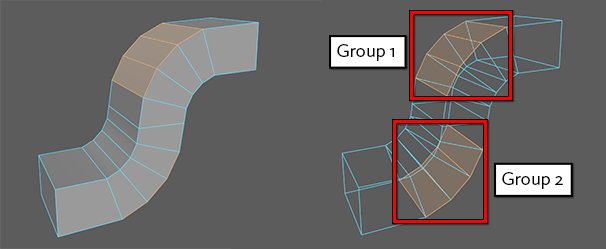
Setting Axis Orientation to Component transforms each group according to its own reference frame. The reference frame for each group is the average of all components within that group.

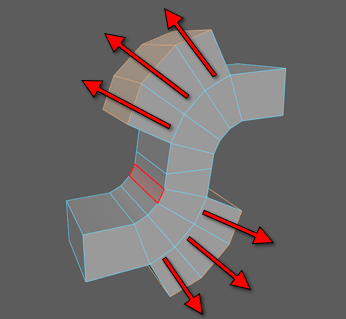
However, one exception is when Ctrl + middle-dragging with the Move Tool. This translates each component along its own reference frame, ignoring their group.
Temporarily activating Component Axis Orientation
While using the Move, Rotate, or Scale Tool, you can temporarily activate Component mode by Ctrl + middle-dragging. This works with any Axis Orientation currently active, except Normal, and will constrain the movement differently depending on which tool is active.
| Operation | Effect: |
|---|---|
|
Ctrl + middle-dragging with the Move Tool moves each component along its own normal (ignoring component groups). |
 |
|
Ctrl + middle-dragging with the Rotate Tool rotates each component group along its local X axis. |
 |
|
Ctrl + middle-dragging with the Scale Tool scales each component group along its local YZ axis. |
 |
For example, if you revolve a curve to create a surface, then tweak CV number 3 on the surface, the tweak will always apply to CV number 3. If you later change the revolve node attributes to reduce the number of segments on the surface, the CV that you tweaked will now have a new number, and the tweak will no longer be applied to it. The tweak will be applied to the CV that is now number 3, which may be in a different location on the surface.
Transforming components with history
In addition to the methods above, you can also move components with history. This method allows you to modify the history node associated with it, but also has more limitations when it comes to working with other features like symmetry.
To create a history node to transform components
- Select the components you want to move.
- Select
Edit Mesh > Transform.
Maya creates a transformation node (polyMoveComponentType) and automatically switches to the Show Manipulator tool, allowing you to edit the node.
- Drag the manipulator handles to move, rotate, or scale the components, or change the settings in the
Attribute Editor or the
Channel Box.
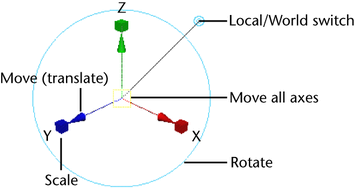
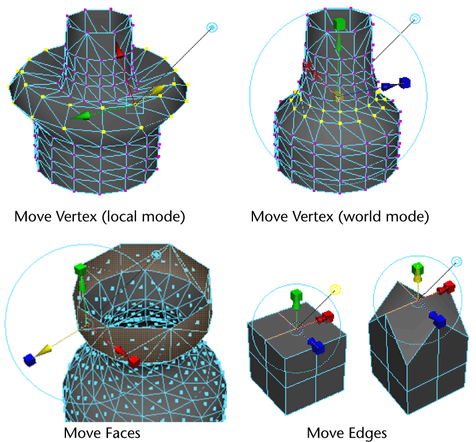
The manipulator is a standard move/rotate/scale combined manipulator, with an extra handle to switch between Local axes and World axes. Moving components along their local Y can be very useful to move components “inward” or “outward”.
Moving UVs using Edit Mesh > Transform
- The manipulator does not display in the scene view when you use Edit Mesh > Transform on UV texture coordinates, but it does display in the UV Texture Editor.
- Local coordinate mode is not applicable for UVs.
- A texture must be assigned to the object to see the results of the transform in the scene view.
- Once you select the UVs on the object, use the options window or the Channel Box to change the settings and transform the UVs within the area you selected.
- It is recommended that you use the UV Texture Editor if you want more control when transforming UVs.