Use the following options to set what happens when you select Curves > Fillet.
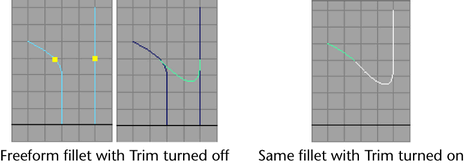
- Trim
-
Keeps only the parts of the original curves that flow toward the fillet curve ends. Other parts are deleted.

- Join
-
Joins the trimmed curves to the fillet curve, thereby creating a single curve. Available only when Trim is on.

- Keep Original
-
Retains the original curves used to create the fillet. This allows you to create a curve fillet again for the curves but with different settings.
- Construction
-
Select the way that the curve fillet is constructed.
Circular creates a semicircular arc.
Freeform creates a curve that’s determined by the curve points you selected before the Curve Fillet operation.
- Radius
-
Sets how sharply a circular fillet arcs.
- Freeform Type
-
Select where to place the freeform fillet’s apex.
Tangent puts the freeform fillet’s apex near the intersection corner.
Blend puts the freeform fillet’s apex near the midpoint between the curve points you selected before the Curve Fillet operation.
- Blend Control
-
Adjusts the fillet shape curvature by enabling Depth and Bias. Note that if Blend Control is on for a circular fillet, the fillet will not be circular.
- Depth
-
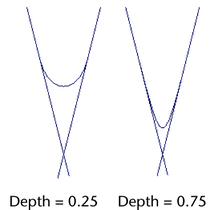
The higher the Depth, the deeper the fillet curve is positioned in the intersection corner.

- Bias
-
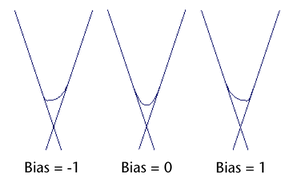
Controls whether the fillet curve warps in the direction of one curve or the other. A value of 1 warps the fillet curve toward one curve, -1 toward the other curve. A value of 0 puts the fillet curve evenly between the two. (You can use a value below 0 in the Attribute Editor, not in the options window.)

- Input Curve
-
Gives you access to the history of the curves you used to create the fillet. Click the arrow buttons to select one of these curves if you want to edit it.
- Curve Parameters
-
The Curve Parameter1 and Curve Parameter2 define the region between the two curves where the fillet curve is created.