The
Target Weld Tool allows you to merge vertices or edges by dragging from one component to another. Components can only be merged if they belong to the same mesh.
To merge components using the Target Weld Tool
- Open the tool by doing one of the following:
- From the
Tools section of the
Modeling Toolkit window, click
 .
.
- From the main menu bar, select .
- When an object is selected, Shift + right-click and select Target Weld Tool from the marking menu.
- When a vertex is selected, Shift + right-click and select from the marking menu.
- When an edge is selected, Shift + right-click and select from the marking menu.
- When a face is selected, Shift + right-click and select Target Weld Tool from the marking menu.
- From the
Tools section of the
Modeling Toolkit window, click
- (Optional) In the
Target Weld Options, adjust the
Merge To setting.
You can toggle between merging components to a target component or at the center of the selected components.
- Select a source component (edge or vertex) or Shift + select multiple components.
- Drag the cursor to a target component (edge or vertex).
Tip: Release your mouse button when your cursor is on the source component to cancel the merge operation.
An orange line appears between the two components. If you selected multiple components then multiple green preview lines are drawn from each source component, showing the result of the merge operation.
If Merge To: Center is on, a green dot is drawn on the orange line to indicate the center point.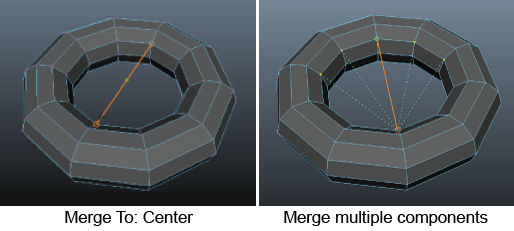
- Release your mouse button to merge the components.
- When finished merging components, change to another tool or click
again to exit the tool.
Tip: You can press Y to reactivate the Target Weld Tool after switching to another tool.