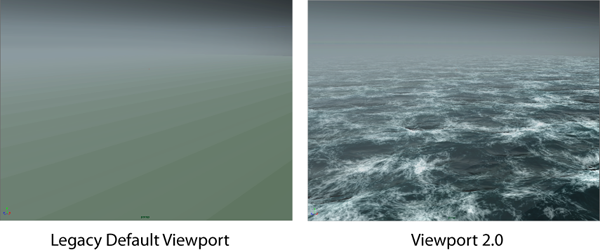
Viewport 2.0 replaces the legacy viewports (default and high quality), and provides improved performance, letting you view high-quality lighting and shadows, materials, and other effects directly within the Maya viewport, without the need to render.

Performance improvements
Viewport 2.0 also includes the following performance improvements over the legacy default viewport:
- GPU Instancing takes advantage of GPU caching if you have multiple instances (or especially a large number of instances) of a Maya shape all using the same material, they render using hardware instancing for much faster rendering results. See Viewport 2.0 Options for more information.
- Consolidate World provides viewport performance gains, particularly in scenes that have large numbers of non-deforming objects by combining traditional consolidation for static objects.
Quality improvements
Viewport 2.0 improves upon earlier Maya viewports with the following:
- Pre-render visualization
- Support for complex shading networks, displacements, normal and bump mapping, light shadows, per-pixel lighting, and ambient occlusion, provide a better realtime idea of what your rendered images will look like.
- Realtime preview
- Realtime preview of ramps, adjustments to texture file attributes, and multi-tiled UV textures.
- Color management
- Color management gives you the advantages of a scene-linear workflow, while still showing a preview that is appropriate for your display in the viewport and Render View. Having advanced color management in the viewport lets artists see the color scenarios that get applied earlier in the pipeline, such as in animation playblasts. Also, by default, lighting in the viewport is more natural and less contrasted than in the legacy viewport.
- Displacement Preview
- Simplified displacement preview workflow minimizes workflow interruptions.
- OSD support
- Native OSD 3.1 lets you preview the actual shape and surface of adaptive openSubdiv geometry.
- Transparency
- High-quality display of transparent objects without performance impacts. For more information about transparency modes, see Viewport 2.0 options.
- Sculpting
- Enhanced display performance when sculpting high resolution meshes.
- Bifröst and XGen support
- Full drawing and shading support for Bifrost and XGen Interactive Grooming for more accurate render previews.
- Data preloading
- Viewport 2.0 preloads data to allow for faster interaction. Startup time can sometimes be slower, but the interactivity is much better.
- Better use of GPU memory
- Viewport 2.0 takes far more advantage of your graphics hardware to do more and provide faster performance. Viewport performance and interactivity increases as the quality of the graphics card increases.
Graphics card ram is also an important factor. See Manage GPU memory for Viewport 2.0 for information about hardware requirements. Also see Optimize Viewport 2.0 for tips on how to deal with large scenes.
API
The Viewport 2.0 API lets you take advantage of Viewport 2.0 performance improvements in your plug-ins and interface with viewport effects and other features
Differences between Viewport 2.0 and the Legacy default Viewport
- Objects with no shader
- In Viewport 2.0, objects with no shader assigned appear in the scene view shaded green. If a shading network error occurs, the object displays white in the scene view. If the object is an OpenSubdiv object, it displays as white dots. This visual change alerts you of any missing shaders.
- In the legacy viewport, objects with no shader appeared as a wireframe.
- ViewCube
- The ViewCube is not available in Viewport 2.0. For a way to quickly switch between views, see Navigate the Viewport without the Viewcube.
- Particle Opacity attribute
- In Viewport 2.0, you do not need the Opacity attribute to see the effect of Color Accum. You can, however, combine both attributes to create a more realistic glowing particle effect; the opacity of each particle is multiplied by the Opacity value, and then overlapping particles are added together. You can lower the Opacity value to prevent particles from appearing overly bright, resulting in a smoother effect.
- In the legacy viewport, to see Color Accum effect, you needed to use the Opacity attribute.
- PP attributes
- In Viewport 2.0, connect particleSamplerInfo through the outColor, outTransparency or outIncandescence attributes in the Hypershade window to connect the rgbPP, opacityPP or incandescencePP attributes.
- Windows Remote Desktop
- In Viewport 2.0, Maya switches the Rendering engine to DirectX 11 mode automatically when accessing Maya through Windows Remote Desktop.
- Deleted shading nodes
- In Viewport 2.0, if you delete the shading node for your object, by default, the object is shaded green. You can change this default color via the object's shape node Attribute Editor, Drawing Overrides section, Color attribute.
- Enabled shadows
- When enabling shadows in your scene, Viewport 2.0 provides a preview of shadows regardless of whether you select Use Ray Trace Shadows or Use Depth Map Shadows for your light. To adjust the look of shadows when visualizing in Viewport 2.0 , select Use Depth Map Shadows and adjust its corresponding settings to see the effect in the viewport.