Load layers in the USD Layer Editor

You can load one or multiple existing layers into the layer stack of a stage with the USD Layer Editor. The loaded layer will be nested under the selected layer or the root layer (if no layer is selected).
Load an existing layer
Do one of the following to open the USD Layer Editor:
- Select Windows > General Editors > USD Layer Editor
- In the Outliner, right-click
stageorstageShapeand select USD Layer Editor
Note: If the Outliner only displays a stage node, Display > Shapes needs to be toggled on to view stage shapes in the Outliner.To bring up the Load Sublayers to
dialog, do one of the following: - Click

- Right-click a layer > Load Sublayers...
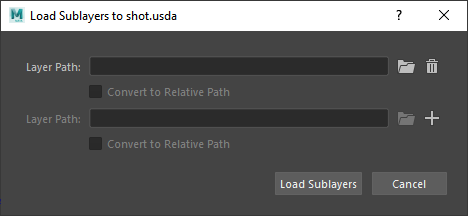
Use this dialog to import existing USD files into your Layer Stack.
Specify the existing layer's file path on disc or use the folder icon
 to locate the file with the file browser.Tip: In your file browser, hold Shift or Control to select multiple files for layer import.
Click
 /
/ to add/remove a sublayer from your import, respectively.
Once you have selected a valid file, you can use Convert to Relative Path. By default, Convert to Relative Path is unchecked, which retains the original file path input. If checked, your file path becomes relative and the field becomes uneditable.
When you are finished you can select Load Sublayers to complete your layer import or Cancel to undo this action.
The contents of the newly loaded sublayer(s) are reflected in the Viewport and Outliner. The parent layer to the loaded layer(s) receives an asterisk to indicate unsaved edits.
Important: If you specify an invalid file path, it will be added to the layer stack but display with a warning badge. You will not be able to mute it, set it as the target layer or reorder it in the layer stack. The only available operation is to right-click the layer and select Remove.
- Click
Further edits with the USD Layer Editor
- Save changes to your layer stack on disk. For more information, see Save edits in the USD Layer Editor.
- Repeat the previous steps to continue to load layers to build your layer hierarchy. For more information on working with the Layer Editor, see USD Layer Editing and Organize layers in the USD Layer Editor.
- To add a prim or a reference to a layer, ensure that the desired layer is set as the target layer. For more information on specific steps, see Work with USD data in the Outliner.