The Optical Gap options enable you to set the interpolation mode, insert Gap keyframes, and change the interpolation to raw sample curve to manually modify keyframes.
The Optical Gap options are displayed when the Timeline indicator is positioned over a gap as shown in the following figure.
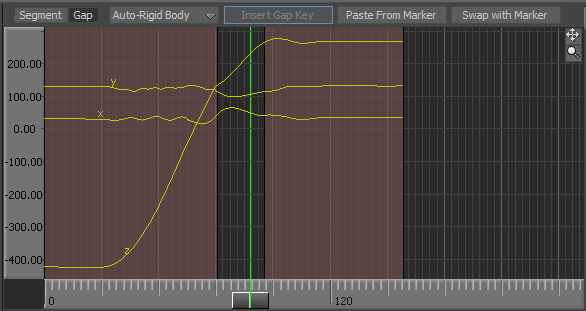
Optical editor displaying the default Optical Gap options
When the Control Curve is selected, the Insert Gap Key button is enabled.
The following table describes the default Optical Gap options available at the top of the Optical editor.
| Optical Default Gap options | Description |
|---|---|
|
Insert Gap Key |
The Insert Gap Key adds a gap key on a Control Curve between two segments.
Note: The
Insert Gap Key option is only available when the Gap Interpolation is set to
Control Curve mode.
|
|
Paste From Marker |
The Paste From Marker Gap option pastes data from one marker to another with a global offset. When you perform Paste From Marker in a gap, handles are generated with which you can adjust the interpolation. |
|
Swap With Marker |
The Swap With Marker Gap option swaps data from the currently selected marker to another marker. The swapping method is determined by the settings in the Insert menu in the Optical Options Label pane. |
The Optical Gap options are also accessible when right-clicking a gap.
Optical Gap interpolation mode
In some cases, it is impossible to fill gaps with data segments. For example, when dealing with instances of occlusion where the sensor could not be captured. In these cases, use the appropriate interpolation setting to reconnect two segments.
When choosing the interpolation mode, consider whether you want to paste data over the current data, edit the data, or manually reconstruct the data. The Optical Gap interpolation modes are described in the following table.
| Optical Gap Interpolation mode | Description |
|---|---|
|
Auto-Rigid Body mode |
Auto-Rigid Body uses the data information of the other markers from the same Rigid body to build accurate data for the current marker. The higher the number of markers in the Rigid body, the more accurate the data. Use the Auto-Rigid Body interpolation mode when there is a lot of data in the gap. |
|
Auto-Constant mode |
Auto-Constant also generates a key of the same value as the first frame of the gap at the last frame of the gap. Use this mode to re-interpolate the FCurve within the gap without using the Rigid body information or to prepare the gap for Control Curve keyframing. |
|
Auto-Linear mode |
Auto-Linear also joins the data from the surrounding segments using a linear curve. Use this mode to re-interpolate the gap without using the Rigid body information or to prepare the gap for Control Curve keyframing. |
|
Auto-Bezier mode |
Auto-Bezier fixes most problems because its editable spline curve gives a smooth transition between the two segments. Use the Auto-Bezier interpolation mode to reconstruct little data, or to prepare the gap for Control Curve keyframing. See Eliminating Swapping. |
|
Control Curve mode option |
The Control Curve Gap mode enables you to edit the FCurve within the gap by inserting keyframes and reconstructing the data manually, or to set keyframes over the current Rigid body information. Use the Control Curve mode option if you want to insert keyframes to edit the gap.
Note: If you want to start from the Rigid body information, choose
Auto-Rigid Body, then switch to
Control Curve, or press
K to add a Gap key.
If you do not want to start from the Rigid body information, choose one of the other interpolation options (Auto-Constant, Auto-Linear, or Auto-Bezier), then switch to Control Curve. The Control Curve matches the previously selected interpolation. |
|
Sample Curve mode option |
The Sample Curve mode option turns the FCurves into raw sample data. Use the
Sample Curve mode option to edit the keyframes individually.
Note: You may have to zoom in on the curve to view all the keyframes.
|