This topic describes some of the more commonly found items in the Asset context menu, which lets you perform actions on assets, change your selection, reorganize your assets into folders, and so on.
To open the Asset context menu, right-click in the Asset list in the Scene browser. Depending on your selection and where you right-click, the options in the context menu may change. For example, right-clicking on a folder shows different options from right-clicking on an asset.
The context menu applies to the asset on which you right-click, and applies to the selection when you right-click a selected asset.
Duplicate
Duplicates the asset on which you right-click. The duplicated asset inherits all the associated properties and assets of the original asset.
For example, duplicating a cube creates a second cube with the same attached assets.
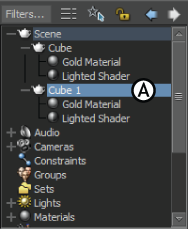
Scene browser A. Duplicated cube (Cube 1) inherits all dependencies of original cube (Cube).
Create Group/Set From Selected Item(s)
Lets you create a new Group or Set consisting of the selected assets in the Scene browser.
Detach/Detach All Assets
Lets you detach all assets from a model or other asset with materials, textures, and shaders. This menu item changes depending on the selected assets and where you right-click.
Right-click a material, texture, or shader in the Scene folder to detach the asset from its parent. For example, if you right-click a shader attached to a cube, the context menu item asks if you want to detach the shader from the cube.
Right-click a material, texture, or shader in its dedicated folder to detach the asset from all attached objects. For example, right-clicking a shader in the Shaders folder displays a menu option that lets you detach the shader from all attached objects.
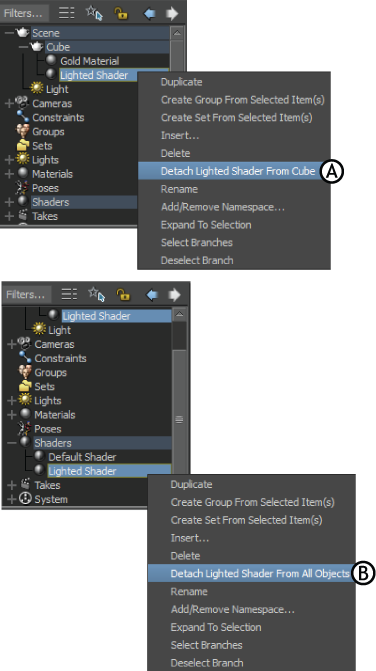
A. Detach From Asset B. Detach From all Objects
Zero
Provides an additional submenu that lets you set all transformations to zero. This item only appears when you right-click a model or other asset with transformation values (translation, rotation, scaling).
Make Camera Current
Makes the camera on which you right-click the current camera. This item displays in the context menu when you right-click a camera in the Cameras folder.
Insert Folder
Lets you add additional folders to the Asset list when you right-click a folder. You can reorganize your list of assets by dragging them into folders.
For example, you can separate your custom cameras in their own folder by right-clicking the Cameras folder and selecting Insert Folder from the context menu. The new folder inherits its Asset folder name. Rename folders by right-clicking the folder, and selecting Rename from the context menu.
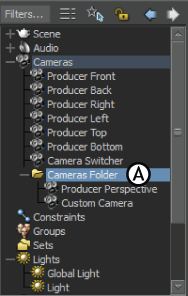
A. Added folder in the Cameras group inherits its parent folder name (Cameras Folder).
You can add folders to any Asset folder, but you cannot add folders under the Scene folder since it displays a hierarchical view of your entire scene.
Insert <Asset>
Lets you add an asset to your scene where <asset> matches the folder that you right-click.
For example, right-clicking the Cameras folder lets you add a custom camera, while right-clicking the Scene folder provides an additional submenu, letting you add any object.
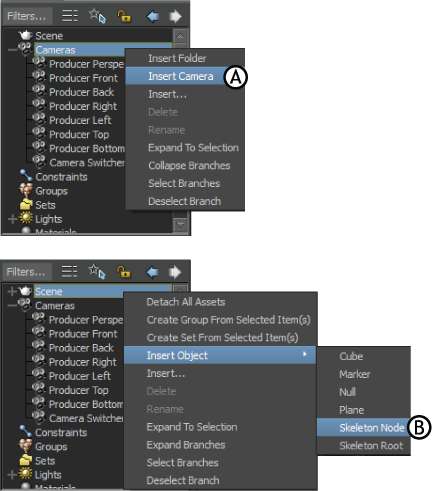
Insert <asset> A. Insert Camera B. Insert Object
Insert
Opens the Asset browser to let you add assets to your scene. If the Asset browser is already open, this command makes the Asset browser the active window.
Delete
Deletes either the asset that you right-click, or all the selected assets when you right-click a selected asset.
Rename
Lets you rename the asset that you right-click. To rename the asset, type a new name in the field that appears and press Enter.
Select/Unselect Branch
Selects or deselects all the assets connected to the branch that you right-click. For example, right-clicking on a cube and choosing Select Branch selects the cube and its child assets.
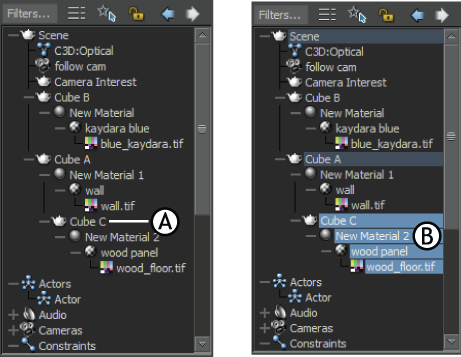
Select Branch A. Right-click on Cube C and choose Select Branch. B. Cube C and all its child assets are selected.
You can also use Select Branch and Unselect Branch with Asset folders. For example, you can right-click the Textures folder and choose Select Branch to select all the textures in your scene.
Expand To Selection
Expands the hierarchy that you right-click to show the selected asset(s). Assets that display in light grey indicate that one of its children are selected.
Expand/Collapse Selected Branches
Expands or collapses all selected branches. Collapse Selected Branches only appears in the context menu after a branch is selected. For Collapse Selected Branches to work, make sure you right-click an asset within a selected branch.