Create and apply a support script that stacks open, rastered, easy-to-remove volumetric supports on top of solid-core, robust volumetric ones.
Jump to:
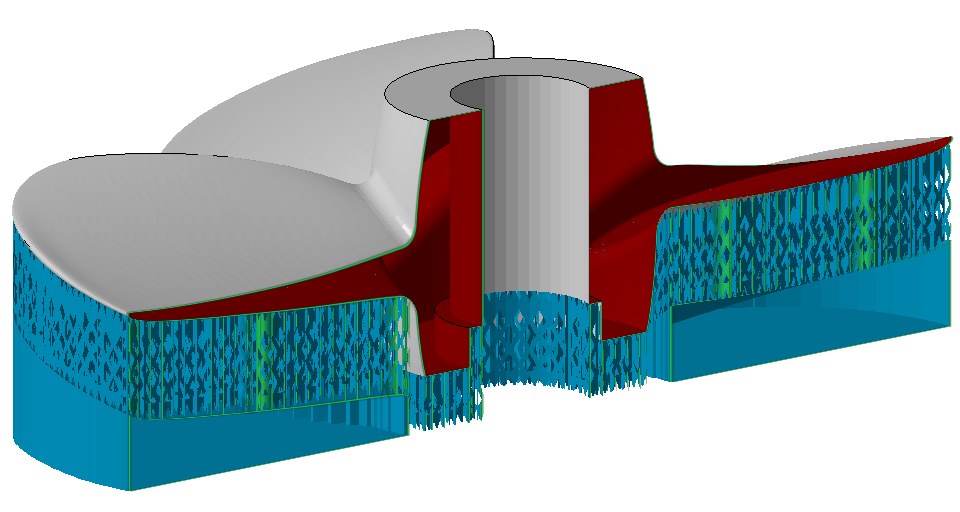
The stacked support on this propeller example generates fully autonomously from only two support actions in mere seconds.
This tutorial shows setting up and generating hybrid support using a support script. While the support actions that comprise the script may be configured and performed manually, using a script saves time and is most importantly reproducible with minimized chance of error.
Creating the support script
Creating the support script requires a part loaded in the support editor. Arranging and orienting it into the right position suitable and practical for your additive machine and buildjob is not part of this tutorial.
- Load the part into Netfabb. Arrange and orient it, and choose Generate supports from the main menu.
- In the context view, select the Support scripts tab.
- Click
 New script.
In the opening dialog, provide a name for the script and click OK.
You now have a new, empty support script ready to be filled with support actions.
TopAdding and configuring script actions
Netfabb can generate hybrid support because it runs the support actions successively, and because subsequent actions can be made aware of places and spaces occupied by supports generated by previous actions.
In which order the solid and the open section is generated is actually not important. The structured section may be generated first, as may the solid one, as long as the second action is configured to tolerate existing supports. In this tutorial, the solid section is generated first.
Action for the solid section
- From the dropdown menu at the bottom of the Support scripts tab, select Area with volume support and click Add.
- In the script listing, make the following configuration changes. Feel free to click
Execute before and after each step to observe the effects of the changes.
- Click on Description and type in solid section. Hit Enter to accept the text change.
- Set from the default Structure to Closed volume.
- Set from the default 0.00 mm to 20 mm.
- Set from the default Cross to No pins.
- Set from the default Yes to No.
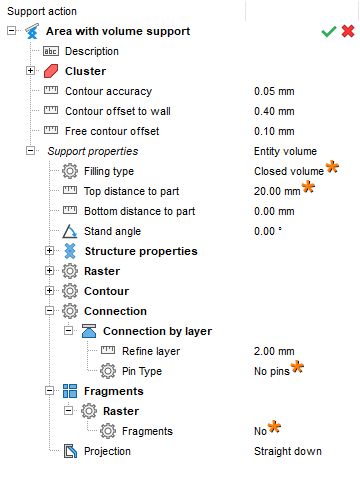
The first support action, configured to produce the solid section of the hybrid support, with the important changes marked with an asterisk
Action for the open section
- From the dropdown menu at the bottom of the Support scripts tab, select Area with volume support and click Add.
- In the script listing, make the following configuration changes to the newly added section. Again, feel free to click
Execute before and after each step to observe the effects of the changes.
- Click on Description and type in open section. Hit Enter to accept the text change.
- Set from the default Avoid duplicate support to Tolerate duplicate support.
- Set from the default 0.00 mm to 20.00 mm.
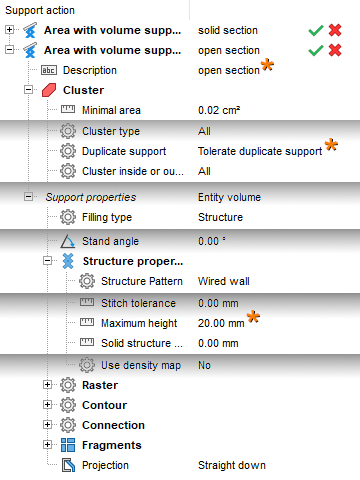
The second support action, configured to produce the open section of the hybrid support, with the important changes marked with an asterisk
With the two actions now configured, click Save. The support script is now ready to run.
Top