Edit individual triangles, edges, and nodes
With the manual repair tools you perform simple repair and mesh editing operations. Enter repair by selecting the part to repair, then click
Home >  Repair Part.
Jump to:
-
 To add triangles
-
 To add nodes
-
 To add a free triangle
-
 To remove an edge
-
 To move a node
-
 To remove selected triangles
-
 To flip selected triangles
To add triangles
Add triangles to manually close holes or connect edges.
- From the main menu, click
Add Triangles.
- Click an edge surrounding a hole. The selected edge is highlighted in blue.
- Hover your mouse over the other edges around the hole to preview the shape of the added triangle. The triangle preview is shown in green.
- Click an edge around the hole to add the triangle.
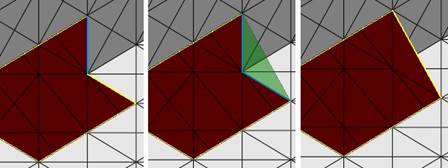
Left: First edge highlighted in blue. Middle: Preview of new triangle. Right: Resulting triangle.
To add nodes
Add nodes to refine the triangle mesh by manually inserting new corner points.
- From the main menu, click
Add Nodes.
- Hover the mouse pointer over the part to preview the new node position on the triangle and the resultant triangles to be created.
- Click the location to insert the new node.
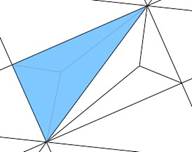
Preview of a node to be added to the middle of a triangle.
To add a free triangle
Add a triangle to an open edge (yellow). Free triangles don't have to be connected to two edges when dropping them into place.
- From the main menu, click
Add Free Triangle.
- Click and hold an edge surrounding a hole. The selected edge is highlighted in blue.
- While still holding down the left mouse button, move your mouse around the part to preview the shape of the free triangle.
- Release the mouse button to add the triangle.
To remove an edge
Remove individual edges from the mesh to reduce the number of triangles required to define a plane or to improve the mesh quality.
- From the main menu, click
Remove Edge.
- Click an edge in the part to remove. The part mesh adjusts to account for the missing edge.
To move a node
Moving nodes allows you to quickly adjust the shape and curvature of the part.
- From the main menu, click
Move Node.
- Click and drag a node in the part to its new position.
When clicked, a label with the X, Y, and Z coordinates of the node appears.
- Release the mouse to finish the move operation.
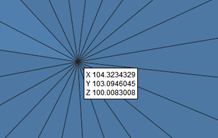
The coordinate label updates dynamically as you reposition the node.
- Right-click the coordinates label to open the
Move Node dialog:
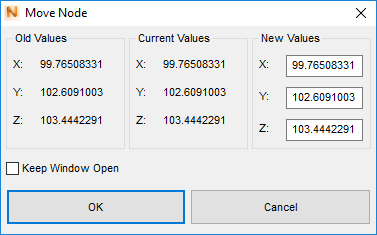
- Enter X, Y, and Z coordinates.
- Click OK to move the node to the coordinate location specified.
To remove selected triangles
- Select one or more triangles.
- From the main menu, click
Remove Triangle.
To flip selected triangles
- Select one or more triangles.
- From the main menu, click
Flip Selected.