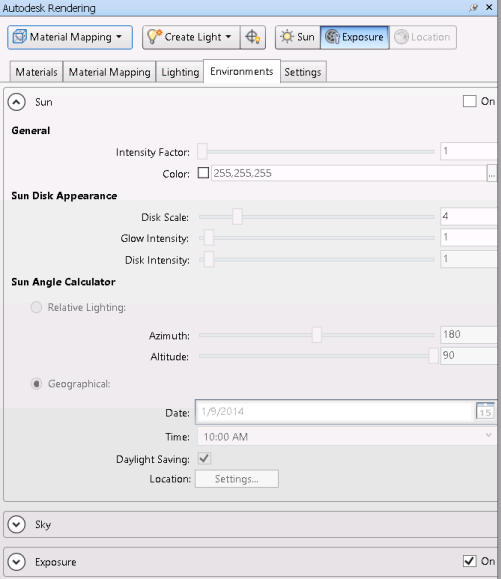
Use the Environments tab to work with sun and sky properties, and exposure settings.

The sun and sky effects are only shown if the exposure is turned on, otherwise the background in the Scene View will become white.
Sun
Sets and modifies the properties of the sun.
- On
-
Turns the sun on and off. If lighting is not enabled in the model, this setting has no effect. To control the model lighting, go to the Viewpoint tab
 Render Style panel.
General
Sets the general properties of the sun.
- Intensity Factor
-
Sets the intensity or brightness of the sun. The range is from 0 (no light) to maximum. The higher the number, the brighter the light.
- Color
-
Use the color picker to choose the color of the sun.
Sun Disk Appearance
These settings affect the background only. They control the appearance of the sun disk.
- Disk Scale
-
Specifies the scale of the sun disk (1.0 = correct size).
- Glow Intensity
-
Specifies the intensity of the sun glow. Values are 0.0-25.0.
- Disk Intensity
-
Specifies the intensity of the sun disk. Values are 0.0-25.0.
Sun Angle Calculator
Sets the angle of the sun.
Relative Lighting
Uses a relative sun position to the building or viewpoint to quickly generate a rendering result using exterior sun lighting. This is the default setting.
- Azimuth
-
Specifies the horizontal coordinate system azimuth coordinate. The range is 0 to 360 degrees. The default setting is 135.
- Altitude
-
Specifies the altitude or elevation above the horizon. The range is 0 - 90. The default setting is 50.
Geographical
Select Geographical to use the sun/location settings.
- Date
-
Sets the current date setting.
- Time
-
Sets the current time setting.
- Daylight Saving
-
Sets the current setting for daylight saving time.
- Location
-
Opens the Geographic Location dialog.
Sky
Sets the properties of the sky.
- Render Sky Illumination
-
Selecting this check box turns on the sun light effect the Scene View. The effect will be visible for both realistic and photorealistic visual styles. If this check box is clear, the sun light will not be shown.
- Intensity Factor
-
Provides a way to magnify the effect of the sky light. Values are 0.0-MAX. Default value is 1.0.
- Haze
-
Determines the magnitude of scattering effects in the atmosphere. Values are 0.0-15.0. Default value is 0.0.
- Night Color
-
Use the color picker to choose the color of the night sky.
- Horizon Height
-
Use the slider to adjust location of the ground plane.
- Blur
-
Use the slider to adjust the amount of blurring between ground plane and sky.
- Ground Color
-
Use the color picker to choose the color of the ground plane.
Exposure
Controls how real-world luminance values are converted into an image.
- On
-
Turns the exposure (or tone mapping) on and off. The effects will be visible for both realistic and photorealistic visual styles. If you deselect this check box, the scene background will be white, and sun and sky simulation will not be shown.
- Exposure Value
-
Overall brightness of the rendered image. This setting is comparable to the exposure compensation setting in cameras with automatic exposure. Enter a value between -6 (brighter) and 16 (darker). The default value is 6.
- Highlights
-
Light level for the brightest areas of the image. Enter a value between 0 (darker highlights) and 1 (brighter highlights). The default is 0.25.
- Midtones
-
Light level for areas of the image whose brightness lies between the highlights and the shadows. Enter a value between 0.1 (darker mid tones) and 4 (brighter mid tones). The default is 1.
- Shadows
-
Light levels for the darkest areas of the image. Enter a value between 0.1 (lighter shadows) and 4 (darker shadows). The default is 0.2.
- White Point
-
Color temperature of the light sources that should display as white in the rendered image. This setting is similar to the White Balance setting on digital cameras. The default value is 6500.
If the rendered image looks too orange, reduce the White Point value. If the rendered image looks too blue, increase the White Point value.
- Saturation
-
Intensity of colors in the rendered image. Enter a value between 0 (gray/black/white) and 5 (more intense colors). The default is 1.