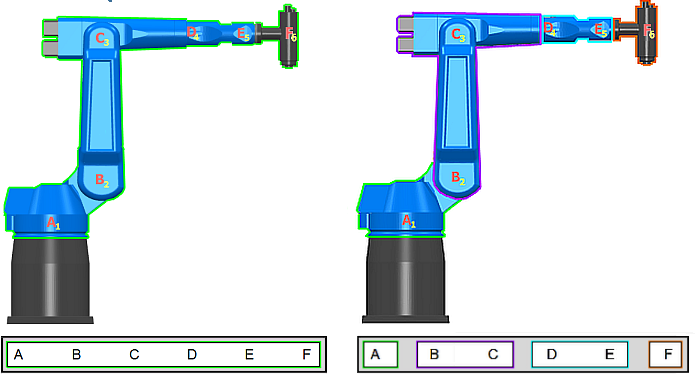
This example shows you how to split the collision group in the Robot_One_CGroup.mtd file into four collision groups.

You need to specify a NAME attribute for the A, B, D and F axis-components, as PowerMill creates a new collision group for every axis-component with a NAME attribute.
Axis-components without a NAME attribute are included in the collision group associated with the previous axis-component with a NAME attribute. By not specifying NAME attributes for axis-components C and E, C is included in the same collision group as B, and E with D.
Split the collision group into four collision groups:
- Open the
Robot_One_CGroup.mtd in an XML editor. This example uses
NotePad ++.
The comment <! --The arm is controlled by 6 rotary axes --> signifies the start of the kinematic chain. Underneath the comment, the six axis-components that make up the robot are defined in their own section (referred to as a parent element in XML language).
Each axis-component section starts with the child element <machine_part>
 . You can identify which axis-component the section defines by the axis address
 .
.

- Edit the <machine_part> element associated with the A axis by entering the attribute NAME="Shoulder", so the element reads: <machine_part NAME="Shoulder">.
- Edit the <machine_part> element associated with the B axis by entering the attribute NAME="Upperarm", so the element reads: <machine_part NAME="Upperarm">.
- Edit the <machine_part> element associated with the D axis by entering the attribute NAME="Forearm", so the element reads: <machine_part NAME="Forearm">.
- Edit the
<machine_part> element associated with the F axis by entering the attribute
NAME="Head", so the element reads:
<machine_part NAME="Head">.
The <machine_part> elements for C and E axis-components should not have NAME attributes.
- Save the .mtd file.
By entering NAME attributes in the <machine_part> elements, you have split the existing collision group into four collisions groups:
- Shoulder (containing the A axis-component)
- Upperarm (containing B and C axis-components)
- Forearm (containing D and E axis-components)
- Head (containing the F axis component)