You can edit a feature using the Edit Features dialog. This enables you to make changes to features you have already created or imported.
To edit a feature:
- Click Feature Group tab > Edit panel > Feature Editor to display the Feature Editor tab.
- Select the feature you want to edit and click Feature Editor tab > Edit panel >Settings to display the Edit Features dialog, depending on the feature type
- For example, selecting a rectangular pocket displays the Edit Rectangular Pocket Features dialog.
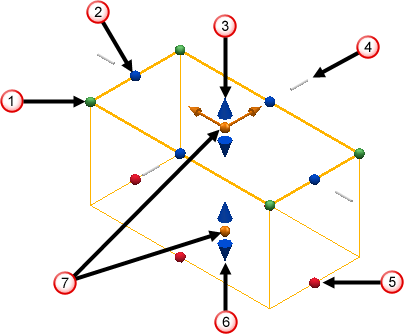
- Use the options on the dialog or use the graphic handles to modify the properties of the feature.

 — Click and drag the green spheres to edit the corner radii of the feature.
 — Click and drag the blue spheres to edit the length of the feature.
 — Click and drag the blue arrows to edit the top face position of the feature.
 — Click and drag the grey bar to edit the profile curve position in the Z axis.
 — Click and drag the red spheres to edit the draft angle of the feature.
 — Click and drag the blue arrows to edit the bottom face position of the feature.
 — Click and drag the orange spheres to edit the position of the feature.
The options and graphics handles available vary depending on the type of feature being created.
- Click Close to accept the changes and close the dialog.
- Click Feature Editor tab > Finish panel >Accept to save the edited feature.