Use the Pattern page to specify the limits and orientation of the toolpath. The options on this page are dependent on the selected strategy:
Limits
Azimuth angle — Each toolpath starts at the
Start angle and ends at the
End angle. The
Angular limits
are measured counter-clockwise about the Z axis, with 0 at the X axis. This option is available only if you select a
Style of
Circular,
Linear, or
Radial.
at the X axis. This option is available only if you select a
Style of
Circular,
Linear, or
Radial.
Elevation angle — Defines the start angle, end angle and the angle between consecutive passes. The elevation values are measured from the horizontal plane.
Parametric pattern limits — Select to limit the machining area using the Start and End fields. This option is only available for Curve projection finishing. The example below shows a Start of 0 and an End of 0.5:
Height — Specify the height each toolpath starts and ends at. The toolpath succesively adds stepover until the end height is reached.
Width — Specify the width each toolpath starts and ends at. The toolpath succesively adds stepover until the end width is reached.
Limits (Distance) — Enter the limits of the pattern. Each pass goes from Start to End. The first pass is at Start, successively adding Stepover until End is reached.
Pattern
Style — Select a style to specify the shape of the pattern projection.
- Linear — Produces a line pattern.
- Circular — Produces a circular pattern at sequential Z heights, in a similar way to constant z finishing.
- Spiral — Produces a spiral pattern.
- Radial — Produces a pattern of lines extending radially outwards from a point.
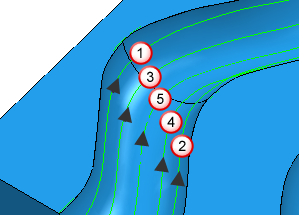
Pattern direction — Select the orientation of the pattern. The two options available are U and V (the surface parametric directions).
-
Pattern direction of
U:
-
Pattern direction of
V:
Spiral — Produces a spiral path. This minimises the number of lifts of the tool and maximises cutting time while maintaining more constant load conditions and deflections on the tool.
Ordering — Select how successive toolpath segment are machined. For more information, see Raster ordering. This option is available only if you select a Style of Circular or Linear.
- One way — The tool cuts only in one direction.
- Two way — The tool can cut in both directions.
- Two way joined — The tool cuts in both directions and joins successive toolpath segments.
Start corner — Select the corner where machining starts. You can choose between four different start corners.

 Min U min V
 Max U min V
 Min U max V
 Max U max V
Sequence — Select the sequence of toolpath segments. This can be useful during line projection of shapes such as bottle molds. This option is available only if you select a Style of Circular or Linear.
- None — Maintains the raster-type movement.
-
Out to in — Sequences the toolpath segments to machine inwards from the pattern's outer region.
-
In to out — Sequences the toolpath segments to machine outwards from the pattern's inner region.

Direction — Specifies the rotational direction of a spiral pattern. This option is only available if you select a Style of Spiral.