This example shows you how to graphically edit hole features.
It uses the RetainerPlate.dgk model in the Examples folder.
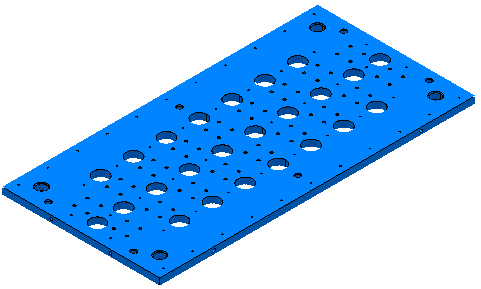
- Select part of the model, including some of the holes.
- From the
Hole Feature Sets context menu, select
Create Holes.
This displays the Create Holes dialog.
- In the
Create Holes dialog:
- Select a Create from of Model.
- Select Create compound holes.
- Deselect Group holes by axis.
- Select Edit after creation.
- Click Apply.
PowerMill recognises the selected holes.
- Double-click on the holes feature you want to edit. This displays the
Hole Feature Set Editor tab.
Selecting a hole feature instruments it.

The selected hole feature is yellow and drag handles
 are placed at the top and the bottom of the hole feature.
If no hole feature is instrumented, or the wrong hole feature is instrumented, select the hole feature you want to edit. You can edit only one hole feature at a time. Editing an inactive hole feature set activates it.
- To change the height of the hole feature, place the cursor on one of the blue arrows. The cursor changes to
 . Click and drag the mouse to change the height. The text next to the cursor shows the current height (in this case
90.8) and the increase in height (in this case
40).
. Click and drag the mouse to change the height. The text next to the cursor shows the current height (in this case
90.8) and the increase in height (in this case
40).
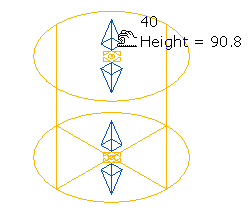
Holding down the Shift key whilst clicking and dragging a blue arrow changes the height of the opposite face at the same time.
- To move the hole feature, place the cursor on the yellow area, or on any part of the selected feature. The cursor changes to
 . Click and drag the mouse to move the hole feature. The text next to the cursor shows the current Z height of the selected hole feature (in this case
20) and by how much you have moved the feature (in this case
0, 0, 20).
. Click and drag the mouse to move the hole feature. The text next to the cursor shows the current Z height of the selected hole feature (in this case
20) and by how much you have moved the feature (in this case
0, 0, 20).

You can only move the hole feature up, or down, the Z axis. If the intelligent cursor is enabled, you can adjust the height by snapping to relevant geometry. You can suppress intelligent cursor snapping by using the CTRL key.
- Click on another hole feature in a model to move the hole feature to that height. In the following case, click on the edge of the hole in the model.

 The feature you are editing.
 The height you want.
- When you have the correct size and location of the hole feature, click Hole Feature Set Editor tab > Finish panel >Accept.