Use the Customise Keyboard Shortcuts dialog to assign keyboard shortcuts to commands.
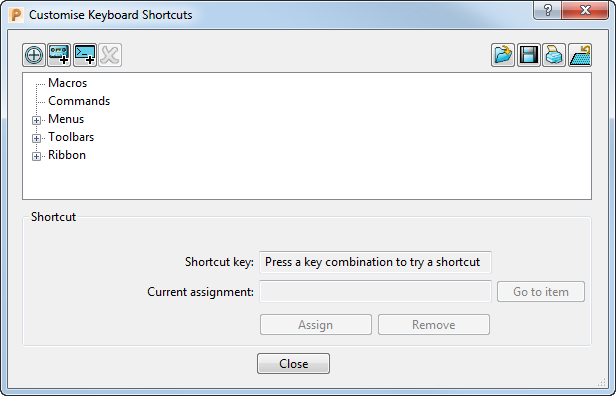
To display this dialog, Click File tab > Options > Customise Keyboard Shortcuts.
This dialog contains the following:
 Control selector
— Click and drag over a button to select it.
Control selector
— Click and drag over a button to select it.
 and places a box around the selected button.
 Add macro shortcut
— Click to add a new macro to the menu list and display the
Macro
field.
Add macro shortcut
— Click to add a new macro to the menu list and display the
Macro
field.
 Add command shortcut
— Click to add a new command item to the menu list and display the
Command
field.
Add command shortcut
— Click to add a new command item to the menu list and display the
Command
field.
 Delete
— Click to remove a selected shortcut.
Delete
— Click to remove a selected shortcut.
 Import shortcuts
— Click to display the
Select keyboard configuration file to import dialog. This enables you import an existing keyboard configuration.
Import shortcuts
— Click to display the
Select keyboard configuration file to import dialog. This enables you import an existing keyboard configuration.
 Export shortcuts
— Click to display the
Export keyboard configuration to a file
dialog. This enables you to save your keyboard configuration.
Export shortcuts
— Click to display the
Export keyboard configuration to a file
dialog. This enables you to save your keyboard configuration.
 Print shortcuts
— Click to display a list of your keyboard shortcuts in the
PowerMill HTML browser and display the
Print Preview window.
Print shortcuts
— Click to display a list of your keyboard shortcuts in the
PowerMill HTML browser and display the
Print Preview window.
 Reset— Click to restore the default keyboard settings.
Menu list — expand the:
- Macros branch to display the file path, with a file selector.
- Commands branch to display your commands.
- Menus branch to display a list of PowerMill menus that you can assign a keyboard shortcut to.
- Toolbars branch to displaya list of PowerMill toolbars that you can assign a keyboard shortcut to.
- Ribbon branch to display the list of PowerMill commands on the ribbon that you can assign a keyboard shortcut to.
Shortcut key — Displays the keyboard shortcut assigned to the selected item in the menu list. To create a new keyboard shortcut, press a combination of approved keyboard keys and click Assign.
Current assignment — If a keyboard shortcut entered in the Shortcut key field is already assigned to an item in the menu list, this field displays the current assignment of that keyboard shortcut.
Go to item — If a shortcut is displayed in the field, click to locate the item in the menu list.
Assign — Click to assign a shortcut to an item.
Remove — Click to remove a shortcut from an item.
Close — Click to close the dialog.