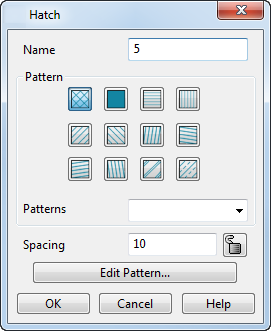
Use this dialog to edit the pattern of the selected hatch and to add extra hatch boundaries when a single hatch is selected.

Name — This name of the selected hatch is displayed. You can edit the name.
Pattern
Select one of the standard hatch patterns to change the selected hatching. The selected pattern is highlighted in blue, for example:

For each of the standard hatch patterns, the colour and spacing (if not locked) match those that are set in the Options dialog.
Patterns — If you do not want to use one of the standard hatch patterns, select a user-defined hatch pattern from the list.
Spacing — This displays the default spacing between the lines of the selected hatch pattern.
Change this value and move the mouse outside the dialog. The hatch pattern updates. On the dialog, the button of the selected pattern is updated to show that the spacing for that pattern no longer matches the default set on the Options dialog.
If you press the button of the selected pattern again, the default spacing is applied to the hatch.
 Lock button — If you click this button to lock, the spacing value is fixed and all the hatch patterns use that value. If you click the
Lock button again and select a hatch pattern, the spacing value changes to its default.
Edit Pattern — Click this button to open the Edit Hatch Pattern dialog to edit the selected hatch pattern.
OK — Saves the edits made to hatch and closes the dialog.
Cancel — Discards any edits made to hatch whilst the dialog is displayed and closes the dialog.