You can limit a group of surfaces and solids to a wireframe object.
To use a wireframe object which lies on the selected surface or solid:
- Select the wireframe item as the cutting object:
- Click Edit tab > Limit panel > Selection to display the Limit selection toolbar.
- Click the Limit mode
 button.
 - To keep a copy of the surfaces and solids to be limited, select the Keep original
 button. The button changes to
  .
. - When limited, surfaces and solids are cut into two portions. To keep both portions of the limited surfaces, click Keep both
 . The button changes to
 . Both pieces of the solids are always kept.
 - Select the surfaces and solids you want to limit. The surfaces and solids limit to the wireframe object, and trim boundaries are created along them.
Using the above example, box select the surfaces.
The surfaces trim as shown:
If the projected wireframe object does not meet the edges of the surfaces and solids, the trim boundaries are automatically extended to meet the edges.
- If the limited surfaces are not as expected, click the Next Solution button
 until the required solution is displayed.
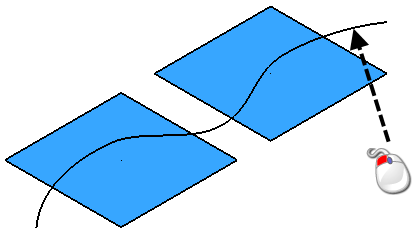
If the wireframe object does not lie on the surfaces and solids, the wireframe object is projected onto the surfaces and solids and they are limited to it. You can project the wireframe onto the surfaces and solids along either:
- the axis normal to the principal plane; or
- the surface normal.
The methods for both projections are similar, except, in the first method, you must ensure one of the axes of the current workspace lies in a suitable direction to project the wireframe object. If it does not, add a workplane and orientate it to a suitable angle.
- Select the wireframe object as the cutting object.
- Click Edit tab > Limit panel > Selection to display the Limit selection toolbar.
- On the toolbar, click one of the projection options:
-
Project mode
 projects the wireframe onto the surfaces and solids along the axis normal to the principal plane.
 -
Project surface normal mode
 projects the wireframe onto the surfaces and solids along the surface normal.
-
Project mode
- If you chose Project mode , change the principal plane so that the axis you want to project along is normal to the principal plane.Note: The principal plane is changed using the selector in the Status bar.
- To keep a copy of the surfaces and solids to be limited, select the Keep original button. The button changes to .
- When limited, surfaces and solids are cut into two portions. To keep both portions of the limited surfaces, click Keep both . The button changes to . Both pieces of the solids are always kept.
- Select the surfaces and solids you want to limit.
The surfaces and solids limit to the wireframe object and trim boundaries are created along them.
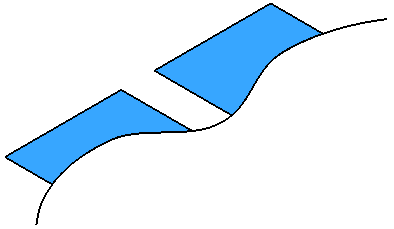
Using the above example, box-select the surfaces.
The surfaces trim as shown:
 Note: If the projected wireframe object does not meet the edges of the surfaces and solids, the trim boundaries are automatically created extending to meet the edges.
 - If the limited surfaces are not what you expected, click the Next Solution button until you see the required solution.