The Select Objects page of the Mold Die Wizard lets you choose the objects to be used within the wizard.
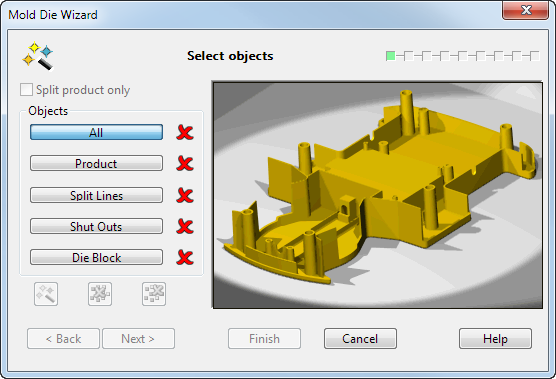
The image on the right of the wizard shows an example part. The image changes to illustrate the types of objects you should select from your own part when you choose a selection option.
If you select objects before starting the wizard, they are automatically classified into categories. You may then alter this classification. You can use Ctrl+A to select all the items that match the Objects selection on the Mold Die Wizard Step 1 - Select Objects page. To use this feature, you must make the background active by clicking on the window away from the wizard.
Split product only — Click this option if you only want to create the core and cavity surfaces. No die block or run off surfaces are created.

Selecting this option hides any buttons or options on the dialog that are not required. This option is not available if you are running the Mold Die Wizard with Non-inserted core/cavity plates selected.
All — Click this option and select all the objects you want to use. You can then click the
Classify button
 to put the objects in their correct categories.
Product — Click this option and select the part you want to use.
A product can be:
- A single, connected solid.
- A set of surfaces, as long as they can be converted into a single, connected solid. During the operation, the surfaces are automatically converted into a solid.
Split Lines — Click this option and select the split lines you want to use.
The split lines are composite curves. The main split line is used to create the split surface and the other split lines are used to create fill-in surfaces, which shut out holes in the product solid.
If more than one composite curve is selected, PowerShape treats the outermost curve as the split line and uses the inner curves to create fill-in surfaces.
This page of the wizard allows you to select existing composite curves as split lines. Page 1 of the wizard allows you to generate split lines using methods available within the wizard.
Shut Outs — Click this option and select the split surfaces you want to use. You can select:
- Split surfaces. The wizard automatically trims these surfaces to the block.
These surfaces can be used to fill awkward regions where it is difficult to create a single split surface.
- Surfaces, which represent filled holes in the die inserts. Note that each group of fill-in surfaces must be enclosed by a composite curve.
Die Block — This option is not available if you are running the Mold Die Wizard with Non-inserted core/cavity plates selected.
Click this option and select the die block you want to use. You can select:
- A solid primitive block.
- Any other solid, but you can't change its size using the wizard. The solid must contain the part.
A die block is automatically created by the wizard if one is not supplied.
— If objects are selected using the
All option, click this option to filter them into their correct groups.
 — This clears all the selections.
 — This clears the current selection.
Next — Displays the Create and edit split lines page of the wizard. If you entered the wizard with no split lines, the wizard attempts to generate them. For subsequent pages of the Mold Die Wizard, all surfaces are viewed trimmed.