A real-life object is made of material such as metal, plastic, or wood. When an object is shaded in PowerShape, a computer-simulated material is generated to make it look realistic. Material is important in the production of an image to enable the designer and customer to see what the finished product will look like. PowerShape provides a large selection of material types to enable this.
When you shade surfaces and solids, the default material is automatically assigned to them. You can change the default material, or the materials of individual surfaces and solids to your requirements, using the Material Selection dialog.
To change the material of selected surfaces and solids:
- Select the surfaces and solids whose material you want to change.
- Shade the surfaces and solids by selecting View tab > Appearance panel > Shade > Shaded or clicking the Shaded
 button on the Views toolbar.
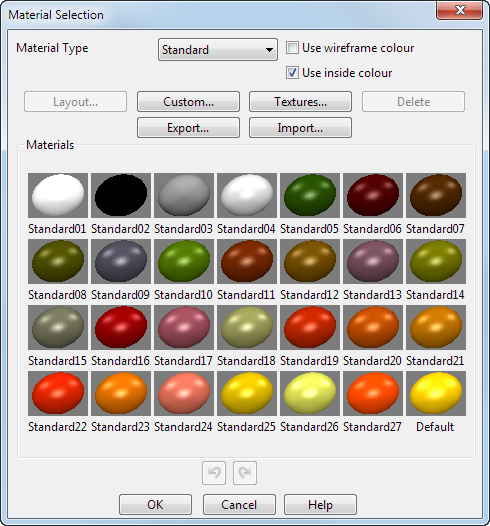
- Click Visualisation tab > Format panel > Material to display the
Material Selection
dialog:
 Tip: You can also select the required surfaces and solids when the dialog is displayed. When changing the material of solids, use the options on the Solid Tools tab > Selection panel to help with selection of solid faces and features.
 - Select the type of material from the Material Type drop-down list. Each type has its own Materials range.
- Select Use wireframe colour to shade the surface or solid using the colour of their wireframe. Deselect this option to use the default material colour.
- Deselect Use inside colour
to use the outside material on the inside as well. Select the option to use the default red material for the inside.
Note: You can change the inside colour from red by setting the inside_colour resource in the powershape.con file. You can see an example of the inside_colour resource in:
C:\Program
Files\Autodesk\PowerShapexxxxx\sys\misc\powershape.con
where xxxxx is the version number of PowerShape and C is the disk on which PowerShape is installed. The colour is specified as three components, red, green and blue, each in the range 0-1. To set the inside colour to yellow, use the following values:inside_colour: 1.0, 1.0, 0.0
Restart PowerShape to use the new inside_colour resource. - Click Layout to display the
Label Editor dialog. This allows you to edit the layout of a leather material in the same way as you would edit a label.
Note: This option is only available when a leather material is selected.
- Click Custom to display the Material Editor dialog . This dialog enables you to edit existing materials or create your own material effects.
- Click Textures to create custom texture materials using the Texture Material Creator dialog.
- Click Delete to delete the selected material.
Note: This option is available only if you have a customized material selected. You cannot delete standard materials that are provided by PowerShape.
- Click Export to export materials using the Export Materials dialog. You can export:
- a group of materials.
- a single material.
- all materials.
- Click Import to import materials using the Select CSV file to Import Material dialog.
- Select a material by clicking one of the graphics in the Materials area of the dialog.
- Click OK to change the material of the selected objects and close the dialog.
Note: To change the default material, ensure that no objects are selected and repeat steps 3-5. The new material is used for subsequent colour shading.