If you label all the components in one view, it may become cluttered. It can be useful to label different components in different views for clarity.
To label components in different views:
- In the Bill of Materials dialog, select all the rows of components that you want to label.
- Select the Labels menu on the Bill of Materials dialog.
- Select the type of label you want to use.
- Create the BOM in the drawing, or save it to a file. Use
 to toggle between saving the data as an embedded Microsoft Excel spreadsheet or creating the BOM in the drawing as an OLE file:
- Create in drawing — Click on the drawing in the position you want the BOM to be displayed. The BOM is created as an OLE file that is embedded in the psmodel.
If a BOM is already in a drawing, this option creates an additional BOM.
- Save To File — This option creates the Bill of Materials as a Microsoft Excel spreadsheet (.xls file). The Save As dialog is displayed where you specify a filename and browse to the drive and folder where you want to store the Bill of Materials.
- Create in drawing — Click on the drawing in the position you want the BOM to be displayed. The BOM is created as an OLE file that is embedded in the psmodel.
- Labels are generated and displayed in the
Bill of Materials dialog and the balloons are displayed in the chosen view.
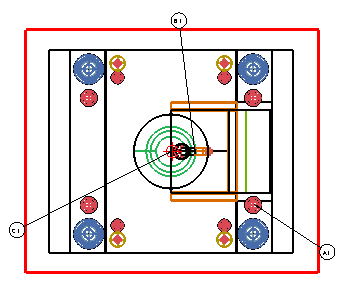
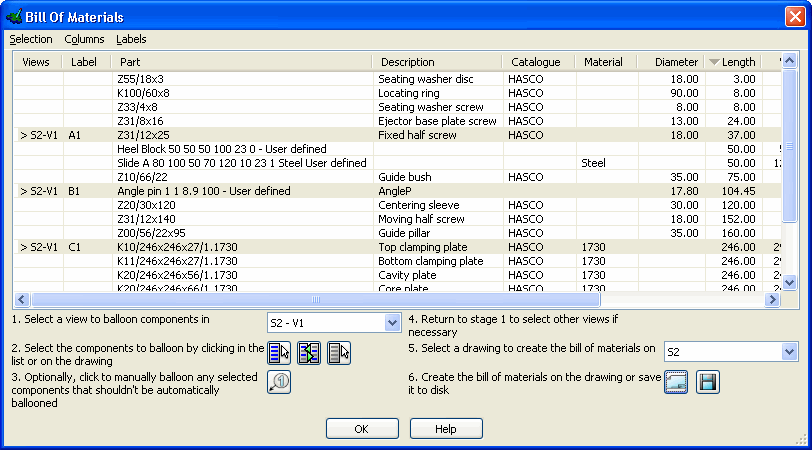
The following example shows a labelled view of an assembly, and the labels displayed in the Bill of Materials dialog.
- Click on a labelled component in the Bill of Materials dialog to see it highlight in the view. You can also click on a component in a view to see it highlight in the Bill of Materials dialog.
Tip: To display or label just one of each item in the
Bill of Materials dialog, sort the data by Quantity — some rows of components do not have a quantity entered. This is because the first instance of the component displays the total quantity. If you do not want to display these rows, you can blank them using
Blank Selected from the
View menu.
Note: If data is sorted when you label the components, any identical data has the same label series. To override this, relabel the components.