Routing with fixed-length piping requires set up in the pipe spec and joint configuration.
- Route a length of fixed-length pipe that exceeds the length of the Fixed Length property.

-
If your piping does not create additional segments at the maximum length, do the following to check pipe properties:
- Right-click on a pipe in the model.
- In the shortcut menu, click Properties.
- In the Properties palette, in the Part Properties group, in Part Geometry, click Use Fixed Length. Fixed length properties are set from the spec and are Read-only in the properties palette.
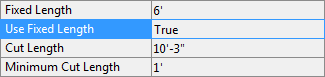
- If Used Fixed Length is false or Fixed Length is not set you can use the Spec Editor to modify these values and plantspecupdatecheck to update model properties.
- If your pipe segment length (Cut Length) exceeds the Fixed Length value, do the following to check joint configuration:
- In the Properties palette, under Port Properties, note the end types (for example: BELL, SPIG).
- In Project Setup, click Piping Connection Settings to display the Joint Setup dialog box.
- If a joint does not exist to connect the end types, click Add to create one.
 Note: You can create new end types. For more information, see Connections. If fasteners are specified, they must exist in the pipe spec.
 - Close Project Setup.
- Repeat step 1 to route a length of fixed-length piping that exceeds the length of the Fixed Length property. The project is set up for fixed-length piping.
 Note: Adding or modifying joints in Project Setup modifies your project DefaultConnectorsConfig.xml file. Some content packs include this file, or specify how to add joints in the installation instructions (readme) of the content pack.