Create an Ortho BOM
This procedure assumes that you are editing an ortho drawing that has at least one ortho view created.
- If you want to modify the BOM contents (for example, add columns or display cut lists), click

- In the Table Setup dialog box, under Table Layout tab, Table type dropdown list, select Bill of Material.
- In Ortho drawing area, select a viewport.
- If you did not create an ortho BOM template in the title block, do the following:
- Specify the upper left location of the ortho BOM table.
- Specify the lower right location (the .Y is ignored).
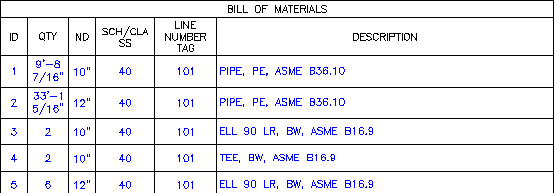
The ortho BOM table displays.
Split (Break) an Ortho BOM Table
Ortho BOMs do not split into additional tables or drawings automatically.
- In the Ortho drawing area, select the outer border of the ortho BOM table. Table grips display.

- Click the table breaking grip at the bottom of the ortho BOM table.

- Specify a break location (for example, the top of a group header). The table splits.
Create an Ortho BOM Annotation
After you place an ortho BOM table, you can add BOM mark number annotations into one or more views.
- Click
- Select an item in the ortho view that is listed in the ortho BOM.
- At the Command prompt, enter b (BOM).
- If you want to rotate the text, enter
r (Rotate).
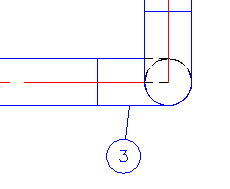
- Specify a location for the annotation.
Create a BOM annotation from a table item
You can pick a line in the BOM list to create an ortho BOM annotation.
- Click
- Pick the left border of the table near the ID number. The leader displays in the default viewport.
 Note: The default viewport is the viewport selected when the ortho BOM table is created. However, you can add BOM annotations to any viewport that contains parts listed in the ortho BOM table.
 - If you want to select a different viewport, at the Command prompt, enter v (viewport).
- Specify a location for the annotation.
- If the same BOM item has additional symbols in the ortho view (QTY greater than one), specify additional locations or enter s (Skip).
Add Ortho BOM Annotations for the Entire BOM Table
After you place an Ortho BOM table, you can add BOM mark number annotations into one or more ortho views.
- Click
- At the Command prompt, enter t (entire table).
- Select the ortho BOM table.
- Specify one or more locations for the first line in the ortho BOM (ID=1).
- Specify locations for all additional lines in the ortho BOM (ID=2, 3, and so on).
Set Up an Ortho BOM in the Title Block
You can specify the default ortho BOM location and settings for a project in the BOM title block. Settings apply to new ortho drawings. The default location applies to the first ortho BOM table that you create in each ortho drawing.
- In Project Setup, Ortho DWG settings, Title Block and Display, click Setup Title Block.
- If you want to modify the BOM contents (for example: add columns or display cut lists), click Table Setup.
- Click Bill of Material. In the title block drawing area, specify the upper left of the BOM table template.
- Specify the lower right. The Ortho BOM table template displays.
 Note: Unlike an Iso BOM, you do not specify a table area (blue hatch) in the title block. The table does not split automatically. Also, the Ortho BOM does not support draw and no-draw areas.