Use this dialog to save a screen capture of a table that you can reuse in the project documentation.
- Access
-
- Right-click in the table view and select
 Screen Capture, or
 - Click anywhere in a table, and then click File
 Screen Capture.
- Right-click in the table view and select
Dialog elements
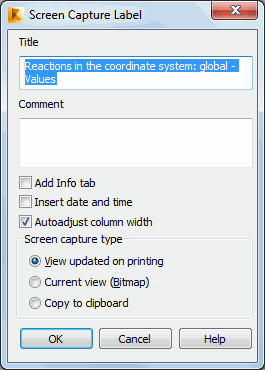
- Title
- Enter a title for the screen capture.
- Comment
- (Optional) Enter a comment in this box.
- Add Info tab
- Adds the information from the Info tab of the table into the screen capture.
- Insert date and time
- Inserts the date and time into the documentation.
- Autoadjust column width
- Adjusts the width of the columns automatically so that the optimal number of columns is presented on a page. Note: Clear this option if you want to change the column width manually.
- Screen Capture Type
-
- View updated upon printing: Updates the screen capture in the documentation every time it is printed or previewed. This update includes the current geometry, data and results of the project.
- Current view (PNG): Generates a *.PNG file. The image shows the project at the moment of the screen capture. If the structure model is modified, the view is not updated, which is useful when analyzing results of large structures.
- Copy to clipboard: The screen capture is saved as a clipboard copy of the current view and can be inserted into the documentation.
Note: The list of screen captures is accessible from the Screen Capture tab of the Printout Composition dialog. From there, screen captures can be placed in projected structure documentation.