You can change the structure of a stacked wall in several ways.
- You can add or delete walls.
- You can move subwalls up or down the height of the stacked wall.
- You can define a reference line for the entire stacked wall, and then offset each subwall from that reference line.
- When creating stacked slanted walls, the constituent walls have the same angle as the stacked wall. You can't change the slant angle of the constituent walls (other than by changing the slant angle of the stacked wall).
 Video: Create a Stacked Wall
To define the structure of a stacked wall
- Access the wall’s type properties using one of the following methods:
For example, in the Project Browser, under Families
 WallsStacked Wall, right-click a stacked wall type, and click Properties. Alternatively, if you have placed a stacked wall in the project, select it in the drawing area, and on the Properties palette, click
 Edit Type.
- In the Type Properties dialog, click Preview to open the preview pane, which shows a section view of the selected wall type. All changes you make to the wall display in the preview pane.
- For the Structure parameter, click Edit to open the Edit Assembly dialog. Each row in the Types table defines a subwall within the stacked wall.
- For Offset, select the plane that will be used to align the subwalls. (This value is used for the Location Line instance property for each subwall.) For walls created with an ellipse or partial ellipse, Wall Centerline must be selected.
- For Sample Height, specify the height for the wall in the preview pane. This value changes if you insert subwalls whose unconnected height is greater than the sample height.
- In the Types table, click a number in the left column to select the row defining a subwall, or click Insert to add a new subwall.
- In the Name column, click the value, and select the desired subwall type.
- In the Height column, specify an unconnected height for the subwall.
Note: One subwall must have a variable, non-editable height that changes relative to the heights of the other subwalls. To change the height of the variable subwall, change another subwall to variable by selecting its row and clicking Variable.
- In the Offset column, specify the distance to offset the location line of the subwall from the reference line (Offset) of the main wall. A positive value moves the subwall toward the exterior side (left side in the preview pane) of the main wall.
- If the subwall is unlocked at the top or bottom, you can enter a positive value in the Top or Base column to specify a distance to raise the subwall, or a negative value to lower it. These values determine the subwall’s Top Extension Distance and Base Extension Distance instance properties respectively.
For more information on unlocking layers, see Allowing Layer Extension.
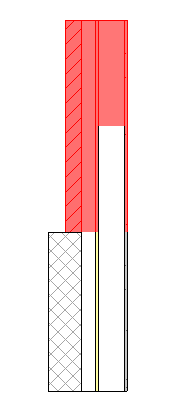
If you specify an extension distance for a subwall, the subwall below it attaches to it. For example, if you specify a Base value of 2 feet for the top subwall, the top of the next subwall down moves up to attach to the modified wall above it. The value in the Top column for the lower subwall changes to Attach. The top wall shown below (highlighted in red) has a positive base extension distance. The lower subwall attaches to it.
- To flip the subwall about the reference line (Offset) of the main stacked wall, select Flip.
- To rearrange rows, select a row and click Up or Down.
- To delete a subwall type, select its row and click Delete.
If you delete a subwall with an explicit height, the variable subwall extends to the height of the other subwalls. If you delete a variable subwall, the subwall above it becomes variable. If there is only one subwall, you cannot delete it.
- Click OK.