Add one or more instances of a slanted wall to the building model.
For full instructions for placing a wall, see Place a Wall.
- Open a plan, elevation, section, 3D orthographic or perspective view.
- For architectural walls, navigate to Architecture tab
 Build panelWall drop-down
 (Wall: Structural). For structural walls, navigate to Structure tabStructure panelWall drop-down (Wall: Architectural).
- Select a wall type from the Type Selector.
If desired, use the Properties palette to adjust instance properties before placing a wall.
- On the Properties paletteConstraintsCross-Section, select Slanted.
The Angle From Vertical parameter displays.Note: You must select Cross-Section Slanted for the Angle From Vertical to display.
- Using the Angle From Vertical parameter, specify the wall's angle between +90° and -90°, where 0° is vertical.
You can also change a vertical wall to a slanted wall using this parameter. If the wall contains inserts (windows, doors), sweeps, or reveals, they will remain in a vertical orientation, and you must adjust their orientation manually using the Orientation Instance property.
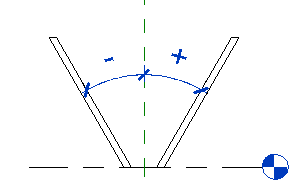 Note: Positive or negative slant, as indicated in the Angle from Vertical parameter, is determined by the direction in which the wall is drawn. In the draw direction, right is always positive and left is always negative.
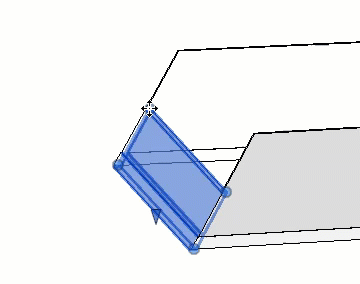
 - Use the in-canvas dot controls at the top of the slanted wall to adjust the wall angle and top offset. Snapping behavior is enabled by default, and guidelines display to allow greater accuracy.
- To exit the Wall tool, click Modify.