When you import or link geometry to the current Revit model, use the Positioning option of the related Import or Link dialog to specify how the incoming geometry is placed relative to the host model.
Choose an option that best matches your situation and workflow.
- Automatic positioning options place the incoming geometry in the host model based on a set of rules. If you know the position of coordinates in the host model and in the imported or linked file, use automatic positioning to precisely place the incoming geometry. These options streamline the process and avoid errors that can occur during manual placement.
- Manual positioning options allow you to place the incoming geometry based on a specific point defined in the imported or linked file. These options give you direct control over the placement of the incoming geometry in the host model.
Auto - Center to Center
Select this option to place the center of the incoming geometry at the center of the host Revit model.
For both the incoming geometry and the host model, the geometric center is calculated by finding the center of a bounding box around the geometry.
In the following example, the center point
 of the incoming geometry
 is placed at the center point
of the host model
is placed at the center point
of the host model
 .
.
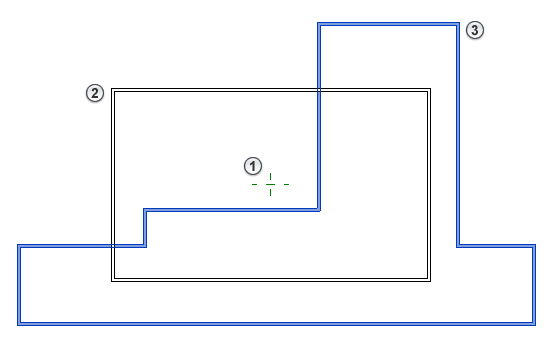
Use Auto - Center to Center when you are unsure of the origin points in the incoming geometry. This option ensures that it is positioned near the host model geometry.
Do not use Auto - Center to Center if you need to re-import a file or import multiple files into the host model. This option determines the center point based on geometry at the time of importing or linking the file. If the geometric extents of the incoming file or of the host model change, the calculated center point changes. Multiple files may not align properly and will require manual adjustments.
Auto - Origin to Origin
Select this option to place the origin of the incoming geometry at the origin of the Revit host model.
- In a Revit model, the origin is also referred to as the internal origin. When you first create a Revit project, the project base point corresponds to the internal origin. However, the project base point can be moved so that it no longer corresponds to the internal origin.
- In a CAD file, the origin refers to 0,0,0 of the World Coordinate System (WCS).
In the following example, the WCS origin
of the incoming geometry
is placed at the internal origin
of the
Revit host model. In the host model,
shows the
survey point, and
 shows the project base point, which has been moved away from the internal origin.
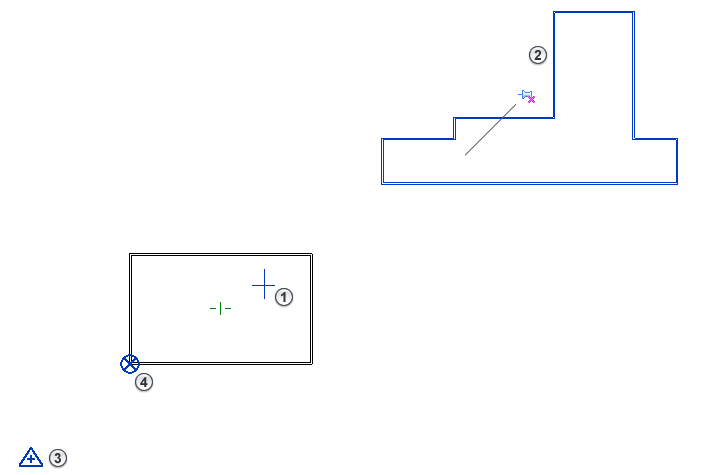
Use Auto - Origin to Origin when you need to use a common point to coordinate the position of multiple imports or links. The origin points of the host model and the incoming geometry remain constant, regardless of the geometry in each file.
However, the origin of the incoming geometry may be a large distance from the geometry of the host model. Use Zoom the View to help locate geometry that is a large distance from its origin.
Do not use Auto - Origin to Origin when the distance of the incoming geometry is more than 20 miles (32 kilometers) from the origin. In this case, use Auto - Center to Center or another positioning option.
Auto - By Shared Coordinates
Select this option to place the incoming geometry in the host Revit model based on shared coordinates.
If the incoming geometry is a Revit link and it does not share a coordinate system with the host model, the link uses center-to-center positioning.
If you are linking a DWG file, you can use this positioning option to establish shared coordinates with the Revit model. See Linking DWG Files with Grid Coordinates.
If the incoming geometry is a CAD file and it does not share a coordinate system with the host model, the incoming geometry is placed by aligning its origin (World Coordinate System) with the shared coordinates of the host file.
When working with multiple links from different sources, coordinate a shared position with all members of the project team. This strategy provides the most reliable results for positioning models and ensuring that the linked geometry is aligned with the host model.
Auto - Project Base Point to Project Base Point
Select this option to align the project base point of the linked Revit model with the project base point of the host Revit model.
This positioning option only affects initial placement of the linked model. If the host model's project base point changes, the linked model does not reflect the change. To reposition the linked model, select it, right-click, and click Reposition to Project Base Point.
Use Auto - Project Base Point to Project Base Point to coordinate Revit models from different disciplines, such as structural engineering, MEP engineering, and architecture, or to coordinate multiple buildings on a campus. You can position the project base point in each model on a common location, such as a grid intersection. When you link the models, the geometry aligns. See Linked Models and Shared Positioning.
Manual - Origin
Select this option to display the incoming geometry in the current view, with the cursor placed at the world origin of the import or link.
- Move the cursor to adjust the position of the incoming geometry.
- Click in the view to place the geometry in the host Revit model.
Manual - Center
Select this option to display the incoming geometry in the current view, with the cursor placed at the geometric center of the import or link.
- Move the cursor to adjust the position of the incoming geometry.
- Click in the view to place the geometry in the host Revit model.
Place At
Select the level for the incoming geometry. Its origin point is placed at this level in the host Revit model.
Orient to View
When True North and Project North are not aligned in the host Revit model, use this option to orient the CAD file in the view.
If the view is set to True North, and True North is rotated away from Project North, clear this option to align the incoming geometry to Project North.
If True North and Project North are aligned in the view, this option has no effect on positioning.