Meshop 面メソッド
meshOp Struct により公開されている次のメソッドは、メッシュ面に対する高度なアクセスを提供します。
- 面の数
- 面の取得
- 面の情報の取得
- フェースを削除する
- 面の非表示化
- 面のベベル、押し出し、クローン、集約およびデタッチ
- 面の分割
- 面の分解
- B を使用した A の取得
- 法線の反転と統一
- 平面化
- 面の自動スムージング
メソッド:
面の数
<integer>meshop.getNumFaces <Mesh mesh>メッシュの面の数を返します。
meshop.setNumFaces <Mesh mesh> <int>メッシュの面の数を設定します。
面の取得
<point3> meshop.getFace <Mesh mesh> <int faceIndex>3ds Max 2018.2 以降で使用可能: インデックスで指定された面の面頂点インデックスを point3 として返します。Point3 値の各コンポーネントは、頂点インデックスを含みます。
<point3_array> meshop.getFaces <Mesh mesh> <facelist>3ds Max 2018.2 以降で使用可能: インデックスで指定された面の面頂点インデックスを point3 配列として返します。Point3 値の各コンポーネントは、頂点インデックスを含みます。
面の情報の取得
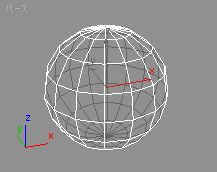
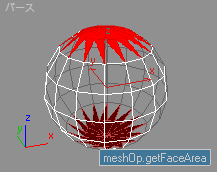
<float>meshop.getFaceArea <Mesh mesh> <facelist>指定された面の範囲を浮動小数点として返します。例
例
    --Select all faces with area smaller than 20.0
    obj = sphere radius:20 --create a Sphere
    convertToMesh obj --collapse to EditableMesh
    faceSel= #() --init. an array
    --Loop through all faces in the mesh,
    --compare the face area to the threshold and
    --append the face to the array to be selected
    for f = 1 to obj.numfaces do
    if meshop.getFaceArea obj #{f} < 20.0 then
    append faceSel f
    setFaceSelection obj faceSel --select all collected faces
    update obj --update the mesh
    max modify mode --switch to modify mode
    select obj --select the mesh
    subObjectLevel = 3 --switch to face sub-object level
<point3>meshop.getBaryCoords <Mesh mesh> <int faceIndex> <point3 pos> node:<node=unsupplied>指定された面の平面における指定されたポイントの(指定された面に相対する)重心座標。
<mesh> がノードの場合、または <mesh> が編集可能メッシュあるいはメッシュ値で、node: が指定されている場合、位置は現在の座標系コンテキストにあります。
<mesh> が編集可能メッシュまたはメッシュ値で、node: が指定されていない場合、位置はメッシュのローカル座標系にあります。
<point3>meshop.getFaceCenter <Mesh mesh> <int faceIndex> node:<node=unsupplied>指定された面の中心を返します。面の中心は 3 つの頂点の座標の平均になります。
<mesh> がノードの場合、または <mesh> が編集可能メッシュあるいはメッシュ値で、node: が指定されている場合、位置は現在の座標系コンテキストにあります。
<mesh> が編集可能メッシュまたはメッシュ値で、node: が指定されていない場合、位置はメッシュのローカル座標系にあります。
meshop.getFaceRNormals <Mesh mesh> <int faceIndex> node:<node=unsupplied>面の 3 つの頂点に対してレンダー法線の 3 つの要素配列を返します。
<mesh> がノードの場合、または <mesh> が編集可能メッシュあるいはメッシュ値で、node: が指定されている場合、位置は現在の座標系コンテキストにあります。<mesh> が編集可能メッシュまたはメッシュ値で、node: が指定されていない場合、位置はメッシュのローカル座標系にあります。
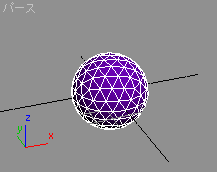
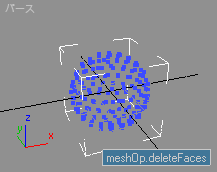
フェースを削除する
meshop.deleteFaces <Mesh mesh> <facelist> delIsoVerts:<boolean=true>指定された面を削除します。delIsoVerts: が true の場合、分離した頂点が削除されます。
例
    obj = geosphere() --create a GeoSphere
    convertToMesh obj --collapse to EditableMesh
    --Delete all faces in the mesh but leave the vertices:
    meshop.deleteFaces obj #{1..obj.numfaces} delIsoVerts:false
    update obj --update the mesh
    max modify mode --switch to modify mode
    select obj --select the mesh
    SubObjectLevel = 1 --switch to vertex level to see the vertices
meshop.removeDegenerateFaces <Mesh mesh>メッシュ内の展開された面を削除します。展開された面には、同じ頂点インデックスが複数あります。
meshop.removeIllegalFaces <Mesh mesh>メッシュ内の不正な面を削除します。不正な面には、1 つまたは複数の範囲外の頂点インデックスがあります。
面の非表示化
meshop.setHiddenFaces <Mesh mesh> <facelist>指定された面を非表示にして、指定されていない面を表示するように設定します。
meshop.getHiddenFaces <Mesh mesh>非表示のすべての面に設定されているビットで、size=(mesh 内の #faces)の BitArray を返します。
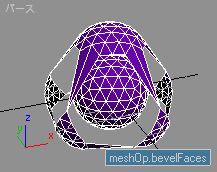
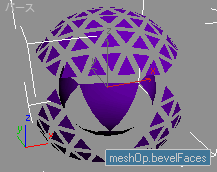
面のベベル、押し出し、クローン、集約およびデタッチ
meshop.bevelFaces <Mesh mesh> <facelist> <float height> <float outline> dir:<{<point3 dir> | #independent | #common}=#independent> node:<node=unsupplied>指定された面を <height> で移動し、<outline> でアウトラインを作成します。
面を移動する方向は、<dir> によって決定されます。
dir が Point3 値の場合、面はその方向に移動します。
(<mesh> がノードの場合、または <mesh> が編集可能メッシュあるいはメッシュ値で、node: が指定されている場合、方向は現在の座標系コンテキストにあります。<mesh> が編集可能メッシュまたはメッシュ値で、node: が指定されていない場合、方向はメッシュのローカル座標系にあります)。
dir:#independent が指定されている場合、面は個々の面の法線に基づいて移動されます。
dir:#common が指定されている場合、面は面集団の法線に基づいて移動されます。
meshop.extrudeFaces <Mesh mesh> <facelist> <float height> <float outline> dir:<{<point3 dir> | #independent | #common}=#independent> node:<node=unsupplied>指定された面に対応する新しい面を作成して、新しい面を <height> で移動し、<outline> でアウトラインを作成します。
面を移動する方向は、dir によって決定されます。
dir: が Point3 値の場合、面はその方向に移動します。
(<mesh> がノードの場合、または <mesh> が編集可能メッシュあるいはメッシュ値で、node: が指定されている場合、方向は現在の座標系コンテキストにあります。<mesh> が編集可能メッシュまたはメッシュ値で、node: が指定されていない場合、方向はメッシュのローカル座標系にあります)。
dir:#independent が指定されている場合、面は個々の面の法線に基づいて移動されます。
dir:#common が指定されている場合、面は面集団の法線に基づいて移動されます。
例
    obj = geosphere() --create a GeoSphere
    convertToMesh obj --collapse to Editable_Mesh
    --Loop from half the face count back to 1.
    --Since ExtrudeFaces creates new faces, counting backwards
    --ensures the loop will go only through the original faces:
    for f = obj.numfaces/2 to 1 by -1 do
    meshop.extrudeFaces obj #{f} 5.0 -1.0 --extrude the single face
    update obj --update the mesh

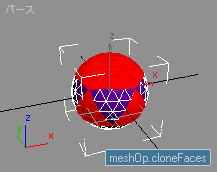
meshop.cloneFaces <Mesh mesh> <facelist>指定された面のクローンを作成します。
例
    obj = geosphere() --create a GeoSphere
    convertToMesh obj --collapse to EditableMesh
    --Clone half of the faces - they get selected automatically:
    meshop.cloneFaces obj #{1..obj.numfaces/2}
    --Offset the selected Faces at 20 units along their local normals
    meshop.bevelFaces obj (getFaceSelection obj) 20 0 dir:#independent
    update obj--update the mesh
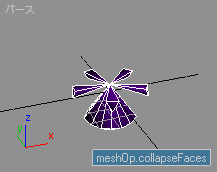
meshop.collapseFaces <Mesh mesh> <facelist>指定された面を集約します。
例
    obj = geosphere() --create a GeoSphere
    convertToMesh obj --collapse to EditableMesh
    --Collapse half the faces:
    meshop.collapseFaces obj #{1..obj.numfaces/2}
    update obj --update the mesh
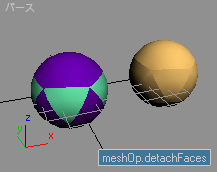
meshop.detachFaces <Mesh mesh> <facelist> delete:<boolean=true> asMesh:<boolean=false>指定された面をデタッチします。
delete: が true の場合、面はデタッチ後に削除されます。delete: が false の場合、面は削除されません。
asMesh: が true の場合、面はデタッチされ、メッシュ値として返されます。asMesh: が false の場合、面はメッシュの要素としてデタッチされ、OK が返されます。
例:
    --Let's detach faces as element inside the original mesh:
    obj = geosphere pos:[100,0,0] --create a GeoSphere
    convertToMesh obj --collapse to EditableMesh
    --Detach half of the faces as element, delete the originalfaces
    meshop.detachFaces obj #{1..obj.numfaces/2} delete:true
    update obj --update the mesh
    --In this example, the same mesh will be detached as a separate object
    obj = geosphere pos:[0,0,0] --create another GeoSphere
    convertToMesh obj --collapse to EditableMesh
    -- Detach the faces as Mesh and
    --get the resulting TriMesh in a variable:
    newMesh = meshop.detachFaces obj #{1..obj.numfaces/2} delete:true asMesh:true
    update obj --update the mesh
    emesh = Editable_mesh() --create an empty Editable_mesh
    emesh.mesh = newMesh --assign the detached faces to the new mesh
    update emesh --update the mesh
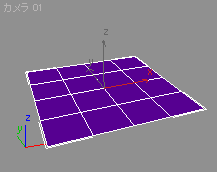
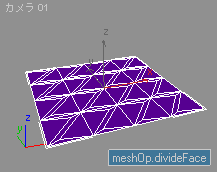
面の分割
meshop.divideFace <Mesh mesh> <int faceIndex> baryCoord:<point3=unsupplied>指定された面を分割します。
baryCoord: が指定されている場合、対応する位置に新しい頂点が作成されます。
baryCoord: が指定されていない場合、面の中心に新しい頂点が作成されます。
「重心座標」も参照してください。
例
    obj = plane() --create a plane
    convertToMesh obj --collapse to Editable_Mesh
    --Loop backwards through all original faces.
    --This will ignore any new faces added to the face array
    for f = obj.numfaces to 1 by -1 do
    meshop.divideFace obj f barycoord:[0.1,0.1,0.5] --divide the face
    update obj --update the mesh
    --Note that if the sum of the barycentric coordinates' components is not
    --equal to 1.0, the values will be scaled proportionally. Thus the above
    --coordinates are equivalent to [0.142857,0.142857,0.714285].
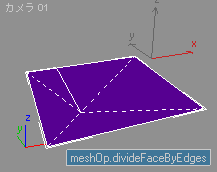
meshop.divideFaceByEdges <Mesh mesh> <int faceIndex> <int edge1Index> <float edge1f> <int edge2Index> <float edge2f> fixNeighbors:<boolean=true> split:<boolean=false>指定された面を分割します。新しい頂点は、指定された距離(分数)の指定されたエッジに、それらの長さに沿って作成されます。
fixNeighbors: が true の場合、継ぎ目が適用されるのを防ぐため、エッジの反対側の面(つまり「背面」)も分割されます。
split: が true の場合、メッシュの開口部を対角線に沿って分割し、2 等分されたエッジに対して別々の頂点が作成されます。
例
    obj = plane lengthsegs:1 widthsegs:1 --create a simple plane of 2 faces
    convertToMesh obj --collapse to Editable_mesh
    obj.allEdges = true --show all edges
    --Divide face 1 connecting edges 2 and 3 at 0.25 resp. 0.75 along
    --their length. This gives a new edge parallel to edge 1
    meshop.divideFaceByEdges obj 1 2 0.25 3 0.75
    update obj --update the mesh
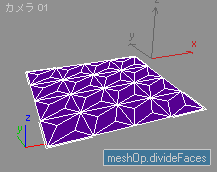
meshop.divideFaces <Mesh mesh> <facelist>指定された面を分割し、面の中心に新しい頂点を作成します。
例
    --The following code does the same as Tessellate in Face-Center mode
    obj = plane() --create a plane
    convertToMesh obj --collapse to Editable_Mesh
    --Divide all faces by placing a new vertex at the face center:
    meshop.divideFaces obj #{1..obj.numfaces}
    update obj --update the mesh
面の分解
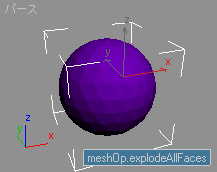
meshop.explodeAllFaces <Mesh mesh> <float threshold>メッシュを別の要素に分解します。
<threshold> は面と面の間の角度を指定し、それらの面が同じ要素に存在するか、または別の要素に存在するかを示します。
浮動小数点のしきい値パラメータは、現在、ラジアンで指定することが求められています。
例
    obj = geosphere() --create a GeoSphere
    convertToMesh obj --collapse to EditableMesh
    --Explode all faces in the mesh to elements, disregarding the angle:
    meshop.explodeAllFaces obj 0
    update obj --update the mesh
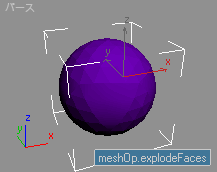
meshop.explodeFaces <Mesh mesh> <facelist> <float threshold>指定された面を別の要素に分解します。
<threshold> は面と面の間の角度を指定し、それらの面が同じ要素に存在するか、または別の要素に存在するかを示します。
例
    obj = geosphere() --create a GeoSphere
    convertToMesh obj --collapse to EditableMesh
    --Explode half of the faces regardless the angle
    meshop.explodeFaces obj #{1..obj.numfaces/2} 0
    --Move the exploded faces (selected by the explodeFaces method)
    --along their normals at 10 units without outline:
    meshop.bevelFaces obj (getFaceSelection obj) 10 0 dir:#independent
    update obj --update the mesh
B を使用した A の取得
meshop.getVertsUsingFace <Mesh mesh> <facelist>指定された面で使用されるすべての頂点に設定されているビットで、size=(mesh 内の #vertices)の BitArray を返します。
スクリプト:
    macroScript Face2VertSel category:"MXS Help"
    (
    --make sure a single EMesh object is selected
    on isEnabled return
    selection.count == 1 and classof selection[1] == Editable_Mesh
    on execute do
    (
    obj = selection[1]--get selected object
    faceSel = getFaceSelection obj--get selected Faces
    --get Verts of selected Faces:
    vertsSel = meshop.getVertsUsedFace obj faceSel
    setVertSelection obj vertsSel --select the Verts
    update obj --update the mesh
    max modify mode--switch to Modify panel
    subObjectLevel = 1--set Vertex SO level
    )
    ) --end macro
よくある誤解の 1 つは、単一の面の配列を meshop.getVertsUsingFace() に渡すと、配列に変換された結果はその面の定義(すべての頂点)であると思い込むことです。
このような結果になるのは、面の定義で頂点のインデックスが偶然昇順に並んでいる場合だけです。戻り値の BitArray では、インデックスが常に昇順に並べ替えられるためです。
たとえば、面の定義が[4,6,9]の場合は、結果の配列も同じになります。一方、面の定義が[6,9,4]の場合は、配列に変換された meshop.getVertsUsingFace() の結果は#(4,6,9)となり一致しません。この場合、頂点の順序が正しいことを前提とする演算(重心座標の計算を伴う演算など)では、正しい結果が得られません。
面の 3 つの頂点を正しい順序で取得する適切な方法としては、getFace() を呼び出して、返される Point3 値のコンポーネント .x、.y、および .z にアクセスします。
meshop.getEdgesUsingFace <Mesh mesh> <facelist>指定された面で使用されるすべてのエッジに設定されているビットで、size=(mesh 内の #edges)の BitArray を返します。
スクリプト:
    macroScript Face2EdgeSel category:"MXS Help"
    (
    --make sure a single EMesh object is selected
    on isEnabled return
    selection.count == 1 and classof selection[1] == Editable_Mesh
    on execute do
    (
    obj = selection[1] --get selected object
    faceSel = getFaceSelection obj --get selected Faces
    --get Edges of selected Faces:
    edgeSel = meshop.getEdgesUsingFace obj faceSel
    setEdgeSelection obj edgeSel --select the edges
    update obj --update the mesh
    max modify mode --switch to Modify panel
    subObjectLevel = 2 --set Edge SO level
    )
    ) --end macro
meshop.getPolysUsingFace <Mesh mesh> <facelist> ignoreVisEdges:<boolean=false> threshhold:<float=45.>指定された面が含まれる「ポリゴン」にあるすべての面に設定されているビットで、size=(mesh 内の #faces)の BitArray を返します。ポリゴンは、非表示エッジを共有するすべての面として定義します。エッジ角度はしきい値角度未満です。既定値のしきい値角度は 45 度です。ignoreVisEdges: が true に設定されている場合、エッジの可視性は無視されますが、しきい値の関連性は保持されます。
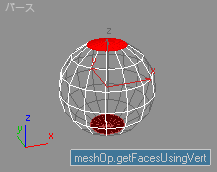
meshop.getFacesUsingVert <Mesh mesh> <vertlist>指定された頂点を使用するすべての面に設定されているビットで、size=(メッシュ内の #faces)の BitArray を返します。
例
    obj =Sphere() --create a Sphere
    convertToMesh obj --collapse to EditableMesh
    --Get the faces used by the first vertex (north pole)
    verts= meshop.getFacesUsingVert obj #{1}
    --Add the faces used by the last vertex (south pole)
    verts+= meshop.getFacesUsingVert obj #{obj.numverts}
    --Select the faces used by both pole vertices
    setFaceSelectionobjverts
    update obj --update the mesh
    max modify mode --switch to modify mode
    select obj --select the mesh
    subObjectLevel = 3 --switch to face sub-object level

スクリプト:
    macroScript Vert2FaceSel category:"MXS Help"
    (
    --make sure a single EMesh object is selected
    on isEnabled return
    selection.count == 1 and classof selection[1] == Editable_Mesh
    on execute do
    (
    obj = selection[1] --get selected object
    vertSel = getVertSelection obj --get selected Vertices
    --get Faces of selected Verts:
    faceSel = meshop.getFacesUsingVert obj vertSel
    setFaceSelection obj vertsSel --select the Faces
    update obj --update the mesh
    max modify mode --switch to Modify panel
    subObjectLevel =3 --set Face SO level
    )
    ) --end macro
meshop.getElementsUsingFace <Mesh mesh> <facelist> fence:<facelist=unsupplied>要素内の少なくとも 1 つの面が <facelist> に指定されている場合に、要素のすべての面に設定されているビットで、size=(mesh 内の #faces)の BitArray を返します。fence: が指定されている場合、その面は要素の境界とみなされ、処理されません。
meshop.getVertsUsedOnlyByFaces <Mesh mesh> <facelist>指定されたエッジで使用されるすべての面に設定されているビットで、size=(mesh 内の #vertices)の BitArray を返します。
法線の反転と統一
meshop.unifyNormals <Mesh mesh> <facelist>指定された面の法線を統一します。
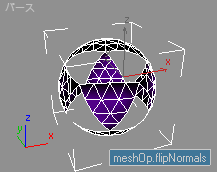
meshop.flipNormals <Mesh mesh> <facelist>指定された面の法線を反転します。
例
    obj =sphere() --create a Sphere
    convertToMesh obj --collapse to EditableMesh
    --Flip the normals of the top half of the faces:
    meshop.flipNormals obj #{1..obj.numfaces/2}
    update obj --update the mesh
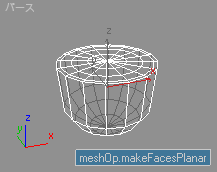
平面化
meshop.makeFacesPlanar <Mesh mesh> <facelist>指定された面が平面になるように移動します。
例
    obj = sphere()
    convertToMesh obj
    --make the faces of the top half of the sphere planar:
    meshop.makeFacesPlanar obj #{1..obj.numfaces/2.0}
    update obj
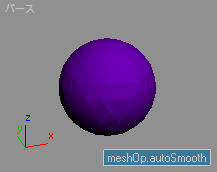
面の自動スムージング
meshop.autoSmooth <Mesh mesh> <facelist> <float threshold>しきい値角度に基づいて、指定された面のスムージングを行います。
例
    obj =geosphere() --create a GeoSphere
    convertToMesh obj --collapse to EditableMesh
    --Smooth half of the faces:
    meshop.autoSmooth obj #{obj.numfaces/2..obj.numfaces} 0.0
    update obj --update the mesh
メッシュに関連するメソッドについては、以下を参照してください。