チュートリアル - SVG ポリゴン レンダラーの開発 - 第 3 部
次に、3 部で構成されるチュートリアル シリーズのうち、Vector_Map テクスチャ マップとともに MAXScript を使用する方法を説明する第 3 部を示します。MAXScript はレンダリングされるシーン オブジェクトの面を表すポリゴン エンティティを含むディスクに SVG XML ファイルを書き込むために使用されます。SVG ファイルは、任意の Web ブラウザにロードまたは renderMap() 関数を使用してビットマップにレンダリングすることができます。MAXScript を使用してSVG ファイルを作成する方法の詳細については、「Vector_Map テクスチャ マップと MAXScript」のトピックを参照してください。
チュートリアルの第 1 部では、すべてのジオメトリ オブジェクトのカメラに面する三角面をすべて出力しました。
チュートリアルの第 2 部では、ポリゴンを奥行きでソートし、面が不正確に重ならないようにしました。
チュートリアルの第 3 部では、フラット シェーディングおよびブリン鏡面反射光ハイライトを使用して、マテリアル カラーのサポートを追加し、ライティングを実装します。
関連トピック:
Vector_Map テクスチャ マップと MAXScript
自然言語
ビューの変換行列からビューアの位置の値を取得します。
拡散反射光カラー、SpecularLevel、およびマテリアルの光沢があれば取得します。なければ、既定値を使用します。
ブリン シェーディング モデルの拡散反射光と鏡面反射光コンポーネントを計算します。
変数内のすべてのシーン ライトの影響をアキュムレートします。
ソートと描画の配列に新しい照明変数を渡します。
スクリプト:
    (
    fn ColorToHex col =
    (
        local theComponents = #(bit.intAsHex col.r, bit.intAsHex col.g, bit.intAsHex col.b)
        local theValue = "#"
        for i in theComponents do
            theValue += (if i.count == 1 then "0" else "") + i
        theValue
    )

    fn compareFN v1 v2=
    (
        if v1[6] < v2[6] then -1 else 1
    )

    local st = timestamp()
    local theFileName = (getDir #userscripts + "\\PolygonRendering8.svg")
    local theSVGfile = createFile theFileName
    format "<svg xmlns=\"http://www.w3.org/2000/svg\"\n" to:theSVGfile
    format "\t\txmlns:xlink=\"http://www.w3.org/1999/xlink\">\n" to:theSVGfile

    local theViewTM =  viewport.getTM()
    theViewTM.row4 = [0,0,0]
    local theViewTM2 = viewport.getTM()
    local theViewPos = (inverse (viewport.getTM())).row4
    local theViewSize = getViewSize()
    local theViewScale = getViewSize()
    theViewScale.x /= 1024.0
    theViewScale.y /= 1024.0

    local drawArray = #()

    local theStrokeThickness = 1

    gw.setTransform (matrix3 1)
    local theLights = for o in Lights where classof o != TargetObject collect o
    for o in Geometry where not o.isHiddenInVpt and classof o != TargetObject do
    (
        local theStrokeColor = o.wirecolor
        if classof o.material == StandardMaterial then
        (
            local theFillColor = o.material.diffusecolor
            local theSpecularPower = o.material.Glossiness
            local theSpecularLevel = o.material.SpecularLevel/100.0
        )
        else
        (
            local theFillColor = o.wirecolor
            local theSpecularPower = 50.0
            local theSpecularLevel = 0.25
        )

        local theMesh = snapshotAsMesh o
        for f = 1 to theMesh.numfaces do
        (
            local theNormal = normalize (getfaceNormal theMesh f)
            if (theNormal*theViewTM).z > 0 do
            (
                local theFace = getFace theMesh f
                local v1 = gw.transPoint (getVert theMesh theFace.x)
                local v2 = gw.transPoint (getVert theMesh theFace.y)
                local v3 = gw.transPoint (getVert theMesh theFace.z)

                v1.x /= theViewScale.x
                v1.y /= theViewScale.y
                v2.x /= theViewScale.x
                v2.y /= theViewScale.y
                v3.x /= theViewScale.x
                v3.y /= theViewScale.y

                local theFaceCenter = meshop.getFaceCenter theMesh f
                local theZDepth = (theFaceCenter*theViewTM2).z
                local theViewVector = normalize (theViewPos - theFaceCenter)

                local theLitFillColor = black
                for aLight in theLights where classof aLight != TargetObject do
                (
                    local theLightVector = normalize (aLight.pos - theFaceCenter)
                    local theHalfVector = normalize (theLightVector + theViewVector)

                    theDiffuse = (dot theLightVector theNormal)
                    if theDiffuse < 0 do theDiffuse = 0

                    theSpecular = (dot theNormal theHalfVector)
                    if theSpecular < 0 do theSpecular = 0
                    theSpecular = (theSpecular^theSpecularPower)*theSpecularLevel

                    theLitFillColor += theFillColor * aLight.color * theDiffuse + aLight.color * theSpecular
                )
                if theLitFillColor.r > 255.0 do theLitFillColor.r = 255
                if theLitFillColor.g > 255.0 do theLitFillColor.g = 255
                if theLitFillColor.b > 255.0 do theLitFillColor.b = 255

                append drawArray #(v1, v2, v3, (ColorToHex theStrokeColor), (ColorToHex theLitFillColor), theZDepth)
            )--end aLight loop
        )--end f loop
    )--end o loop
    qsort drawArray compareFN

    for d in drawArray do
    (
        format "\t<polygon points='%,%  %,%  %,%' \n" d[1].x d[1].y d[2].x d[2].y d[3].x d[3].y to:theSVGfile
        format "\tstyle='stroke:%; fill:%; stroke-width:%'/>\n" d[4] d[5] theStrokeThickness to:theSVGfile
    )

    format "</svg>\n" to:theSVGfile
    close theSVGfile
    local theSVGMap = VectorMap vectorFile:theFileName alphasource:0
    local theBitmap = bitmap theViewSize.x theViewSize.y
    renderMap theSVGMap into:theBitmap filter:true
    display theBitmap
    format "Render Time: % sec.\n" ((timestamp()-st)/1000.0)
    )
ステップごとの解説
(
fn ColorToHex col =
(
    local theComponents = #(bit.intAsHex col.r, bit.intAsHex col.g, bit.intAsHex col.b)
    local theValue = "#"
    for i in theComponents do
        theValue += (if i.count == 1 then "0" else "") + i
    theValue
)

fn compareFN v1 v2=
(
    if v1[6] < v2[6] then -1 else 1
)

local st = timestamp()
local theFileName = (getDir #userscripts + "\\PolygonRendering8.svg")
local theSVGfile = createFile theFileName
format "<svg xmlns=\"http://www.w3.org/2000/svg\"\n" to:theSVGfile
format "\t\txmlns:xlink=\"http://www.w3.org/1999/xlink\">\n" to:theSVGfile

local theViewTM =  viewport.getTM()
theViewTM.row4 = [0,0,0]
local theViewTM2 = viewport.getTM()
local theViewPos = (inverse (viewport.getTM())).row4シェーディングを計算するには、フェースのセンターに視点(カメラの位置)を接続するビュー レイを計算する必要があります。
明示的なカメラがない場合でも、反転ビューの変換行列の 4 番目の行によってビューアの位置を確認することができます。
local theViewSize = getViewSize()
local theViewScale = getViewSize()
theViewScale.x /= 1024.0
theViewScale.y /= 1024.0

local drawArray = #()

local theStrokeThickness = 1

gw.setTransform (matrix3 1)
local theLights = for o in Lights where classof o != TargetObject collect o
for o in Geometry where not o.isHiddenInVpt and classof o != TargetObject do
(
local theStrokeColor = o.wirecolor
if classof o.material == StandardMaterial then
(
local theFillColor = o.material.diffusecolor
local theSpecularPower = o.material.Glossiness
local theSpecularLevel = o.material.SpecularLevel/100.0
)
else
(
local theFillColor = o.wirecolor
local theSpecularPower = 50.0
local theSpecularLevel = 0.25
)ここでは、オブジェクトのワイヤ カラー プロパティから取得されるストローク カラーを変更します。
標準マテリアルがオブジェクトに割り当てられている場合は、塗り潰しカラーはマテリアルの拡散反射光カラーに設定されます。そうでなければ、ワイヤ カラーが再度使用されます。
さらに、シェーディング パラメータが正しく反映されるように、標準マテリアルの SpecularPower (光沢)値および SpecularLevel を取得してみます。
3ds Max UI では、制御のしやすさのために反射レベルを 100 倍の強さで表示することに注意してください。したがって、レベルを正しい範囲に戻すために 100.0 で割らなければなりません。
マテリアルが存在しない場合は、特定の設定を 3ds Max ビューポートが使用する値に非常に近い値に設定します。
local theMesh = snapshotAsMesh o
    for f = 1 to theMesh.numfaces do
    (
        local theNormal = normalize (getfaceNormal theMesh f)
        if (theNormal*theViewTM).z > 0 do
        (
            local theFace = getFace theMesh f
            local v1 = gw.transPoint (getVert theMesh theFace.x)
            local v2 = gw.transPoint (getVert theMesh theFace.y)
            local v3 = gw.transPoint (getVert theMesh theFace.z)

            v1.x /= theViewScale.x
            v1.y /= theViewScale.y
            v2.x /= theViewScale.x
            v2.y /= theViewScale.y
            v3.x /= theViewScale.x
            v3.y /= theViewScale.y

            local theFaceCenter = meshop.getFaceCenter theMesh f
            local theZDepth = (theFaceCenter*theViewTM2).z
local theViewVector = normalize (theViewPos - theFaceCenter)シェーディング計算の場合は、ビューアの位置の面の中心から正規化されたビュー ベクトルが向いている必要があります。
local theLitFillColor = black新しい変数を黒に初期化します。
これは、ライトを処理し、面をシェーディングするときのライティング情報をアキュムレートする変数になります。
周囲光をサポートする場合は、この値をマテリアルの周囲光カラーに初期化することができます。
            for aLight in theLights where classof aLight != TargetObject do
            (
                local theLightVector = normalize (aLight.pos - theFaceCenter)
                local theHalfVector = normalize (theLightVector + theViewVector)
For ループは、シーン内のすべての光源を処理します。
各ライトについて、ライトのベクトル(ライトの面の中心からの正規化されたベクトル)を計算します。
また、ライト ベクトルとビュー ベクトルを追加して、ハーフベクトル(フォン シェーディング モデルをブリン シェーディングで近似したもの)を計算します。
                 theDiffuse = (dot theLightVector theNormal)
                if theDiffuse < 0 do theDiffuse = 0
拡散反射光コンポーネントは、ライト ベクトルと法線の内積として計算されます。これはビューに依存しません(拡散は等方性で全方向で同一のため)。
拡散される光の量は、ライト ベクトルと法線の角度のコサインによってのみ決まります。
ライトに向いていない面にはまったくライトが当たらないため、内積が負の場合は値を 0 に設定します。
                 theSpecular = (dot theNormal theHalfVector)
                if theSpecular < 0 do theSpecular = 0
                theSpecular = (theSpecular^theSpecularPower)*theSpecularLevel
一方、鏡面反射光コンポーネントはビューに依存します。
ライト ベクトルとビュー ベクトルに依存する、法線とハーフ ベクトルの内積を計算します。
ここでも、反対方向を向いている面の影響を受けないよう、0 未満の値はすべて 0 に設定します。
これで、実際の鏡面反射光の値は光沢の累乗(SpecularPowerとも呼ばれる)に取り込まれ、反射レベルによって乗算されます。
                theLitFillColor += theFillColor * aLight.color * theDiffuse + aLight.color * theSpecular
            )--end aLight loop
ライトの影響は、最初に黒に初期化された変数にアキュムレートされます。
追加される値は、ライト カラー、続いて拡散反射光の係数によって乗算された塗り潰しカラーで構成されます。
それに対して、鏡面反射光係数によって乗算されたライト カラーを追加します。
これはすべてのライトに対して繰り返され、面の組み合わせられたイルミネーションを生成します。
            if theLitFillColor.r > 255.0 do theLitFillColor.r = 255
            if theLitFillColor.g > 255.0 do theLitFillColor.g = 255
            if theLitFillColor.b > 255.0 do theLitFillColor.b = 255
最後に、16 進変換では高ダイナミックレンジのカラーをサポートしていないため、不自然な結果にならないようカラーを 255 に固定します。
append drawArray #(v1, v2, v3, (ColorToHex theStrokeColor), (ColorToHex theLitFillColor), theZDepth)ここでは、配列内の照明を含めるために、塗り潰しカラー変数の名前を変更する必要があります。
                            )
    )--end f loop
)--end o loop
qsort drawArray compareFN

for d in drawArray do
(
    format "\t<polygon points='%,%  %,%  %,%' \n" d[1].x d[1].y d[2].x d[2].y d[3].x d[3].y to:theSVGfile
    format "\tstyle='stroke:%; fill:%; stroke-width:%'/>\n" d[4] d[5] theStrokeThickness to:theSVGfile
)

format "</svg>\n" to:theSVGfile
close theSVGfile
local theSVGMap = VectorMap vectorFile:theFileName alphasource:0
local theBitmap = bitmap theViewSize.x theViewSize.y
renderMap theSVGMap into:theBitmap filter:true
display theBitmap
format "Render Time: % sec.\n" ((timestamp()-st)/1000.0)
)
スクリプトを使用してジオメトリとライトをレンダリングする
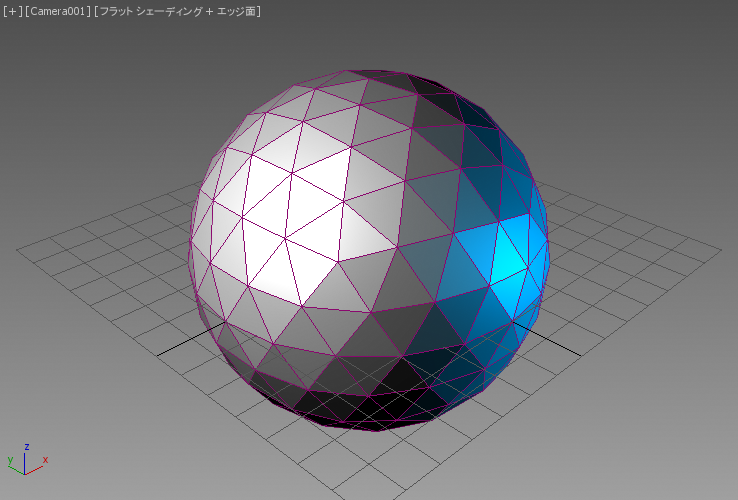
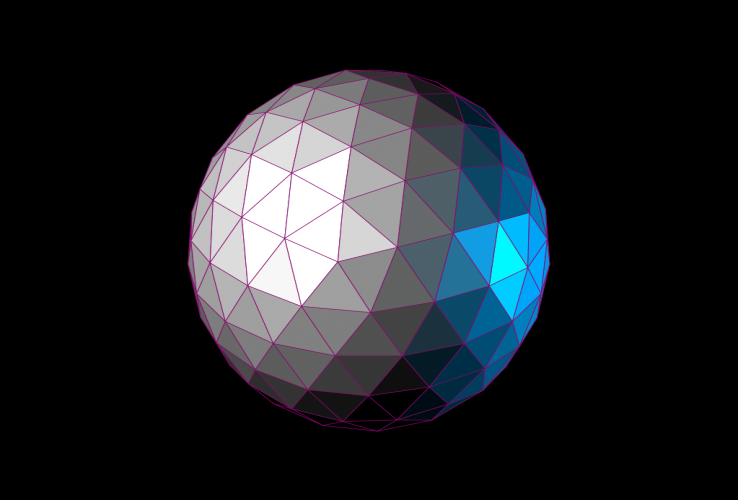
以前と同じ天球体をもう一度レンダリングしてみます。ただし今回は 2 つのオムニ ライトを使用し、白のライトを左に、青の強度を下げたライトを右に配置して照らします。
左のイメージは、面 + エッジ面モードに設定されたビューポートのスクリーンショットです。右のイメージは、SVG スクリプトのレンダリング出力を示します。
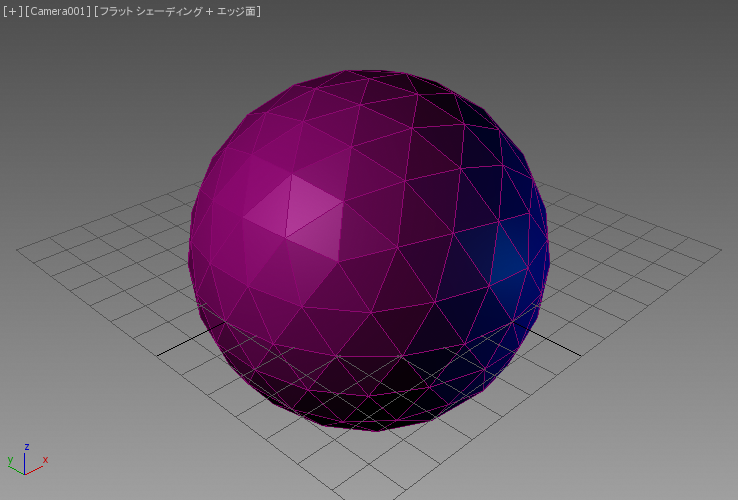
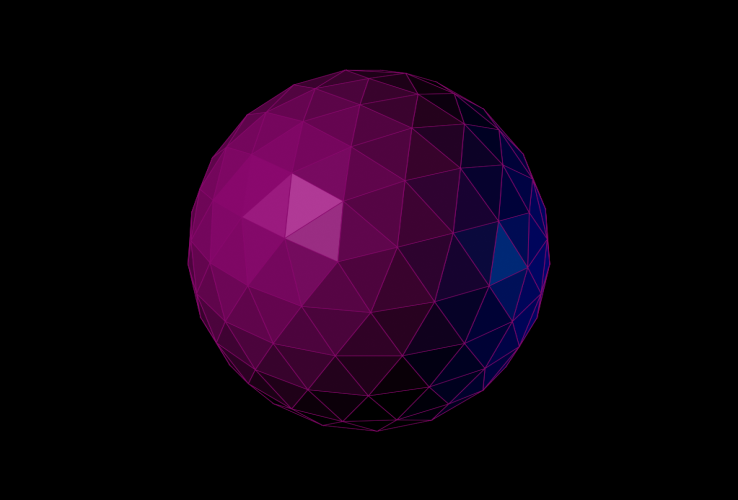
ここでは、既定値の標準マテリアルをこのオブジェクトに割り当てた場合にどのように変化するかを見てみましょう。
面の塗り潰しカラーはマテリアルの拡散反射光カラーから取得され、ストローク カラーは .wirecolor プロパティから取得されるようになります。
既定の標準マテリアルの[反射レベル](Specular Level)は 0 であるため、上記のレンダリングには鏡面反射光コンポーネントはありません。
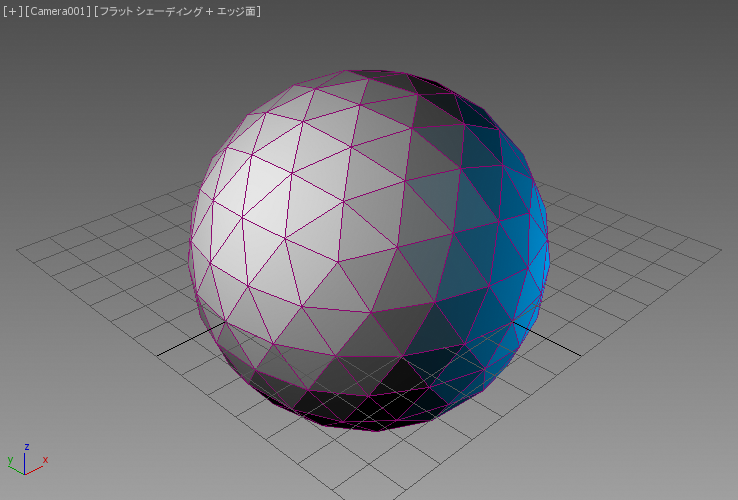
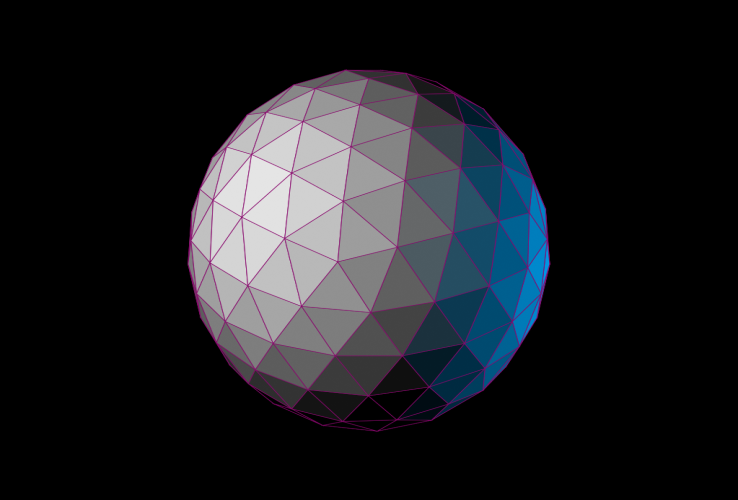
[反射レベル](Specular Level)を 100 に増やし、[光沢] (Glossiness)を 20 に変更してみます。
エッジ面なしでレンダリングするようにスクリプトを変更するのは簡単です。エッジの色を照らされた塗り潰しカラーに設定するだけです。
append drawArray #(v1, v2, v3, (ColorToHex theLitFillColor), (ColorToHex theLitFillColor), theZDepth)スクリプトの出力が、ビューポート内の同じオブジェクトの表現に非常によく似ていることがわかります。

