The Stories option defines stories, which are selected (automatically or manually) elements of a structure. For a selection of elements, Robot calculates values for the following: the mass, the center of gravity, the center of rigidity, moments of inertia, and eccentricities. This data is necessary for simplified seismic calculations of many seismic codes.
In Robot, a story is defined as a set of structure elements (nodes, bars, panels, and solids) that you have selected. For automatic and geometrical selection, a story comprises elements that are entirely contained in an interval that is limited by user-defined levels (lower and upper level of a story). However, horizontal elements positioned on a lower story level belong to the previous story.
Open the Stories dialog using either method:
- Click Geometry menu > Stories > Stories.
- Click
 .
.
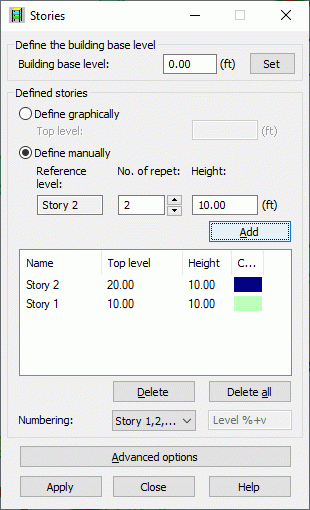
At the top of the dialog define the building base level. Clicking Set completes the definition.
In the Defined stories field is a list of defined stories. You can define a story 2 ways:
- Graphically - after selecting this option, you can define stories left-clicking the mouse in the drawing area. The top level is entered to the edit field and a defined story is added to the list of stories.
- Manually - after selecting this option, start defining a new story with selecting the reference level in the Reference level field, then specify a number of repetitions, height and numbering of the story (you can select one of the following: numerical numbering, numbering using letters, user-defined numbering).
To define a new story:
- Specify the building base level
- If you want stories to repeat every certain height, specify a number of repetitions and height of a story
- Define numbering in the Numbering field
- Click Insert.
To delete a story, highlight the story in the list and click Delete. To delete all stories, click Delete all.
The middle of the dialog has fields for defining the parameters for a story:
- Story name - By default, stories are designated: Story n
- Top level
- Story height
- Color assigned to a story, which opens the dialog for selecting colors
A story name can be selected in the Numbering field. A default name is Story n; however, you can define your own numbering for as well. To do so, use the follow the steps:
- Select the Define option in the Numbering field.
- In the field to the right of Numbering (available after selecting the Define option), specify a name (label) for the story. After you enter the name Story, the following names are generated: Story1, Story2, and so on.
- Click Insert.
Also, you can assign a story name corresponding to a story position, such as. 4.0, 6.5, and so on. To do so, select the Define option in the Numbering field. The %v variable in the field to the right, generates a story name depending on the position of the story.
You can change the name of a story by double-clicking the name of the story you want to change. After you change the name, press ENTER. Before Robot changes the name, an additional dialog (Story Labels) displays.
Click Save to save a story definition. The following parameters are assigned to a story: a list of objects, a name, and a color. This data is available in the Stories - Masses table.
Robot assigns a list of finite elements to a story when generating a calculation model. These are planar elements contained entirely within the story geometry and bar elements. Bar objects that pass-through story levels are not automatically divided into finite elements by story levels. (You must divide these bars correctly into finite elements.) Robot calculates all the story properties and displays them in the Stories - Masses table.
Clicking Advanced options at the bottom of the dialog opens an additional dialog.
See also:
Verification if a structure is correct: Assign geometrically and Assign manually