The option for defining a moving load lets you analyze a structure with a moving load applied. The moving load can be defined by any combination of forces (the definition of loads originating from vehicles can contain concentrated loads, linear loads, and planar loads). A moving load case lets you analyze a structure subjected to a load caused by a set of forces, moving along a defined route.
The option is available by:
- Clicking Load menu > Special Loads > Moving.
- Clicking
 .
.
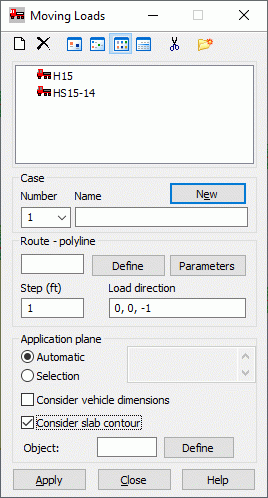
Moving loads are defined by indicating the vehicle and its route over the structure. The vehicle is a set of forces with a defined direction, value, and position. Each step consists in moving the vehicle from one position to another, while the set of forces applied to elements is created for each position. That is why the case of a moving load is treated as a set of several static load cases (describing successive positions of the vehicle).
The top of the dialog has the following:
 - Adds a new type of vehicle (New vehicle).
  - Deletes a selected vehicle type from the active list.
  ,
,  ,
,  , and
, and  - Displays the list of active vehicles as big icons, small icons, a short list, or a full list.
  - Delete from the active list, all the vehicle types that are not in a structure.
  - Opens the Label Manager dialog.
The process of defining a moving load case in a structure can be divided into the following steps:
- Defining (Definition of a new vehicle) and selecting the vehicle that will move over the structure. To select a vehicle, highlight it in the list of active vehicle types.
- Define a moving load case.
To define a moving load case, enter the number and name of the load. Clicking New creates a new (next) moving load case.
- Define the route to be followed by the vehicle.
To define a route to be followed by a vehicle, click Define, which opens the Polyline - Contour dialog. Clicking Parameters opens an additional dialog, where you can define route parameters (multiplication coefficients for loads belonging to a moving load, and so.).
The following 2 parameters define a moving load:
-
Step - Specifies the size of the step by which the vehicle moves. The option uses the currently selected units.
- Load direction - Specifies the direction of the force defining the vehicle. The direction is defined using the values of the components of the vector that define the direction of the forces describing the vehicle. (Depending on the type of structure and the allowable degrees of freedom, some of the components must equal 0.).
-
- Define the plane of load application. This option describes the method of redistributing the forces defining a vehicle moving over a structure. There are 2 ways:
- Automatic - Forces are automatically distributed over the closest elements among structure elements.
- Selection - Forces are applied to the closest elements (or nodes belonging to these elements) from the <list_of_elements> at the bottom right of the dialog. If the Consider vehicle dimensions option is selected, the bars are selected on which a load induced by vehicle forces will be generated. This selection is determined by the dimensions of the vehicle contour: b - width, d1, and d2 distances between the load and vehicle contour from the front and back, respectively. (Parameters for vehicle contour are determined for each vehicle together with a definition of a set of loads in the vehicle definition dialog.)
At the bottom of the dialog, there is the Consider slab contour option. It considers the distribution of forces caused by a vehicle, assumed by a user in the moving load analysis, onto the bars for several structure types. (It considers loads because of a vehicle part that extends outside the contour carrying the load.). A typical example is loads of a bridge grillage. (See the following image.)
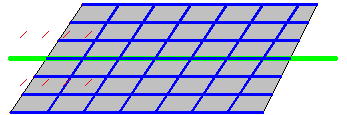
If the Consider slab contour option is cleared, a full set of vehicle forces are applied to the bars starting with the first position of the vehicle. If the Consider slab contour option is selected, you can define a geometrical limitation that determines which of the vehicle component forces should be applied to the bars. Such a limitation can be defined using an object, such as a side panel without an assigned thickness. The generation of loads on bars considers the position of each of the force components. If a force is positioned outside the slab contour, it is not applied to bars.
The field is used to define a number of an object describing the slab contour. Clicking Define opens the dialog for defining a polyline-contour with the Face option selected.
When generating loads on bars from a vehicle load, Robot considers all bars or of their selection determined on the Application plane - selection list. These bars are projected onto a plane formed by a segment of the polyline route and a perpendicular vector defined as a Load direction. If the Consider vehicle dimensions option is selected, then on the projection plane, a vehicle contour is determined and the selection of the bars in the projection is limited to these bars that are within or intersect with the vehicle contour. This type of limitation for selecting bars, on which vehicle loads are generated, might help in situations when an automatic search of bars might cause problems.
Clicking Apply creates a new moving load case, whose parameters are defined in the dialog.
The vehicle route, vehicle, elements loaded by the vehicle, and a set of loads can all be visualized after the structure calculations are performed (Display option).
The results for a moving load case can be presented in 2 ways. The first method lets you display the results of a static case for a moving load position. There are options available that let you change the position of the moving load. You can move the load step by step or take advantage of the vehicle animation. The second method displays the changes in a value of a selected quantity at a selected point, because of the movement of a load over the structure, that is, the display of the influence lines for the selected quantity.
NOTES for using moving loads for different structure types:
- Bar structures
For a bar-type structure (frame, truss, and grillage), you can apply a load generated by a vehicle defined using concentrated and linear forces. Concentrated forces are applied as a bar load. When a concentrated force does not hit directly onto a bar, Robot operates according to an algorithm that resolves the force over the neighboring bars. The linear force is modeled by 10 concentrated loads along the length of the linear load.
For bar-type structures, you cannot use vehicles defined using planar loads.
- Plate-shell structures
For a surface structures (plate and shell), you can use all types of vehicles (defined using a concentrated, linear or planar loads). A concentrated force is applied as a geometrical load at a point, applied to surface elements, and it is resolved onto the bar elements. Linear force is applied as a geometrical linear load to surface elements. It is not applied to bars. Surface force is applied as a geometrical contour load to surface elements. When using this type of load, the place where the contour load is applied is important, for it is generated on each panel located within the contour limits. To apply the load type only to selected panels, use the selection options when defining the moving load case.
- Bar-shell structures
For mixed structures (bar-shell), linear and planar load are applied only to the surface element. For a load originating in a vehicle to be applied directly to bars, use the concentrated forces in vehicle definition.