The Options panel of the Grid And Snap Settings dialog lets you set options related to snapping.
Rotating and Scaling with Snaps
The effect of rotating and scaling with snaps depends on whether Auto Key is on or off:
- With Auto Key on, snap toggles are disabled, while Angle and Percent snaps remain active. Rotation and scaling occur around the pivot point of the object.
- With Auto Key off, rotations and scales occur around the snap point. For example, using Vertex snap, you can rotate a box about any of its corners.
Procedures
To set snap options:
- On the main toolbar, right-click Snaps Toggle, Angle Snap Toggle, or Percent Snap Toggle.
This opens the Grid And Snap Settings dialog.
- If necessary, click the Options tab.
- Adjust options as desired.
Example: To use Snap Preview:
- Reset
3ds Max, and then maximize the Perspective viewport.
To maximize the Perspective viewport, make sure it's active (highlighted border), and then press Alt+W.
- Zoom in a bit so the grid squares are relatively large.
Snap and Snap Preview measure in pixels, so if the grid points are relatively far apart, it's easy to see the difference between Snap Preview and Snap.
- On the main toolbar, click Snaps Toggle to turn on snapping, and then right-click the button to open the Grid And Snap Settings dialog to the Snaps panel.
The default Snaps setting is Grid Points only; if this is not the case, make it so. A grid point is the intersection of two grid lines.
- On the dialog, click the Options tab.
In the General group, Snap Preview Radius is set to 30 pixels and Snap Radius is set to 20 pixels. You can leave this dialog open while you use snaps.
- On the Create panel, click Shapes), and then click Object Type rollout
 Line.
Line.
You're now in line-creation mode.
- Click anywhere in the viewport to start creating a line-type spline object.
- Move the cursor around the viewport.
As you do so, a rubber-band line connects the mouse cursor to the start point.
- Position the mouse cursor near a grid point, but not too close, so that the snap cursor (box + crosshairs) appears at the grid point, but the line endpoint remains attached to the mouse cursor.
This shows the snap preview; you'll see its purpose in the next step.
- Click the left mouse button.
The second line vertex is created not where you clicked but at the grid point indicated by the snap preview. Snap preview lets you see where a snap will occur before it actually happens.
- Move the cursor toward another grid point.
At the Snap Preview Radius distance (30 pixels), the snap cursor appears at the grid point.
- Continue moving the cursor toward the grid point.
After you move it 10 pixels closer (the difference between Snap Preview Radius and Snap Radius), the line endpoint jumps from the mouse cursor to the grid point. This is the legacy snap functionality.
- Click to accept the snap.
- Complete the line, and then zoom out so the grid points are closer together. Start another line, and then position the mouse cursor in the center of a grid square, so the preview snap point appears at one of the grid points.
The Snap Preview Radius setting lets you preview a snap before it actually happens. The Snap Radius setting determines when actual snapping occurs, providing the same functionality as Snap Strength in previous versions.
This procedure also demonstrates how to cycle through available snap/preview points with the keyboard shortcut.
Interface
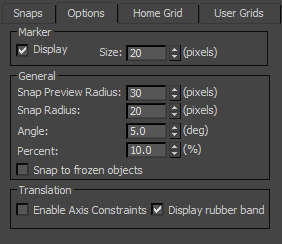
Marker group
Provides settings that affect the visual display of the snap points.
- Display
-
Toggles the display of the snap guides. When off, the snaps still function, but the snap cursor does not appear.
- Size
-
Sets the size, in pixels, of the snap "hit" point. This is the box-shaped icon that indicates either the source or target snap point.
General group
Snap functionality includes several features that enhance ease of use. When using Snap, if the cursor comes within distance of a potential snap point that's less than the Snap Preview Radius distance but greater than the Snap Radius distance, the snap cursor jumps to that point as a preview of where the snap will occur, but no actual snapping occurs.
To use the preview point as the snap point, click or release the mouse button, depending on the context. If, instead, you then continue to move the cursor toward the potential snap point so that it comes within a distance equal to or less than the Snap Radius value, the snap takes place.
- Snap Preview Radius
-
When the cursor is a distance from a potential snap-to point between the Snap Preview Radius value and the Snap Radius value, the snap marker jumps to the closest potential snap-to point, but no snap occurs. Default=30.
When a snap-to preview point is highlighted, release or click the mouse button (depending on the context) to snap the current selection to that location. Alternatively, before using the displayed snap point, you can cycle though any other available preview and snap points by pressing and holding Alt+Shift and then press S repeatedly.
Note: The Snap Preview Radius value should generally be set higher than the Snap Radius value, so that previewing occurs before snapping. If you attempt to set the Snap Preview Radius value lower than the Snap Radius value, 3ds Max lowers the latter so that the two are equal. This effectively turns off previewing, so that only snapping is in effect. - Snap Radius
-
Sets the size of the area around the cursor, in pixels, within which snapping occurs automatically. Default=20.
Note: The Snap Radius value should generally be set lower than the Snap Preview Radius value, so that previewing occurs before snapping. If you attempt to set the Snap Radius value higher than the Snap Preview Radius value, 3ds Max raises the latter so that the two are equal. This effectively turns off previewing, so that only snapping is in effect. - Angle
-
Sets the increment at which objects are rotated about a given axis (degrees) when Angle Snap is active. Angle snap also affects the following:
- Pan/Orbit camera controls
- FOV and Roll camera settings
- Hotspot and Falloff light angles
For more information, see Angle Snap.
- Percent
-
Sets the percentage increment for scale transforms when Percent Snap is active.
For more information, see Percent Snap.
-
 Snap to frozen objects
 -
When on, snapping to frozen objects is enabled. Default=off. This option is also available from the Snaps shortcut menu, accessed when you hold Shift and right-click in any viewport, as well as from the Snaps toolbar.
Translation group
- Enable Axis Constraints
-
When on and you move an object using an axis constraint via the Move gizmo or the Axis Constraints toolbar, constrains the selected object to move only along the specified axis or plane. When off, the constraints are ignored, and snapped objects can be translated in any dimension (assuming 3D snapping is used).
Also when Enable Axis Constraints is on, a circle appears at the intersection of the Move gizmo axes (that is, the pivot point). If, instead of dragging the gizmo, you drag this circle, Snap turns off Enable Axis Constraints temporarily, constraints are ignored, and the object moves in Screen space. As a visual indicator, all axis and plane elements of the gizmo turn yellow while this mode is active. As soon as you release the mouse button, Enable Axis Constraints becomes active again.
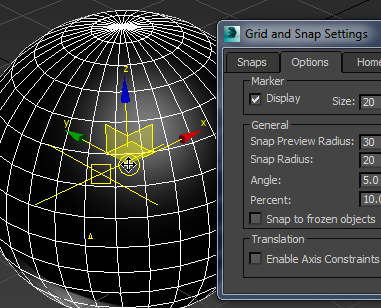
Dragging the circle icon on the Move gizmo temporarily turns off Enable Axis Constraints, permitting free movement.
Buttons on the Axis Constraints toolbar update interactively, depending on which portion of the gizmo or geometry you use to move the object.
This option is also available from the Snaps shortcut menu, accessed when you hold Shift and right-click in any viewport, as well as from the Snaps toolbar.
- Display rubber band
-
When on and you move an selection, a rubber-band line appears between the original location and the mouse position. Use this visual aid for greater accuracy when fine-tuning your model. Default=on.
Note: See Snap Handle when Moving an Object for more information.