![]()
![]()
![]()
2D, 2.5D, 3D Snaps flyout
A variety of snap types is available from the Snaps dialog, which you can use to activate different snap types as you work.
Object Snapping
Object snapping lets you snap to specific portions of existing geometry during creation and transforms of objects or sub-objects. You can also snap to the grid, and you can snap to tangents, midpoints, pivot points, face centers and other options.
The mode you choose maintains its state when you switch levels.
Transforming Around Snap Points
When snapping is on and Auto Key is off, rotations and scales occur about the snap point. For example, if you're using Vertex snapping and you're rotating a box, you can rotate it about any of its corner vertices. See To use snaps to move an absolute distance, below.
When Auto Key is on and either Select And Rotate or Select And Scale is active, the Snaps Toggle button is disabled, and rotation and scaling take place about the pivot point of the object.
Snap Handle When Moving an Object
When both the Snap tool (any mode) and the Move tool are active and Enable Axis Constraints is on, the Move gizmo shows a circle at its center.
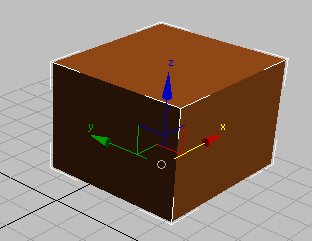
A circle at the center of the Move gizmo shows that snapping is active.
Not only does the circular handle indicate that snapping is active, it helps increase the accuracy of snapping. You can use the gizmo controls as before, or drag the handle itself: In either case, 3ds Max shows the original position of the object, and by default a rubber-band line stretches from the original position to the new destination. When you drag the snap handle or the Move gizmo, the axis center is the start snap point.
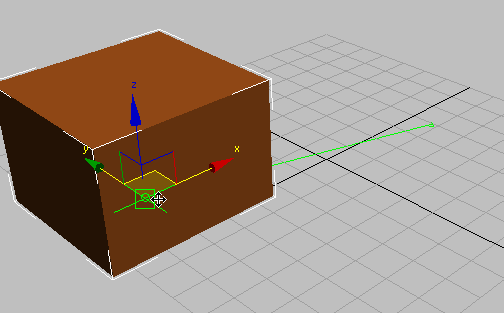
The green line shows start and destination points.
- When you drag the circular snap handle, axis constraints don’t apply, and Enable Axis Constraints is automatically turned off.
- When you drag an axis or a plane, axis constraints apply, and if Enable Axis Constraints is on, the snapping uses it.
- When you drag from a snap point other than the axis center (for example, a vertex), the state of Enable Axis Constraints determines whether movement is constrained or not.
When start and destination points are snapped or aligned, the color of the snap points and rubber band changes from Snap Point Active (default=green) to Snap Point Snapped (default=yellow).
 Colors panel, choose Elements Snaps.
Dragging from the snap handle is equivalent to using the Snap Option Use Axis Center As Start Snap Point that was available in versions of 3ds Max prior to version 2011. In addition, you can use other snap points on the object that you are moving. For example, when snapping to vertices, the following illustrations show that you can snap from a vertex on the object you are moving.
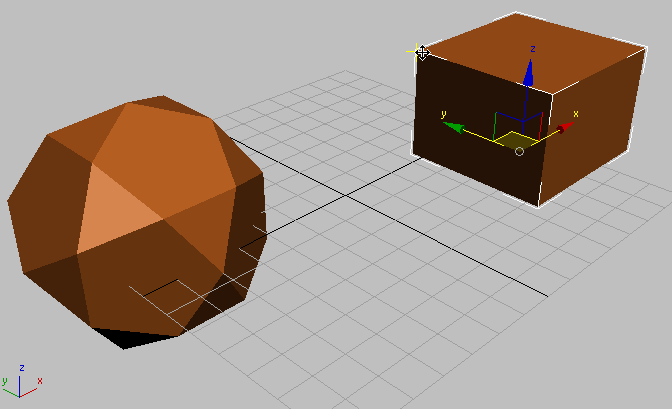
Vertex snap: Snapping from the upper-left corner of the box.
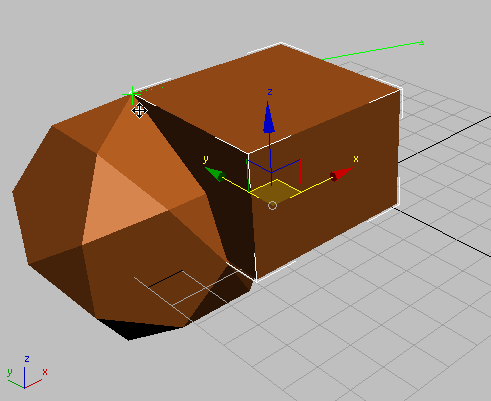
Snapping the upper-left corner of the box to a vertex on the dodecahedron.
- Make sure the Move cursor is visible when you click. Otherwise, you might deselect the object you are trying to move.
- If the vertex (or other snap location) is close to an axis of the Move gizmo, the move might be constrained along that axis.
Using the snap handle or the Move gizmo corresponds to the toggle Enable Axis Constraints, or to Snaps Use Axis Constraints Toggle on the Axis Constraints toolbar
Procedures
To turn snap off during a transform:
- Press S to toggle snapping off when it gets in the way. Press S again to turn it back on.
To use snaps to move a relative distance:
- Turn on Snaps with the S key, or by clicking Snaps Toggle.
- Lock your selection set by pressing Ctrl+Shift+N or by clicking Selection Lock Toggle on the status bar.
- Wherever you click in the viewport, the snap will stay relative to the distance of your cursor to the object.
To use snaps to move an absolute distance:
- Turn on Snaps Toggle.
- Click the selection. Snap uses the point you click for the snap source.
- Move to whatever target snap you desire. The object will snap to an absolute distance.
Example: To rotate a box around a vertex using snaps:
- Make sure AutoKey is off.
- Select the box.
- On the main toolbar, click Select And Rotate.
- Turn Snaps on by pressing S on the keyboard.
- On the Tools menu, choose Grids And Snaps Grid And Snap Settings. Turn on Vertex and turn off Grid Points.
- Lock your selection set by clicking Selection Lock Toggle on the status bar.
- On the toolbar, choose Use Transform Coordinate Center (hold the mouse down on Use Pivot Point Center to open the flyout).
- Move your cursor over any vertex in the box. The snap cursor appears, and then you can rotate the box around that vertex.
Interface
3ds Max supports three snap modes as described following. How a particular snap tool works in practice depends on the active function (for example, moving an object vs. creating one) and the snap settings, particularly those on the Snaps panel.
Here's a brief example: Say you have a box positioned above the home grid. In the Perspective viewport, you're looking at it from above, at an oblique angle. You're using the Move tool to translate the box parallel to the grid, and on the Snaps panel only Grid Points is on. With Snaps Toggle on and set to 2D, no snapping is performed. As its name suggests, 2D snapping is best for operations that involve two dimensions only, such as creating a Plane primitive on the grid. Using 2.5D, the box moves parallel to the grid (assuming you're moving it that way) and snapping occurs when the box is above the grid, because it's using the projected snapping, but not when it is beyond the grid limits. And using 3D snapping, the box moves to the grid so as to snap the starting point (represented by a green circle when Enable Axis Constraints is on) to an actual grid point rather than its projection.
 2D Snap
-
The cursor snaps only to the active construction grid, including any geometry on the plane of that grid. The Z axis, or vertical dimension, is ignored.
 2.5D Snap
-
The cursor snaps only to the vertices or edges of the projection of an object onto the active grid.
Suppose you create a grid object and make it active. You then position the grid object so you can see through the grid to a cube further off in 3D space. Now with 2.5D set, you can snap a line from vertex to vertex on the distant cube, but the line is drawn on the active grid. The effect is like holding up a sheet of glass and drawing the outline of a distant object on it.
 3D Snap
-
This is the default tool. The cursor snaps directly to any geometry in 3D space. 3D snapping lets you create and move geometry in all dimensions, ignoring the construction plane.
Right-click this button to display the Grid and Snap Settings dialog, which lets you change snap categories and set other options.