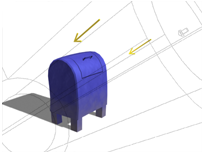
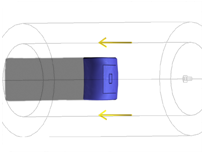
Directional lights cast parallel light rays in a single direction, as the sun does (for all practical purposes) at the surface of the earth. Directional lights are primarily used to simulate sunlight. You can adjust the color of the light and position and rotate the light in 3D space.


Top: Perspective view of a free directional light
Bottom: Top view of the same light
Unlike a targeted directional light, a Free Direct light has no target object. You can move and rotate the light object to aim it in any direction.
A Free Direct light is used when you select a Standard sun in your Daylight system.
Because directional rays are parallel, directional lights have a beam in the shape of a circular or rectangular prism instead of a "cone."
Procedures
To create a free direct light:
- On the
 Create panel, click
  (Lights).
 - Choose Standard from the drop-down list.
- On the Object Type rollout, click Free Direct.
- Click a viewport.
The light is now part of the scene. It points away from you in the viewport you clicked.
- Set the creation parameters.
To adjust the light's direction, you can rotate it as you would any object.
To change a viewport to a Light view:
- Click or right-click the POV viewport label.
3ds Max opens the Point-Of-View viewport label menu..
- Choose Lights.
The Lights submenu shows the name of each spotlight or directional light in the scene.
- Choose the name of the light you want.
The viewport now shows the light's point of view. You can use the Light Viewport Controls to adjust the light.
The default keyboard shortcut for switching to a Light viewport is $.
Interface
Directional Parameters rollout
When you create a Free Direct light, the Targeted parameter is adjustable on the General Parameters Rollout (Standard Lights). This is a fixed value for target lights.
- Targeted
-
When on, 3ds Max sets a point to use as an invisible target about which the Free Direct light can orbit. The spinner adjusts the distance to the target.
This parameter also affects the length of the light's cone display.