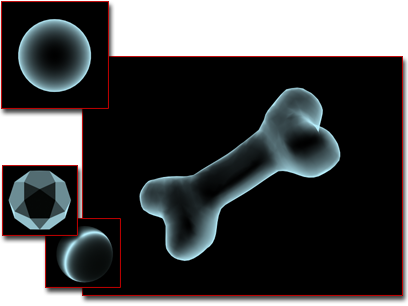
The Falloff map generates a value from white to black, based on the angular falloff of the face normals on the surface of the geometry.

Falloff map creates the appearance of translucency.
The direction used to specify the angular falloff varies, depending on the methods you choose. However, with the default settings, the map generates white on faces whose normals point outward from the current view, and black on faces whose normals are parallel to the current view.
Falloff map provides a greater variety of opacity falloff effects than those in the Falloff settings in a standard material's Extended Parameters rollout. You assign the Falloff map as an Opacity map. However, you can also use Falloff for special effects, such as an iridescent look.
Procedure
To control opacity using a Falloff map:
- Assign the Falloff map as an opacity map.
 Render to see the effect.
- Adjust the falloff parameters to vary the effect.
Interface
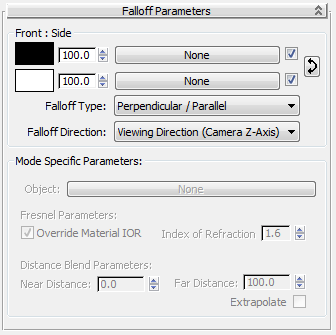
Falloff Parameters rollout

Front : Side group (default title)
By default, "Front : Side" is the name of the group at the top of this rollout. Front : Side indicates Perpendicular/Parallel falloff. This name changes depending on the falloff type selected. In all cases, the name on the left refers to the top set of controls, and the name on the right to the bottom set.
The controls are as follows:
- Click the color swatches to assign colors.
- Use the numeric fields and spinners to adjust the relative strength of the colors.
- Click the buttons marked None to assign maps.
- Turn on the checkboxes to activate the maps; otherwise the colors are used. These are on by default.
 Click Swap Colors/Maps (the curved arrow) to exchange the assignments.
- Falloff Type
- Chooses the kind of falloff. Five options are available:
- Perpendicular/Parallel Sets the angular falloff ranges between face normals that are perpendicular to the falloff direction and normals that are parallel to the falloff direction. The falloff range is based on a 90-degree change in face normal direction. (Default.)
- Towards/Away Sets the angular falloff ranges between face normals that face toward (parallel to) the falloff direction and normals that face away from the falloff direction. The falloff range is based on a 180-degree change in face normal direction.
- Fresnel Based on adjustments to the Index of Refraction (IOR). Results in dim reflections on surfaces facing the view, with much brighter reflections on angled faces, creating highlights like those on the sides of a glass.
- Shadow/Light Adjusts between two subtextures based on how much light is falling on the object.
- Distance Blend Adjusts between two subtextures based on Near Distance and Far Distance values. Uses include reducing aliasing on large terrain objects and controlling the shading in non-photorealistic environments.
- Falloff Direction
- Chooses the direction of falloff. Five options are available:
- Viewing Direction (Camera Z-Axis) Sets the falloff direction relative to the camera (or screen). Changing object orientation doesn't affect the falloff map. (Default.)
- Camera X/Y Axis Similar to Camera Z-Axis. For example, using Camera X-Axis with the Toward/Away falloff type runs the gradient from left (Toward) to right (Away).
- Object Uses an object whose position determines the falloff direction. Click the wide button next to Object in the Mode Specific Parameters group, and then pick an object in the scene. The falloff direction is the direction from the point being shaded toward the object's center. Points on the side toward the object center get the Towards value, and those away from the object get the Away value.
- Local X/Y/Z Axis Sets the falloff direction to one of the object's local axes. Changing the orientation of the object changes the falloff direction.
- World X/Y/Z Axis Sets the falloff direction to one of the world coordinate system axes. Changing object orientation doesn't affect the falloff map.
When no object is chosen, the falloff direction uses the local X, Y, or Z axis of the object being shaded.
Mode Specific Parameters group
The first parameter applies and is available only when you set Falloff Direction to Object:
- Object
- Picks object from scene and puts its name on the button.
The following are parameters for the Fresnel falloff type:
- Override Material IOR
- Allows change to the Index of Refraction set by the material.
- Index of Refraction
- Sets a new Index of Refraction. This option is unavailable unless Override Material IOR is turned on.
The following are parameters for the Distance Blend falloff type:
- Near Distance
- Sets the distance at which the blend effect begins.
- Far Distance
- Sets the distance at which the blend effect ends.
- Extrapolate
- When on, the effect continues beyond the Near and Far distances.
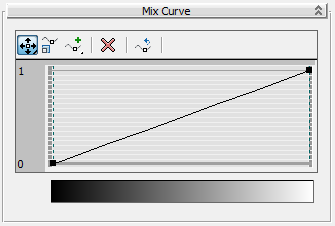
Mix Curve rollout

Using the graph on the Mix Curve rollout, you can precisely control the gradient produced by any falloff type. You see the resulting gradient in the bar below the graph.
- Move flyout
 Moves a selected point in any direction, limited by the unselected points on either side.
 Constrains movement to the horizontal.
 Constrains movement to the vertical.
 Scale Point
-
Scales the selected point within the range of its gradient. On a Bezier corner point, this control is effectively the same as a vertical move. On a Bezier smooth point, you can scale the point itself or either handle. As with the move controls, scale is limited by the unselected points on either side.
- Add Point flyout
 Adds a Bezier corner point anywhere on the graph line. The point makes a sharp angle when moved.
 Adds a Bezier smooth point anywhere on the graph line. Handles attached to the point create smooth curves when moved. On a Bezier smooth point, you can move the point or either handle.
 Delete Point
-
Removes selected points.
 Reset Curves
-
Returns graph to its default, a straight line between 0 and 1.