Add columns to Scene Explorer:
- Do either of the following:
- Right-click a column heading and then choose Configure Columns from the context menu.
- From the Customize menu, choose Configure Columns.
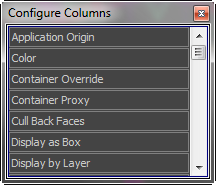
This opens the Configure Columns dialog.
- Drag a column heading from the Configure Columns dialog to the Scene Explorer column headings row.
As you drag the column, arrows appear between neighboring columns above and below the headings row. Drag horizontally to change where the arrows occur.
- When the arrows appear where you want to add the column, release the mouse button.
The new column is inserted where the arrows appeared.
- Alternatively, simply double-click an item in the Configure Columns listing. This automatically adds the column to the right of existing columns in Scene Explorer.
- Continue adding columns as desired. When finished, close the Configure Columns dialog.
Replace a column in Scene Explorer (all columns except Name):
- Right-click a column heading and choose Replace Column from the context menu.
This opens a list of available columns.
- Choose a column to replace the current one.
The new column replaces the previous one.
Remove a column from Scene Explorer:
- Drag the column label vertically away from its position until the mouse cursor changes to an X icon.
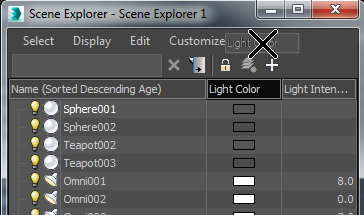
Removing the Light Color column
- Release the mouse button.
Note: You can’t remove the Name column.
Sort the Scene Explorer list based on a column or columns:
- Ascending alphanumeric order
- Descending alphanumeric order
- Ascending age order: newest objects at the top
- Descending age order: oldest objects at the top
- Click a column heading (other than Name).
This performs a single-level sort based on the column contents, in ascending order, as indicated by up arrow on the right side of the heading. To sort in descending order, click again.
Alternatively, right-click a column heading and choose Sort Ascending or Sort Descending. You can sort any number of different columns this way to perform a multi-level sort. For example, you could sort by Type, and then, within that sort, by whether the objects are Frozen.
Tip: If you change a value and simply wish to reorder the list based on the current sort setting, right-click a column heading and choose Resort.Note: Object hierarchies remain together when the list is sorted. Child objects at the same level are sorted only with respect to one another, not objects on other hierarchical levels.
You change the Name column sort order by clicking the column heading repeatedly, or by right-clicking the column heading and choosing the desired menu item.
You can also sort optionally on additional columns. So, for instance, if the Name column is sorted in ascending alphanumeric order (the default), and you then click the Faces column heading, the list is sorted primarily by the number of faces, and then alphanumerically for each set of objects with the same number of faces. Clicking the Name column heading removes sorting from any other column.
To rearrange columns:
- Drag a column heading horizontally. When arrows appear in the new desired location, release the mouse button.
To resize columns, do any of the following:
- To resize a column manually, drag the divider on the right side of the column heading.
- To resize a column automatically, double-click the divider on the right side of the heading, or right-click the column heading and choose Best Fit.
- To resize all columns automatically, right-click a column heading and choose Best Fit (all columns). This enables column headings to be legible.
- To resize all columns automatically to display their settings, while potentially truncating column titles, right-click a column heading and choose Minimize All Widths.