
Parameters rollout

- Presets
- From the drop-down menu, choose from the list of preset chamfer settings.
- Click
 to load a selected preset.
- Click
 to save the current stack as a preset. When saving a preset, you must specify a name and an optional tooltip to show while hovering over the name in the list.
- Click
 to delete the selected preset. A dialog will appear to confirm the action.
You can also right-click the drop-down menu and choose Set as default to apply the current settings as default.
- Click
Corner Options group
- Mitering
- Sets the method for joining corners when multiple edges connect to the same vertex:
- Quad: creates new quadrilateral polygons around each chamfered edge (2 x the current Segments value). For example, setting Segments to 3 results in six new polygons per edge. The higher the Segments value used, the more the chamfer that can be rounded off, depending on the Tension value.
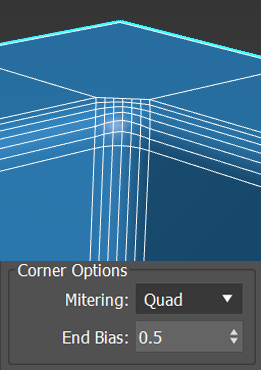
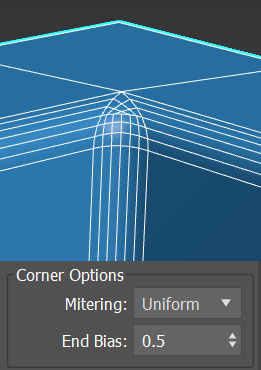
- Uniform: creates a uniform corner with quadrilateral intersections. A Uniform corner can be smoothed or sharpened depending on the Depth setting under the Chamfer options.
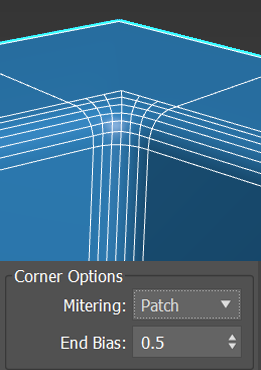
- Patch: creates a patch corner that also has quadrilateral intersections, however can provide higher resolution results and remove artifacts. A patch corner can be smoothed or sharpened depending on the Depth setting under the Chamfer options.
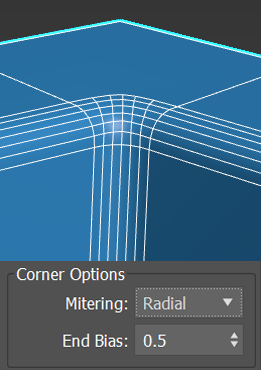
- Radial: creates a corner similar to Patch, however to do so produces an arc in the corners to avoid connecting bevel edge vertices to non-bevel edge vertices. A Radial corner can be smoothed or sharpened depending on the Depth setting under the Chamfer options.
- Tri:
replaces each chamfered edge with a number of polygons equal to the current Segments value. This also increases the Segments value of chamfered edges between non-coplanar polygons, which can cause rounding of the chamfered area. This method generates both triangular and quadrilateral polygons.
Note: Using triangular polygons may cause mesh issues when smoothing or subdividing.

- Quad: creates new quadrilateral polygons around each chamfered edge (2 x the current Segments value). For example, setting Segments to 3 results in six new polygons per edge. The higher the Segments value used, the more the chamfer that can be rounded off, depending on the Tension value.
- End Bias (Not supported for Tri mitered corners)
- Controls the ends of chamfers that do not involve a corner, with the ability to move the end point towards the next edge. A value of 1.0 moves the end of the chamfer to the first vertex of the next edge, while a value of 0.0 ends the chamfer.
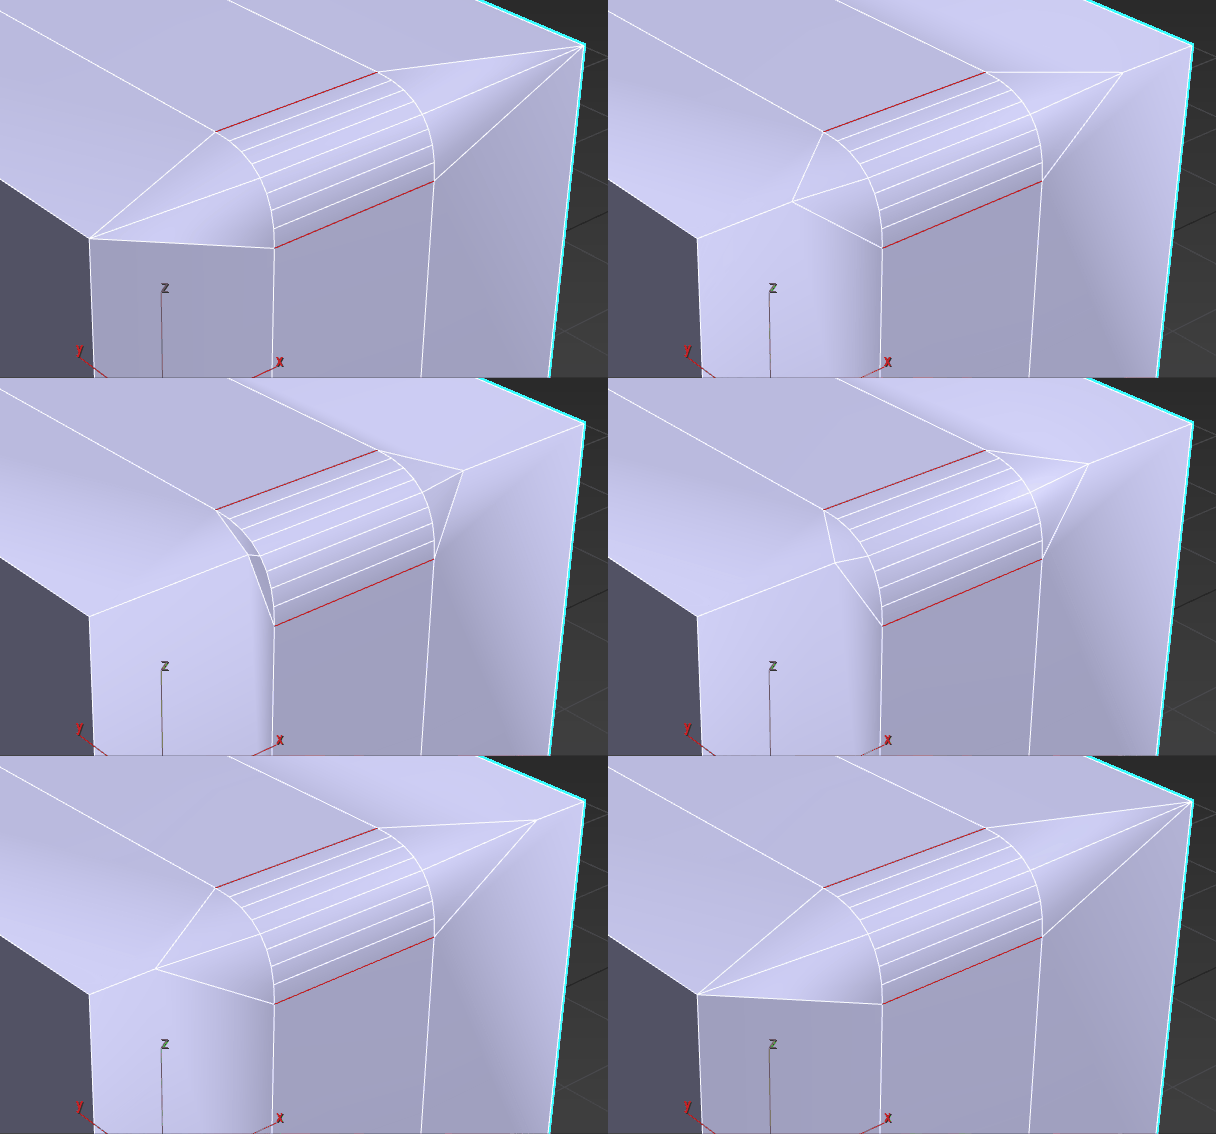
End bias value adjusted from 0 to 1.0 and back again
Chamfer Options group
- Amount Type (Uniform, Patch, and Radial mitered corners only)
- Sets the amount type:
- Fixed: the chamfer amount doesn't grow or shrink based on the number of edges connecting to a point.
- By Weight: uses the Weight channel data from the mesh to drive the amount of chamfer. Weight can be adjusted in the Edge Properties group of Editable Poly or the Edit Poly modifier.
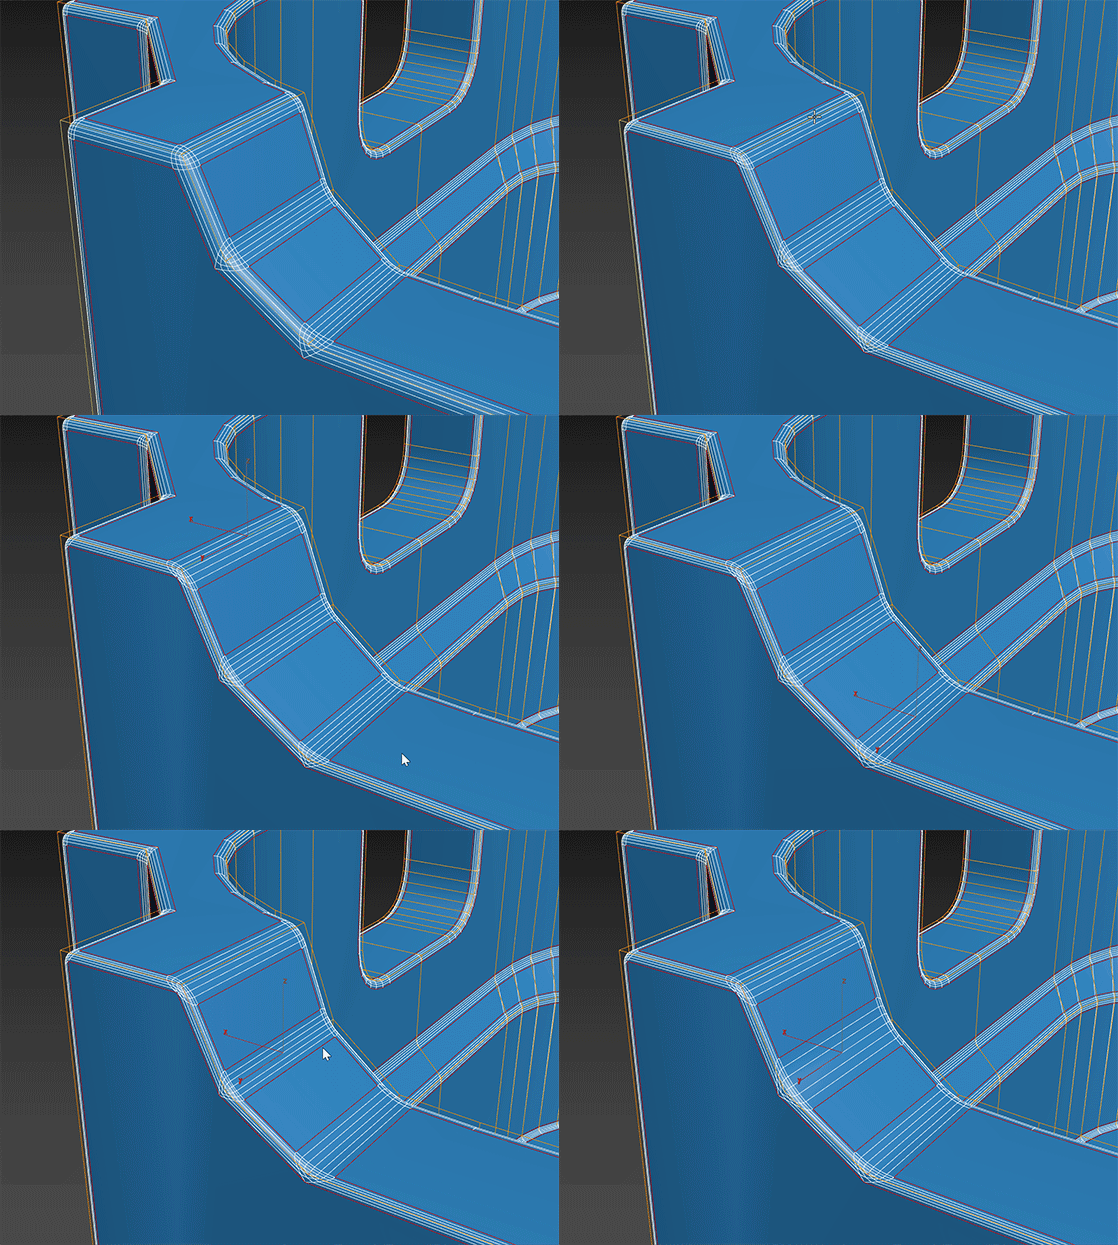
- By Crease Weight: uses the Crease Weight channel data from the mesh to drive the amount of chamfer. Crease weight can be adjusted in the Edge Properties group of Editable Poly or the Edit Poly modifier.
Tip: Use Crease Weight to interpolate the weight between the vertices, creating a blend along the edge of the weight. Use By Weight to maintain a consistent weight along the edge, interpolating the weight within the mitered corners.
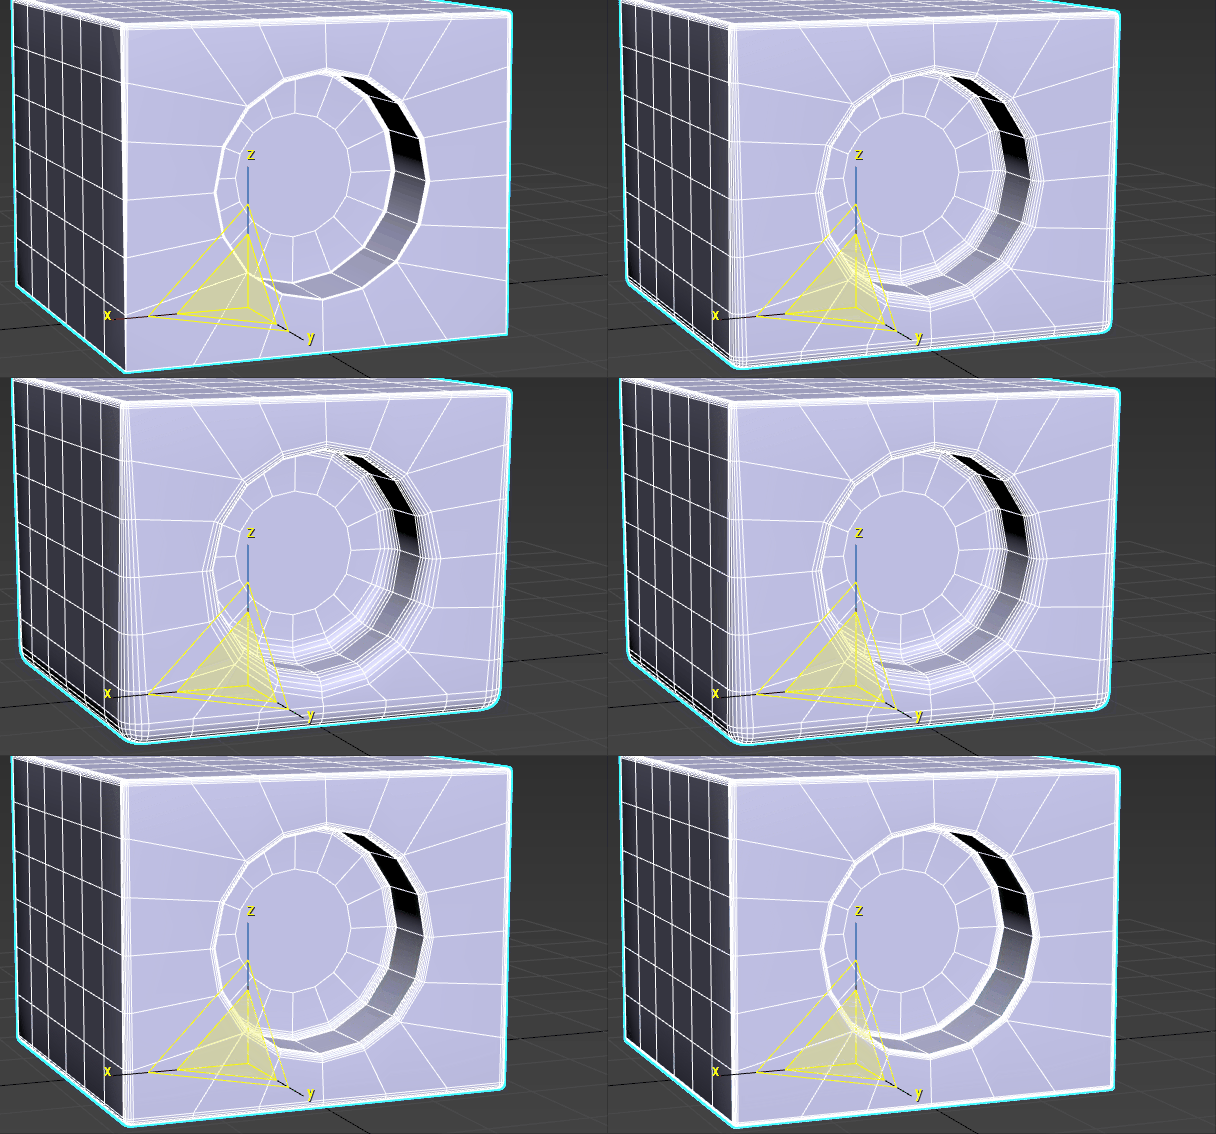
Increasing chamfer amount with the By Crease Weight option enabled
- Legacy: Uses the legacy algorithm combining Quad Chamfer and Quad Intersection. This option remains in order to support legacy files, however it is not recommended for use with new models.
- Amount
- Sets the width of the chamfer in distance units. Default=1.0.
- Scale (By Weight amount type only)
- Scales all the weight values by the same amount, allowing you to tweak the overall size of the chamfer across the model.
- Min Amount (By Crease Weight amount type only)
- Sets the minimum amount for the chamfer based on the minimum crease weight.
- Max Amount (By Crease Weight amount type only)
- Sets the maximum amount for the chamfer based on the maximum crease weight.
- Segments
- Sets the number of segments within the chamfer. More segments create a smoother chamfer.
- Depth Type (Uniform, Patch, and Radial mitered corners only)
- Sets the method for controlling the depth of the chamfer:
- Fixed uses the Depth value set below.
- By Weight uses channel data from the mesh to drive the chamfer. Depth weight can be set in the Edge Properties of either Editable Poly or the Edit Poly Modifier.
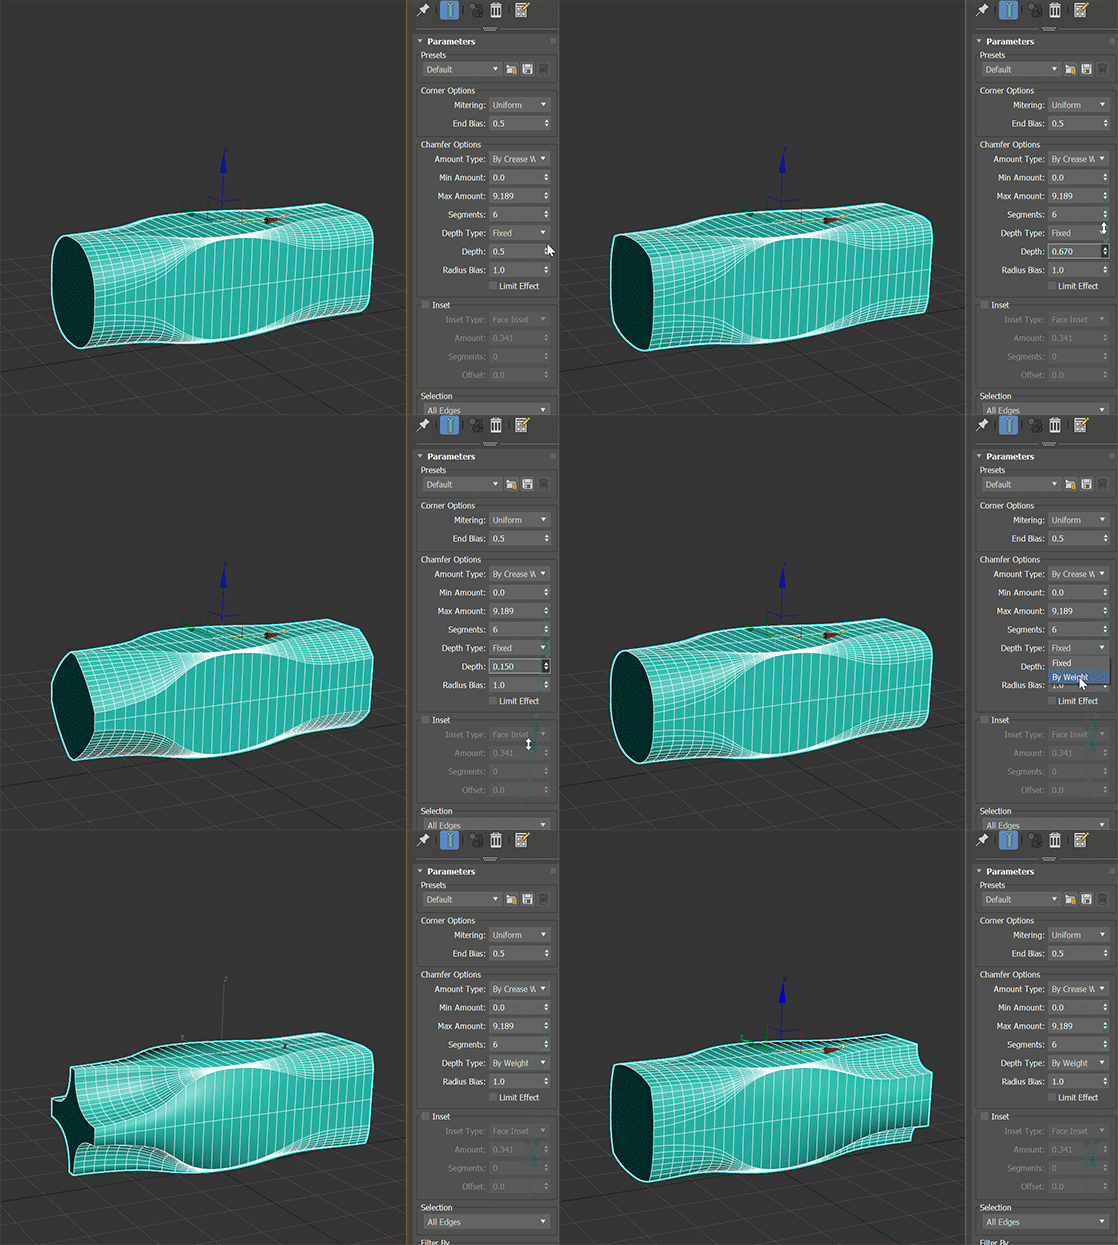
- Depth (Uniform, Patch, and Radial mitered corners only)
- Controls the fixed depth of the chamfer:
- A depth of 1.0 will produce a sharp corner on convex edges.
- A depth of 0.0 will produce a flat surface.
- A depth of -0.5 will produce a concave curve surface along a convex edge.
This option is not available for the Legacy amount type.
- Tension (Legacy amount type only)
- Determines the angle between new polygons generated by chamfering edges between non-coplanar polygons. At the default value of 1.0, all new polygons from each chamfered edge lie flat. Lowering the Tension value increases the angle; with a high enough Segments value and original angle between the polygons on either side of the edge, this can produce curvature of the new polygons. At 0.0, the new polygons occupy the same positions as the original polygons.
The Tension setting does not affect polygons generated from edges between coplanar polygons. The greater the angle between the original polygons adjacent to a chamfered edge, the more curvature is available.

1. Original edge selection
2. Tension=1.0
3. Tension=0.5
4. Tension=0.0
Tip: If you don't get the desired curvature by reducing the Tension value, try increasing the Segments value. - Radius Bias
- Controls the radius of chamfered corners, maintaining a more spherical shape in cases where angles become sharp and the chamfer becomes obtuse.

- Limit Effect
- When on, Helps prevent overshooting of edges by restricting the distance chamfered sub-objects can travel towards each other. In other words, when Limit Effect is on, increasing the Amount setting past a certain value (based on existing geometry) has no effect.
Tip:
 Starting in 3ds Max 2023.2, the
Limit Effect output has been updated to prevent self intersections in chamfered surfaces. You can use the command
$.modifiers[N].SetVersion #VerLatest to update
Chamfer modifiers that were applied in previous versions of 3ds Max, so they use the new functionality.
Note: When the Mitering option is set to Tri mitered corners, Limit Effect is always applied. This setting will remain in effect when changing from Tri to other mitered corners, so it must be turned off explicitly.
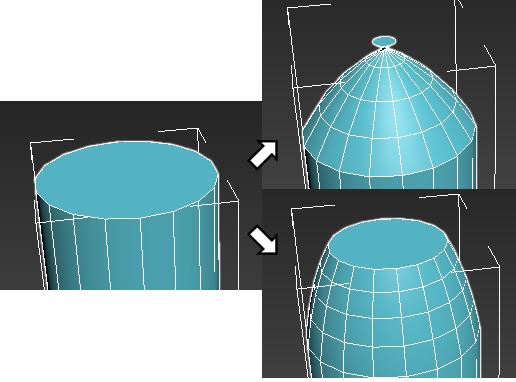
Left: original cylinder; Top right: Chamfered with Amount=8, Limit Effect off; Bottom right: Chamfered with Amount=8, Limit Effect on
Inset group
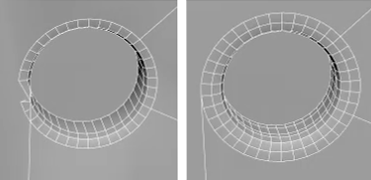
Mesh issue corrected by using Face Inset (right)
- Inset
- Enables a face inset along the edges of the chamfer based on the criteria currently generating the chamfer.
- Inset Type
- Sets the inset type to either Face Inset or Flow Loop. With Face Inset, you can adjust the number of segments and offset. Using Flow Loop, the added edges generate loops which can result in cleaner geometry. Flow Loop does not support Segments or Offset however.
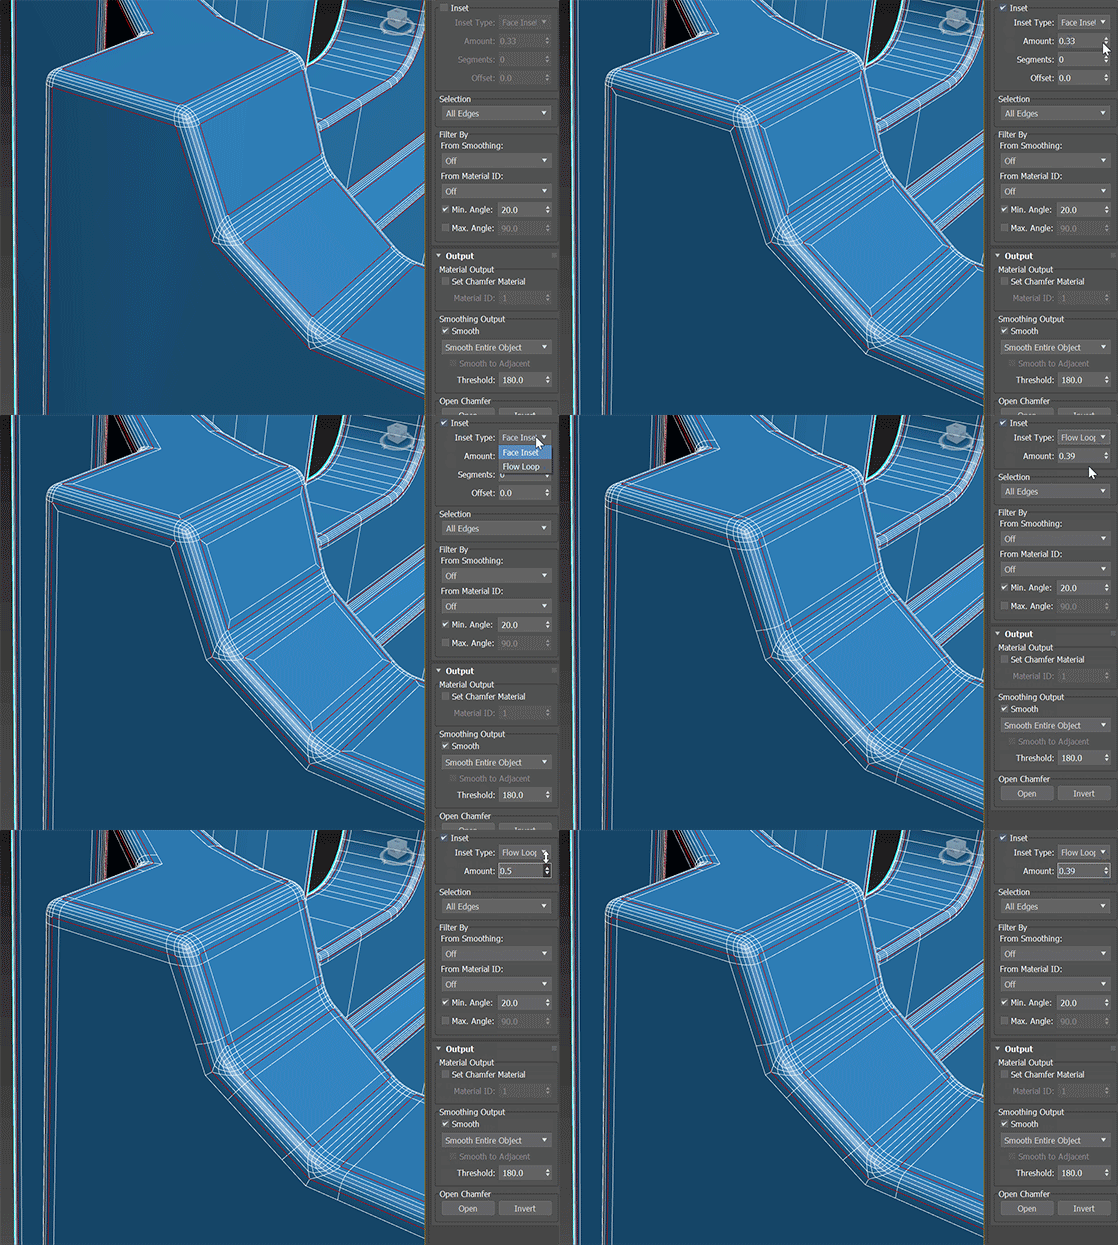
- Amount
- Sets the size of the inset in distance units.
- Segments (Face Inset only)
- Sets the number of segments in the inset.
- Offset (Face Inset only)
- Sets an offset for the inset. Values can be positive or negative.
Selection group
These options let you specify restrictions on input edges beyond the initial selection. You can opt to chamfer only smoothed or unsmoothed edges, and only edges within or on the border of polygon groups with the same material ID.
- Selection
- Enables and specifies the sub-object selection to which the chamfering is applied.
The Chamfer modifier can work on selections at sub-object levels other than the active one. For example, say you have an editable poly object with vertex selections and edge selections in different parts of the object, and you access the Edge sub-object level before applying the Chamfer modifier. Using any of the Selection options with Verts or Vertices in the name causes the modifier to work on the selected vertices without affecting the edge selection.
Choose from the drop-down list:
- From Stack: Chamfers the selection at the current sub-object level. If no sub-object level is active, all edges are chamfered. This is the default Selection option.
Note: The sub-object selection must be active at the stack level immediately below the Chamfer modifier. For example, say you have an editable poly object with the Edge sub-object level active and edges selected. Say you then apply a Poly Select modifier without making a selection or changing the sub-object level (by default, it's Object, or Top-level). At this point in the stack, no sub-object selection is active, so that subsequently applying the Chamfer modifier with the default From Stack option active simply chamfers all edges.
- Selected Edges: Chamfers selected edges, regardless of the current sub-object level.
- Selected Face Edges: Chamfers edges of selected faces, regardless of the current sub-object level.
- Selected Faces Border: Chamfers only edges on the perimeters of face selections, regardless of the current sub-object level.
- Edge Verts Selected: Chamfers only edges both of whose vertices are selected, regardless of the current sub-object level.
- All Edges: Chamfers every edge in the object, regardless of the current sub-object level.
- Selected Vertices: Chamfers only selected vertices, regardless of the current sub-object level.
-
All Vertices: Chamfers every vertex in the object, regardless of the current sub-object level.
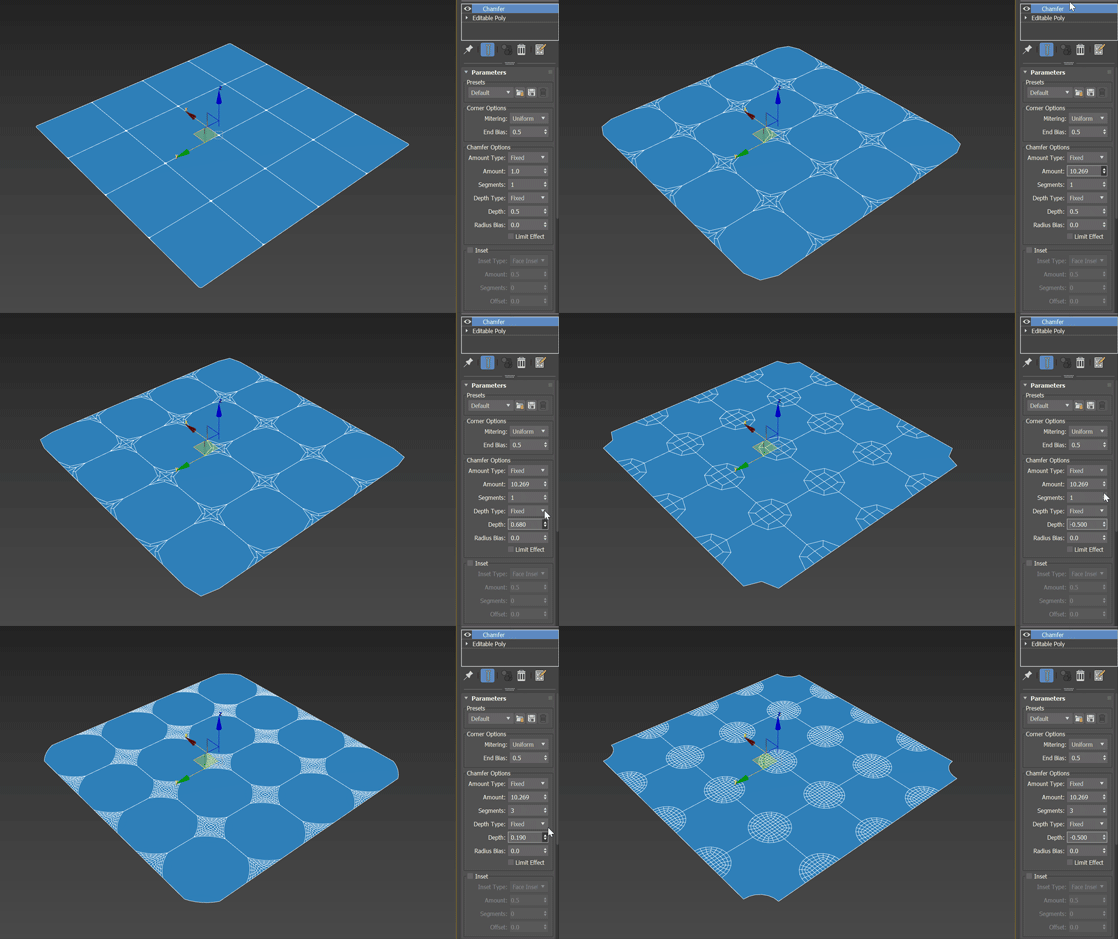
Vertex chamfering operation
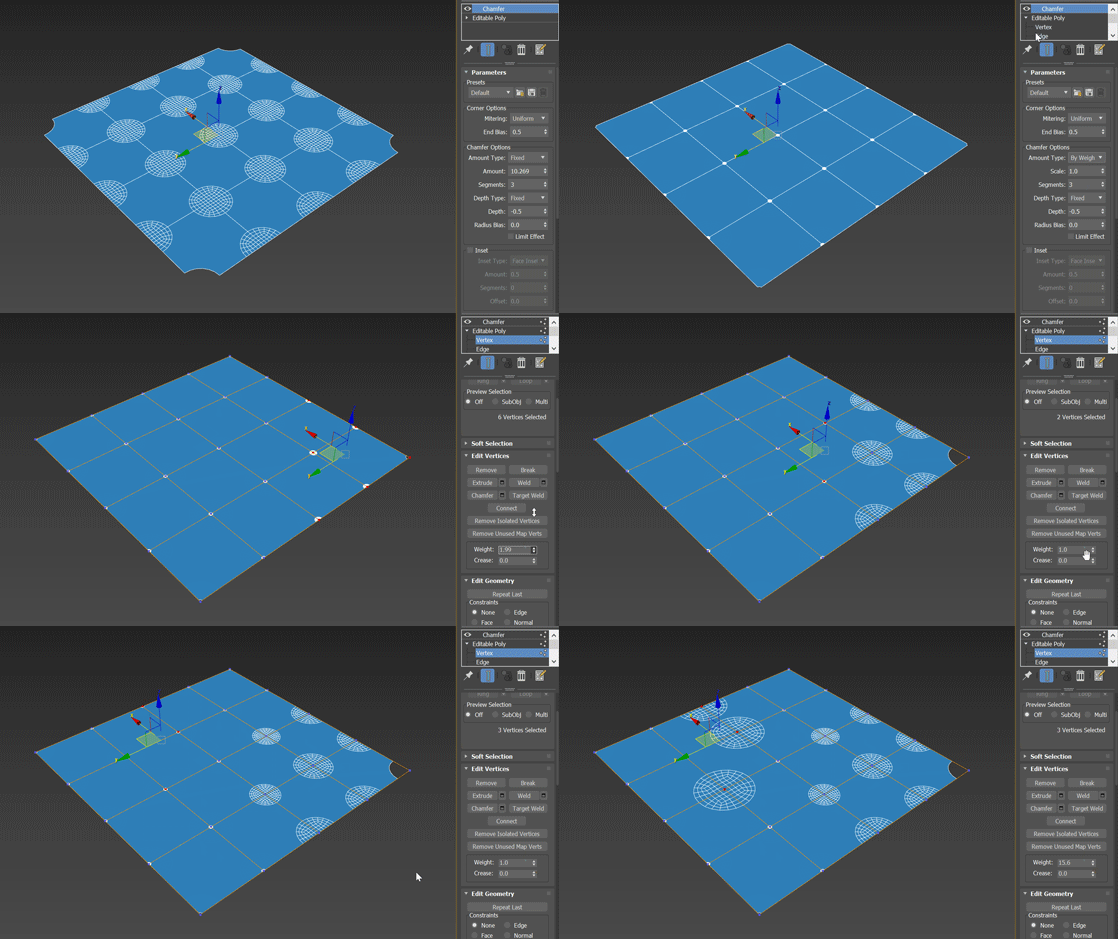
Weighted vertex chamfering operation
- From Stack: Chamfers the selection at the current sub-object level. If no sub-object level is active, all edges are chamfered. This is the default Selection option.
Filter By group
- From Smoothing
- Specifies how the modifier handles input edges based on the smoothing of adjacent faces. Choose from the drop-down list:
- Off: Smoothing groups have no effect on chamfering.
- Smoothed Edges: Chamfers only input edges between faces belonging to the same smoothing group.
- Unsmoothed Edges: Chamfers only input edges between faces that do not belong to the same smoothing group.
- From Material ID
- Specifies how the modifier handles input edges based on material ID assignments of adjacent faces. Choose from the drop-down list:
- Off: Material IDs have no effect on chamfering.
- Different Materials: Chamfers only input edges between faces with different material ID assignments.
- Same Materials: Chamfers only input edges between faces with the same material ID assignments.
- Min. Angle
- When enabled while chamfering edges, the angle between faces below which edges are not chamfered.
For example, to prevent chamfering of edges between coplanar faces, turn on Min. Angle and set the value to 0.0.
- Max. Angle
- When enabled while chamfering edges, the angle between faces above which edges are not chamfered.
For example, to chamfer only edges between faces at right angles to each other, turn on Min. Angle and set it to 89.0 or so, and turn on Max. Angle and set it to 90.0.
Output rollout
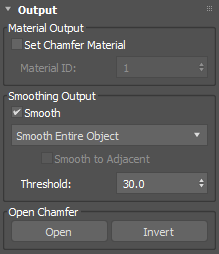
Material Output group
- Set Chamfer Material
- When on, applies the specified material ID (see following) to new polygons produced by chamfering.
- Material ID
- The material ID applied to new polygons when Set Chamfer Material is on.
Smoothing Output group
- Smooth
- When enabled, applies smoothing groups after chamfering. From the drop-down list, choose either option:
- Smooth Entire Object: Applies smoothing groups to the entire object based on the angle between adjacent polygons. Any two adjacent polygons will be put in the same smoothing group if the angle between their normals is less than the Threshold angle, set by the spinner to the right of this button.
- Smooth Chamfers Only: Applies smoothing groups to the new polygons created by the chamfering process based on the angle between adjacent polygons. Any two adjacent polygons will be put in the same smoothing group if the angle between their normals is less than the Threshold angle, set by the spinner to the right of this button.
- Smooth to Adjacent: When smoothing chamfers only (see preceding), performs additional steps using Specified Normals so that the chamfers are smoothed to adjacent original faces, with the original faces retaining their flat appearance.
- Threshold
- When Smooth is enabled, two adjacent faces are placed in the same smoothing group if the angle between their normals is less than the set Threshold value.
Open Chamfer group
- Open
- After chamfering, deletes all faces created by the chamfering operation.
- Invert
- After chamfering, deletes all faces except those created by the chamfering operation.