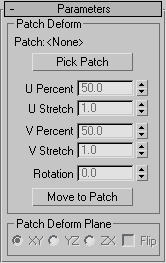
The PatchDeform modifier deforms an object based on the contours of a patch object. This modifier works similarly to the PathDeform modifier, but uses a quad-based patch object instead of a spline shape or NURBS curve path.
To use the PatchDeform modifier, apply it to the object you want to deform, click the Pick Patch button, and then select a patch object. Deform the object by manipulating the patch object or adjusting the various controls in the Patch Deform panel.
Not all objects can be used with PatchDeform. Objects that are valid PatchDeform targets include: Plane, Cylinder, Cone and Torus.
This modifier is also similar to the SurfDeform modifier, except that it uses a patch surface instead of a NURBS Point or CV surface.
There's also a world-space version of the PatchDeform modifier. See PatchDeform (WSM). Generally, the PatchDeform object-space modifier leaves the object in place while moving the patch to the object, while the PatchDeform world-space modifier leaves the patch in place while moving the object to the patch. Also, the WSM version has a Move to Patch button, while the object-space version does not.
Procedures
To use the PatchDeform modifier:
-
 Select an object.
 - Apply PatchDeform.
- On the Parameters rollout, click Pick Patch.
- Click a patch object.
Deform the object by adjusting the controls in the Patch Deform panel and by manipulating the patch object.
Interface
Modifier Stack
- Gizmo
-
At this sub-object level, you can transform and animate the gizmo like any other object, altering the effect of the modifier. The PatchDeform gizmo is a representation of the deforming patch object, so transforming it determines which part of the patch affects the modified object.
Parameters rollout

Patch Deform group
Provides controls that let you pick the patch and adjust the object's position and deformation along the gizmo copy of the patch.
- Patch
- Displays the name of the selected patch object.
- Pick Patch
- Click this button, and then select the patch object you want to use for the deformation. A gizmo is created for the object that matches the patch. Once you assign the patch gizmo, you can adjust the deformation using the remaining controls in this rollout. Note: Patch Deform can be used only with a rectangular quad patch form. 3ds Max makes no distinction between quad-style patches and certain primitive meshes. Examples of suitable patches are the primitive quad patch object, the primitive cylinder, and the primitive torus. (The cylinder actually has tri-patches at each end, but since they are at the end of the list of patches, PatchDeform just ignores these extra faces.)
- U Percent
- Moves the object along the U (horizontal) axis of the gizmo patch, based on a percentage of the U distance. This spinner defaults to a setting of 50 percent, which places the object at the center of the gizmo patch. A setting of 0 percent places the object at the left edge of the gizmo patch, as seen from the viewport where the patch was created.
- U Stretch
- Scales the object along the U (horizontal) axis of the gizmo patch.
- V Percent
- Moves the object along the V (vertical) axis of the gizmo patch, based on a percentage of the V distance. A setting of 0 percent places the object at the bottom of the gizmo patch.
- V Stretch
- Scales the object along the V (vertical) axis of the gizmo patch.
- Rotation
- Rotates the modified object with respect to the gizmo patch.
- Move To Patch
- Clicking this button moves the object from its original position to the patch object you are using for deformation. This button is only available with the PatchDeform (WSM).
Patch Deform Plane group
- XY/YZ/ZX
- Choose a two-axis plane of the object to make parallel with the XY plane of the gizmo patch.
- Flip
- Reverses the gizmo direction.