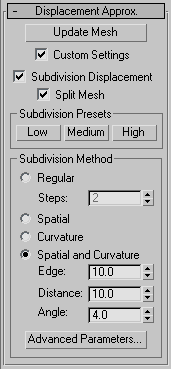
The Displace Mesh world-space modifier (World Space) lets you see the effect of Displacement mapping on editable mesh objects and objects with a Disp Approx modifier applied to them. If a displacement map is applied to the object, the mesh shows the effect of the displacement map. Displace Mesh replaces the mesh with its displaced version.
There are two main reasons for using Displace Mesh:
- As a visualization aid to see the effect of a displacement map in viewports, and to compare the placement of displaced objects with other objects in the scene.
For example, if you use an animated displacement map to create waves on a water surface, you might temporarily apply Displace Mesh to see where the ripples meet the waterline of a boat.
When you use Displace Mesh in this way, usually you delete it once you've obtained the effect you want.
- To obtain an editable mesh created from a displacement map
To use the Displace Mesh this way, you apply it to the object that has a displacement map, then apply the Snapshot command from the Tools menu, and choose Mesh as the clone method.
Snapshot creates a permanently displaced mesh. As it does for other kinds of objects, Snapshot also leaves the original, displacement-mapped object in the scene. After applying Snapshot, you can delete the original object, or you can keep it in your scene to use for other purposes.
Tip: Use Disp Approx to displace editable meshes. Use Displace Mesh for previewing, as in the first item, but avoid using Snapshot. The mesh created by using Displace Mesh and Snapshot can have a high polygon count. This makes it slow to use interactively, and can cause smoothing problems, where the underlying mesh edges are visible.
Interface
The rollout for Displace Mesh lets you choose which surface approximation settings are used to produce the mesh.

- Update Mesh
- Updates the mesh if you have changed the displacement mapping and want to see the results of the change. The mesh isn't updated automatically because that can become extremely time consuming.
- Custom Settings
- When turned off, Displace Mesh uses default settings to subdivide the mesh for the purposes of displacement mapping. When turned on, the subdivision controls in this rollout are enabled. Default=off.
- Subdivision Displacement
- Subdivides mesh faces to accurately displace the map, using the method and settings you specify in the Subdivision Presets and Subdivision Method group boxes. When turned off, the modifier applies the map by moving vertices in the mesh, the way the Displace modifier does. Default=on.
- Split Mesh
- Affects the seams of displaced mesh objects; also affects texture mapping. When on, 3ds Max splits the mesh into individual faces before displacing them; this helps preserve texture mapping. When off, 3ds Max uses an internal method to assign texture mapping. Default=on. Tip: This parameter is required because of an architectural limitation in the way displacement mapping works. Turning Split Mesh on is usually the better technique, but it can cause problems for objects with clearly distinct faces, such as boxes, or even spheres. A box's sides might separate as they displace outward, leaving gaps. And a sphere might split along its longitudinal edge (found in the rear for spheres created in the Top view) unless you turn off Split Mesh. However, texture mapping works unpredictably when Split Mesh is off, so you might need to add a Displace Mesh modifier and make a snapshot of the mesh. You would then apply a UVW Map modifier and then reassign mapping coordinates to the displaced snapshot mesh.
Subdivision Presets group and Subdivision Method group
The controls in these two group boxes specify how the modifier applies the displacement map when Custom Settings and Subdivision Displacement are both turned on. They are identical to the surface approximation controls for NURBS surfaces.