![]()
This window has controls to:
- Set the area to render (region, and so on).
- Choose the viewport to render.
- Choose a render preset.
- Render the scene.
- Save the image to a file.
- Place a copy of the rendered image on the Windows clipboard, ready for pasting into another graphics application.
- Create a clone of the window. This displays a new window so you can create another rendering and compare it with the previous one.
- Open a new Rendered Frame Window.
- Toggle display of the red, green, and blue color channels.
- Display the alpha channel.
- Display only monochrome (gray scale).
- Clear the image from the window.
- Print the rendered output.
When you choose the View Image File command from the Rendering menu, 3ds Max displays still images and image sequences in a feature-reduced version of the Rendered Frame Window. When you view sequentially numbered image files or images in an IFL file, this window displays navigation arrows that let you step through the images.
The Rendered Frame Window Title Bar
The title bar of the Rendered Frame Window includes this information:
- Viewport name
- Frame number
- The display gamma value, if gamma has been enabled. If the color-correction method you use is a look-up table, then when the table is enabled the title bar shows the file name of the table, with no path.
- Image type and color depth
For example, a full-color image with an alpha channel will show “RGBA Color 16 Bits/Channel”; a bitmap with a limited color depth might show “Indexed Color 8 Bits/Pixel,” and so on.
- Image aspect ratio
The Rendered Frame Window
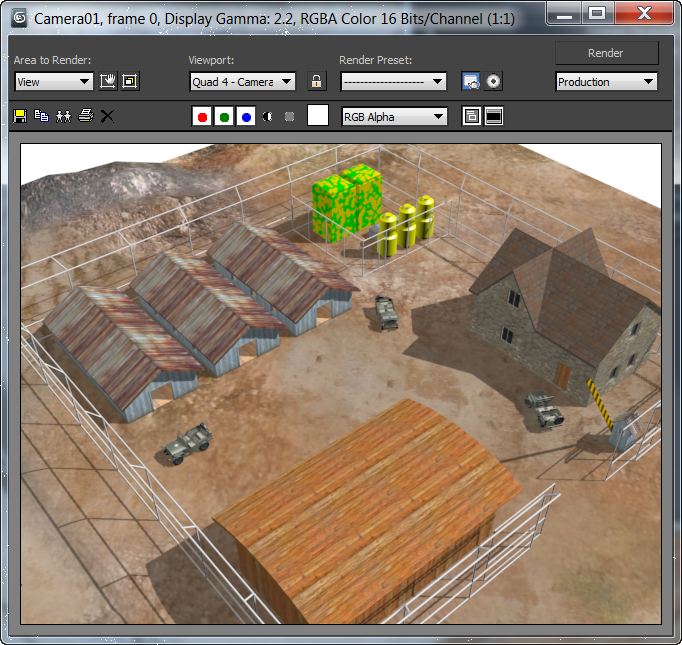
Rendering Controls
These controls provide access to rendering settings such as presets and the viewport to render, as well as the Render command. To toggle display of these controls, click the Toggle UI button at the right end of the Rendered Frame Window toolbar.
- Area to Render
- This drop-down list provides the available Area to Render options. Choose View, Selected, Region, Crop, or Blowup.
When using Region, Crop, or Blowup, set the region with the Edit Region control (see following). Alternatively, you can set the region automatically to the current selection with the Auto Region Selected option (also see following).
-
 Edit Region
 - Enables manipulation of the region window: resize by dragging the handles, and move by dragging inside the window. When Area To Render is set to Region, you can edit the region both in the Rendered Frame Window and in the active viewport.
If Area To Render is set to View or Selected, clicking Edit Region switches to Region mode.
When Area To Render is set to Crop or Blowup, you can edit the region only in the active viewport, because in those cases the Rendered Frame Window doesn’t necessarily reflect the same area as the viewport. Hence, also in Crop and Blowup modes, a warning icon appears to the right of the Auto Region Selected. The icon’s tool tip suggests that you edit the region in the viewport. A warning also appears in Region mode if the Rendered Frame Window area doesn’t match the active viewport.
Turning on Edit Region automatically activates the Show Safe Frames function in the active viewport.
Note: 3ds Max maintains two separate render regions: one for Region and Crop, and another for Blowup. Changing the Area To Render option activates the relevant render region. -
 Auto Region Selected
 - When on, sets the region for Region, Crop, and Blowup automatically to the current selection. This auto-region is calculated at render time and does not overwrite the user-editable regions.
If Area To Render is set to View or Selected, clicking Auto Region Selected switches to Region mode.
-
 [warning]
 - This warning symbol appears when Area to Render is set to Crop or Blowup, accompanied by a tool tip that tells you to edit the Crop or Blowup region in the viewport. It also appears in Region mode if the Rendered Frame Window doesn’t show the same area as the viewport (that is, if you previously rendered in Crop or Blowup mode).
- Viewport
- Shows the viewport that renders when you click the Render button. To specify a different viewport to render, choose it from the list or activate it in the main user interface.
The drop-down list contains all viewports available in all viewport layouts. Each viewport is listed with the layout name first, followed by a hyphen and then the viewport name. For example: "Row 1, Row 2 - Front." For this reason, to identify viewports easily, give your layouts meaningful names, such as "Closeups."
Activating a different viewport in the main interface automatically updates this setting if Lock To Viewport (see following) is off.
-
 Lock To Viewport
 - When on, only the viewport active in the Viewport list renders, even if you activate a different viewport in the main interface. However, you can still choose a different viewport to render from the list.
When off, activating a different viewport in the main user interface updates the Viewport value.
- Render Preset
- Choose a preset rendering option from the drop-down list.
-
 Render Setup
 - Opens the Render Setup dialog.
-
 Environment and Effects Dialog (Exposure Controls)
 - Opens the Environment and Effects dialog to the Environment panel. You can set an exposure control on the Exposure Control rollout.
- Production/Iterative
- Choose the result of clicking the Render button:
- Production Renders using all the current settings on the Rendered Frame Window, Render Setup, dialog, and so on.
-
Iterative Ignores network rendering, rendering of multiple frames, file output, export to MI files, and email notification. Also, with the scanline renderer, rendering Selected leaves the rest of the Rendered Frame Window intact in Iterative mode.
Use this option when doing quick iterations on the image, usually in parts; for example, working on reflections, specific objects, or areas of the scene.
This choice is also available from a drop-down in the bottom-left corner of the Render Setup dialog. And you can render in either mode from the render flyout on the main toolbar.
- Render
- Renders the scene using the current setup.
Toolbar
-
 Save Image
 - Allows you to save the rendered image displayed in the Rendered Frame Window.
-
 Copy Image
 - Places an exact copy of the visible portion of the rendered image on the Windows clipboard, ready for pasting into a paint program or bitmap editing software. The image is always copied as displayed, so, for example, if the Monochrome button is on, the copied data consists of an eight-bit grayscale bitmap.
Note: No HDR (high-dynamic-range) data is copied.
-
 Clone Rendered Frame Window
 - Creates another window containing the displayed image. This allows you to render another image to the Rendered Frame Window and compare it with the previous, cloned image. You can clone the Rendered Frame Window any number of times. The cloned window uses the same initial zoom level as that of the original.
Note: A cloned window provides minimal functionality, and cannot be re-rendered or cloned.
-
 Print Image
 - Sends the rendered image to the default printer as defined in Windows. The background prints as transparent.
-
 Clear
Clear - Clears the image from the Rendered Frame Window.
-
 Enable Red Channel
 - Displays the red channel of the rendered image. When turned off, the red channel is not displayed.
-
 Enable Green Channel
 - Displays the green channel of the rendered image. When turned off, the green channel is not displayed.
-
 Enable Blue Channel
 - Displays the blue channel of the rendered image. When turned off, the blue channel is not displayed.
-
 Display Alpha Channel
 - Displays the alpha channel.
-
 Monochrome
 - Displays an 8-bit grayscale of the rendered image.
- [color swatch]
- Stores the color value of the last pixel you right-clicked. You can drag this color swatch to other color swatches in 3ds Max. Clicking the color swatch displays the Color Selector, which displays more information about the color.
You can leave the Color Selector displayed while you right-click over other pixels in the Rendered Frame Window. (Changing the current value in the Color Selector changes the color swatch on the Rendered Frame Window's toolbar, but it does not change the color of pixels in the rendered image.)
- [channel display drop-down list]
- Lists any channel rendered with the image. When you choose a channel from the list, it is displayed in the Rendered Frame Window.
For most kinds of files, only the RGB and alpha channels are available. If you render an RPF file or RLA file, additional channels can be present.
The Rendered Frame Window displays nonvisual channels, such as Material ID or the G-Buffer, using colors it assigns at random to distinct values.
-
 Toggle UI Overlays
 - When on, displays the frame that shows the Region, Crop, or Blowup area when one of those options is active. To disable display of the frame, turn off this toggle.
Note: The frame is still active when not displayed.
-
 Toggle UI
 - When on, all controls are available. When off, disables display of the rendering controls at the top of the dialog. To simplify the dialog interface and allow it to take up less space, turn this off.
Tip: When off, you can resize the window smaller than is possible when Toggle UI is on.
- Layer
- This setting appears on the Rendered Frame Window toolbar when you render to the RPF or RLA file format. It lets you see the information at different layers of the following channels:
- Z Depth
- Normal
- Non-Clamped Color
- Coverage
- Node Render ID
- Color
- Sub-Pixel Weight
- Sub-Pixel Mask
Layer shows no additional information for other channels. It is useful primarily when the scene contains objects that occlude each other, and you have turned on the Render Occluded Objects toggle for these objects. Be aware that rendering occluded objects increases render time.
Tip: Rendering occluded objects can help you create 3D effects when you composite images with the Autodesk Combustion software. -
 Frame-Steps (arrows)
 -
When viewing sequentially numbered files (such as image0005.jpg) or IFL files, the arrows display the next or the previous file in the sequence. To jump to the first image or the last image in the sequence, hold down Ctrl and click an arrow.
Available only when you use the View Image File command on the Rendering menu.
Tip: To see these buttons, enlarge the size of the Rendered Frame Window.