The Group sub-object rollout is for selecting groups of vertices and constraining them to surfaces, collision objects, or other cloth objects.
Interface

[Group management buttons]

- Make Group
- Makes a group out of selected vertices. Select the vertices to include in the group, and then click this button. Name the group, and it will then show up in the list below for you assign to an object.
- Delete Group
- Deletes the group highlighted in the list.
- Detach
- Removes any constraint assigned to the group and sets it back to being unassigned (that is, without any constraint). Any unique properties assigned to this group will remain in effect.
- Initialize
- Constraints that involve attaching the vertices to another object (Node, SimNode, Surface and Cloth constraints) contain information regarding the relative positions of the group vertices to the other object. This information is created upon the creation of the constraint. To regenerate this information, click this button.
- Change Group
- Lets you modify the vertex selection in the group. To use, follow this procedure:
- Choose the group in the list.
- Change the selection of vertices.
- Click Change Group.
- Rename
- Renames the highlighted group.
[constraint creation buttons]

- Node
- Constrains the highlighted group to the transforms of an object or node in the scene. To use, click Node, and then select the node for constraining. The node cannot be an object in the simulation; for that purpose, use the SimNode constraint. Note: Node and SimNode simply constrain the group to an object's transforms , not to the object itself. They need not be near each other. When the cloth and the constraining object should be in close proximity, such as with clothing on a character mesh, use the Surface constraint instead (see following).
- Surface
- Attaches the selected group to the surface of a collision object in the scene. To use, click Surface, and then select the node for attaching. Tip: This constraint is best suited for when the cloth and the constraining object should be in close proximity, such as with clothing on a character mesh.
- Cloth
- Attaches the selected group of cloth vertices to another cloth object.
- Preserve
- This group type preserves the motion from below the Cloth modifier in the modifier stack. For example, you might have a dress that you've skinned to a skeleton. You want the upper portion of the dress to be unaffected by the Cloth simulation (that is, to retain its deformation defined by the skinning), and the lower part to be simulated. In this case, you'd make a Preserve constraint from the upper vertices.
- Drag
- This group type locks the vertices in place or adds a damping force to selected group. When Group Parameters rollout
 Soft is off, you can use this constraint for nailing vertices in place so that they do not move at all. When Soft is on, the vertices will have a drag force applied where the amount of drag is controlled by the Strength and Damping values, also on the Group Properties rollout.
 - SimNode
- This option works the same as the Node option, except that the node must be part of the Cloth simulation.
- Group
- Attaches one group to another. This is recommended only for single-vertex groups. (that is, groups that contain only one vertex). With this, you can make one cloth vertex stick to another cloth vertex. Select one group, click this button to open the Pick Group dialog , and then choose another group.
- NoCollide
- Causes collisions between the currently selected group and another group to be ignored. When you click this button, you're prompted to choose another group. You could use this option to prevent the simulator from processing collisions between cloth and the body under an arm or between the legs.
- Forcefield
- Allows you to link a group to a space warp and have the space warp affect the vertices.
- Sticky Surf
- The group sticks to a surface only after it has collided with that surface. Solid Coll must be enabled for this constraint to work.
- Sticky Cloth
- The group sticks to a surface only after it has collided with that surface. Self Coll must be enabled for this constraint to work.
- Weld
- Click to make an existing group into a Weld constraint. You must first highlight the name of the group in the Group list.
Weld does not create a tear; it only welds vertices that are in close proximity. Use Weld if you create a tear by modeling two elements with matching edges and then applying the Cloth modifier later.
- Make Tear
- Click to make a vertex selection into a tear with a Weld constraint. First, select the vertices, and then click Make Tear.
- Clear Tears
- Click to remove all tears from the Cloth modifier. You cannot remove individual tears. Note: Deleting a Weld constraint does not remove a tear: instead, it causes the mesh to break along those vertices, because the Weld constraint holds vertices together until tearing occurs.
[Group list]

Shows all current groups. The number of vertices associated with the highlighted group is shown below the list. To assign, copy, paste, delete, or edit a created group, first highlight the group name in the list.

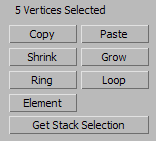
- Copy
- Copies a named selection set to the copy buffer.
- Paste
- Pastes the named selection set from copy buffer.
- Shrink
- Click to shrink the current vertex selection. 3ds Max removes the outer row and column from the selection.
- Grow
- Click to grow the current vertex selection. 3ds Max adds an outer row and column to the selection.

Growing a selection from a single vertex
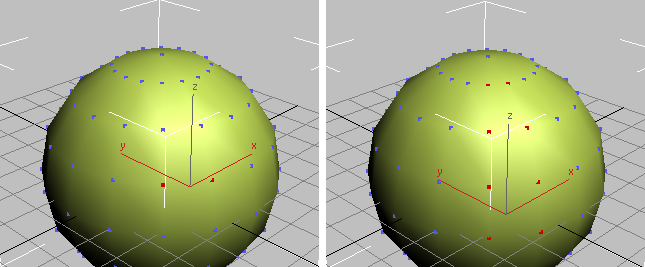
- Ring
- Select two vertices, and then click Ring to select the vertices that are perpendicular to these two.
Ring also works with selections of more than two vertices, but the results might not be what you expect. This is especially likely if Ignore Backfacing is turned off, as it is by default.

Ring selection based on two vertices
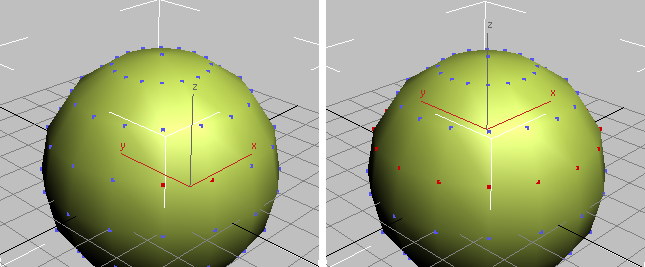
- Loop
- Select two vertices, and then click Loop to select the vertices that are parallel to these two.
Loop also works with selections of more than two vertices, but the results might not be what you expect. This is especially likely if Ignore Backfacing is turned off, as it is by default.

Loop selection based on two vertices
- Element
- Select one or more vertices, then click Element to select all the vertices in an element. An element corresponds to an Element in the underlying geometry: Use this option with Editable Poly, Editable Patch, or Editable Mesh objects.
- Get Stack Selection
- Gets a sub-object selection from below the Cloth modifier on the stack, and applies it to the Group vertex selection. For example, if you create an Editable Poly object, make a vertex sub-object selection for the Editable Poly object, apply the Cloth modifier, and then at the Group level click Get Stack Selection, the vertex selection is identical to the one you made for the Editable Poly object.
If the underlying selection is of a different sub-object type, such as Edge or Poly, clicking Get Stack Selection creates a selection whose vertices correspond to vertices in the underlying selection: for example, all vertices that belong to the Edges or the Polys selected below.
- Ignore Backfacing
-
When on, you can select only vertices that face you in a viewport. When off (the default), you can select any vertices under the mouse cursor, regardless of whether they face you in the viewport.