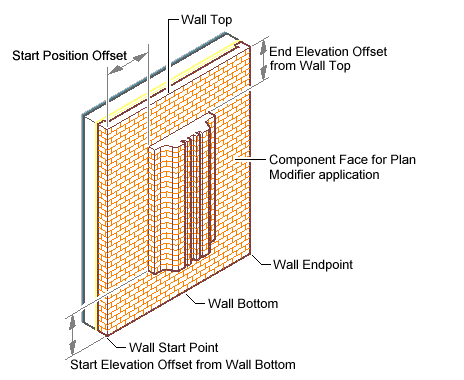
Use this procedure to create a wall modifier from an open polyline. You can draw the polyline in the location for the wall modifier, or you can project the modifier you create to the wall. The polyline cannot be closed.

Converting a polyline to a wall plan modifier
The wall modifier you create is added to the selected wall and is also saved as a wall modifier style that you can apply to other walls.

Wall plan modifier in plan and 3D views
- Draw the polyline in the shape of the wall modifier.
- Select a wall to which you want to apply a wall modifier.
- Click


 .
. 
- Select the polyline.
- Enter y (Yes) to erase the selected polyline, or enter n (No) to keep the polyline in the drawing.
- Enter a name for the wall modifier style created from the polyline, and click OK.
- Select the wall component to which the wall modifier applies.
- To offset the opposite face of the selected component in the shape of the wall modifier, select Offset Opposite Face.

Applying a wall plan modifier and offsetting the opposite component face
- Specify the vertical position of the modifier on the wall component:
If you want to … Then … specify the beginning height of the wall modifier enter a value for Start Elevation Offset, and specify whether the offset occurs from the wall top, the wall base height, the wall justification line, or the wall bottom. specifying the ending height of the wall modifier enter a value for End Elevation Offset, and specify whether the offset occurs from the wall top, the wall base height, the wall justification line, or the wall bottom. Enter a negative offset value to specify a location toward the ground.

Wall plan modifier location parameters
- Click OK.