You can customize ribbon panels by adding, modifying, or deleting commands and controls.
Display the Customize User Interface (CUI) Editor
- Click
 .
Find
.
Find
Create a Ribbon Panel
- In the Customize tab, Customizations In <file name> pane, click the plus sign (+) next to the Ribbon node to expand it.
- Right-click the Panels node. Click New Panel.
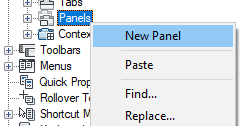
A new panel (named Panel1) is placed at the bottom of the Panels node.
- Right-click Panel1. Click Rename and enter a new panel name.
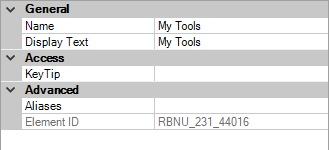
- Select the new panel, and update its properties in the Properties pane:
- In the Display Text box, enter the text you want to display for the title of the panel when it is displayed on the ribbon.
- In the KeyTip box, enter the characters to access the ribbon panel from the keyboard when Alt is pressed.
- In the Aliases box, enter an alias for the ribbon panel.
- Click Apply.
Remove a Ribbon Panel
- In the Customize tab, Customizations In <file name> pane, click the plus sign (+) next to the Ribbon node to expand it.
- Click the plus sign (+) next to the Panels node to expand it.
- Right-click the panel that you want to remove. Click Delete.
 Caution: There is no way to undo the removal of a ribbon panel. If you remove the wrong ribbon panel, click Cancel to close the Customize User Interface (CUI) Editor and not save the changes made. Doing this though will undo any other changes that you might have made.
 - In the message box, click Yes.
- Click Apply.
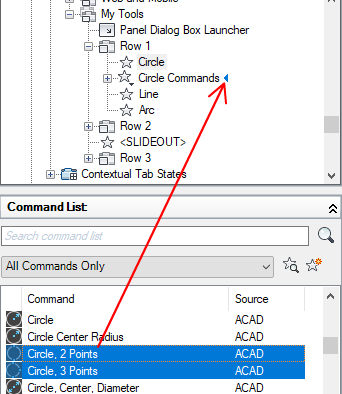
Add a Command
- In the Customize tab, Customizations In <file name> pane, click the plus sign (+) next to the Ribbon node to expand it.
- Click the plus sign (+) next to the Panels node to expand it.
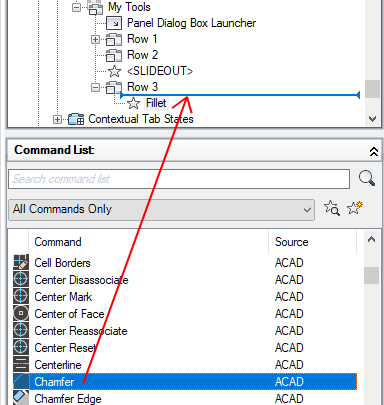
- Click the plus sign (+) next to the ribbon panel where you want to add a command.
- Click the plus sign (+) next to the rows, sub-panels, or drop-downs to get to the location you want to add a command.
- Drag and drop a command from the Command list to a row, sub-panel, or drop-down on the panel.
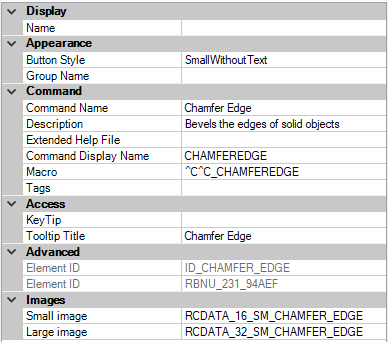
- In the Properties pane, change the properties of the command you added.
- Click Apply.
Add a Control
- In the Customize tab, Customizations In <file name> pane, click the plus sign (+) next to the Ribbon node to expand it.
- Click the plus sign (+) next to the Panels node to expand it.
- Click the plus sign (+) next to the ribbon panel where you want to add a control.
- Create a new row for the control if you need to, or click the plus sign (+) next to the row where you want to add a control.
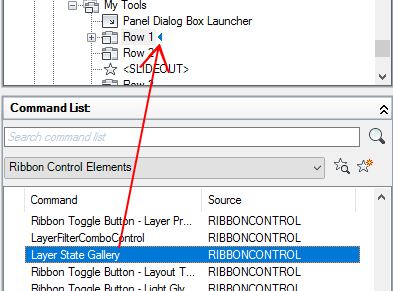
- In the Command List pane, Categories list, select Ribbon Control Elements.
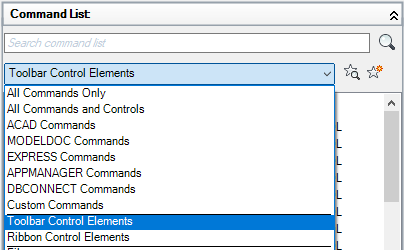
The Command list displays the list of ribbon control elements only.
- Drag and drop a control from the Command list to a row in the ribbon panel.
- Click Apply.
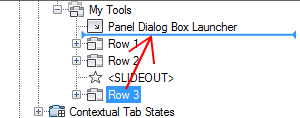
Assign a Command to the Panel Dialog Box Launcher
- In the Customize tab, Customizations In <file name> pane, click the plus sign (+) next to the Ribbon node to expand it.
- Click the plus sign (+) next to the Panels node to expand it.
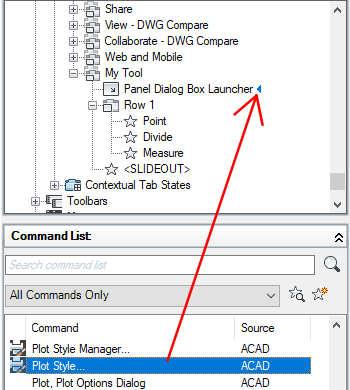
- Click the plus sign (+) next to the ribbon panel where you want to assign a command to its Panel Dialog Box Launcher node.
- Drag a command from the Command list to Panel Dialog Box Launcher on the panel.
- Click Apply.
Remove a Command or Control
- In the Customize tab, Customizations In <file name> pane, click the plus sign (+) next to the Ribbon node to expand it.
- Click the plus sign (+) next to the Panels node to expand it.
- Click the plus sign (+) next to the ribbon panel where you want to remove a command or control.
- Click the plus sign (+) next to the rows, sub-panels, or drop-downs to get to the location you want to remove a command or control.
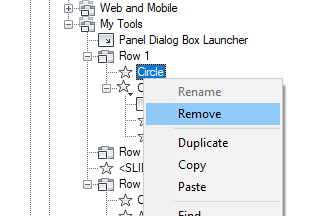
- Right-click the command or control that you want to remove. Click Remove.
- Click Apply.
Reposition a Command or Control
- In the Customize tab, Customizations In <file name> pane, click the plus sign (+) next to the Ribbon node to expand it.
- Click the plus sign (+) next to the Panels node to expand it.
- Click the plus sign (+) next to the ribbon panel where you want to reposition a command or control.
- Click the plus sign (+) next to the rows, sub-panels, or drop-downs to get to the location you want to reposition a command or control.
- Drag the command or control to a new location.
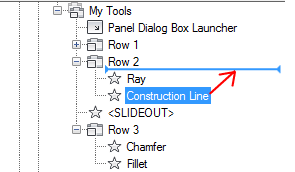
Use the visual indicator bar to specify the position of the command or control.
- Click Apply.
Add a row
- In the Customize tab, Customizations In <file name> pane, click the plus sign (+) next to the Ribbon node to expand it.
- Click the plus sign (+) next to the Panels node to expand it.
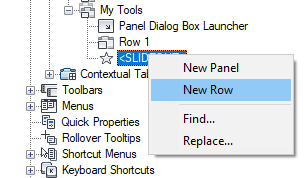
- Right-click the ribbon panel to which you want to add a row. Click New Row.
- Click Apply.
Add a Sub-panel or Fold Panel to a row
- In the Customize tab, in the Customizations In <file name> pane, click the plus sign (+) next to the Ribbon node to expand it.
- Click the plus sign (+) next to the Panels node to expand it.
- Click the plus sign (+) next to the ribbon panel where you want to add a sub-panel or fold panel.
- Create a new row for the sub-panel or fold-panel if needed, or click the plus sign (+) next to the row where you want to add a sub-panel or fold panel.
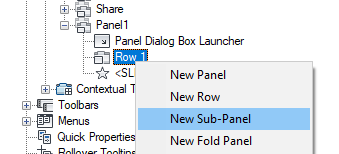
- Right-click the row and choose New Sub-Panel or New Fold Panel.
- Click Apply.
Remove a row or Sub-panel
- In the Customize tab, Customizations In <file name> pane, click the plus sign (+) next to the Ribbon node to expand it.
- Click the plus sign (+) next to the Panels node to expand it.
- Click the plus sign (+) next to the ribbon panel from which you want to remove a row or sub-panel.
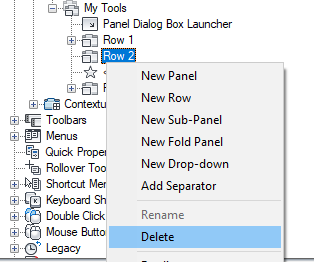
- Right-click the row or sub-panel that you want to remove. Click Delete.
- Click Apply.
Reposition a Panel row or Sub-panel
- In the Customize tab, Customizations In <file name> pane, click the plus sign (+) next to the Ribbon node to expand it.
- Click the plus sign (+) next to the Panels node to expand it.
- Click the plus sign (+) next to the ribbon panel that contains the row or sub-panel you want to reposition.
- Drag and drop the row or sub-panel that you want to reposition.
- Click Apply.
Create a Drop-down in a row
- In the Customize tab, Customizations In <file name> pane, click the plus sign (+) next to the Ribbon node to expand it.
- Click the plus sign (+) next to the Panels node to expand it.
- Click the plus sign (+) next to the ribbon panel where you want to add a drop-down.
- Right-click the row to which you want to add a drop-down. Click New Drop-down.
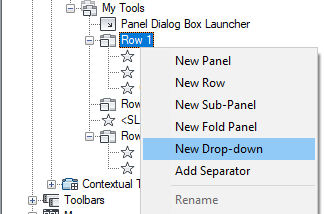
A new drop-down (named New Drop-down) is created in the last position of the row.
- Right-click the new drop-down. Click Rename and enter a new name.
- From the Command List pane, drag and drop the commands that you want to add to the new drop-down.
- Adjust the properties of the drop-down as desired to control the appearance of the drop-down and the commands under the drop-down.
- If the drop-down will use the Split behavior, add a command to the Primary Command node under the drop-down to set the command for the main button.
- Click Apply.
Show the Label and Set the Orientation of a Command or Drop-down
- In the Customize tab, Customizations In <file name> pane, click the plus sign (+) next to the Ribbon node to expand it.
- Click the plus sign (+) next to the Panels node to expand it.
- Click the plus sign (+) next to the ribbon panel where you want to show the label for a command.
- Click the plus sign (+) next to the row, sub-panel, or drop-down where you want to show the label for a command. If you need to, continue expanding rows, sub-panels, and drop-downs to get to the command or drop-down.
- Select the command that you want to show its label for.
- In the Properties pane, Button Style box, click the down arrow and select Large With Text (Vertical), Large With Text (Horizontal), or SmallWithText.
- Click Apply.
Set the Size of a Command or Drop-down
- In the Customize tab, Customizations In <file name> pane, click the plus sign (+) next to the Ribbon node to expand it.
- Click the plus sign (+) next to the Panels node to expand it.
- Click the plus sign (+) next to the ribbon panel which has the command or drop-down for which you want to set the size.
- Click the plus sign (+) next to the row or sub-panel that has the command or drop-down for which you want to set the size. If you need to, continue expanding rows, sub-panels, and drop-downs to get to the command or drop-down.
- Select the command or drop-down for which you want to set the size.
- In the Properties pane, Button Style box, click the down arrow and select Large With Text (Vertical), Large With Text (Horizontal), SmallWithText, SmallWithoutText, or LargeWithoutText.
- Click Apply.
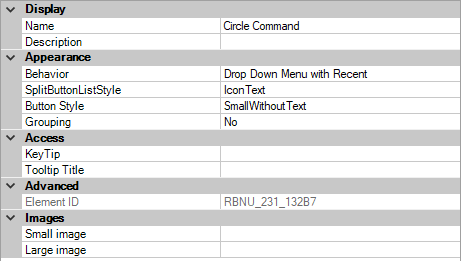
Set the Button Style of a Drop-down
- In the Customize tab, Customizations In <file name> pane, click the plus sign (+) next to the Ribbon node to expand it.
- Click the plus sign (+) next to the Panels node to expand it.
- Click the plus sign (+) next to the ribbon panel where you want to change the style of a drop-down.
- Click the plus sign (+) next to the row or sub-panel that contains the drop-down you want to change. If you need to, continue expanding rows and sub-panels to get to the drop-down.
- Select the drop-down that you want to change, and update its properties in the Properties pane:
- In the Behavior box, click the down arrow and select Drop Down Menu with Recent, Drop Down Menu, Split with Recent, Split, or Split with Recent (Static).
- In the Split Button List Style box, click the down arrow and select Icon, Icon and Text, and Descriptive.
- Click Apply.
Copy a Toolbar to a Ribbon Panel
- In the Customize tab, Customizations In <file name> pane, click the plus sign (+) next to the Toolbars node to expand it.
- Right-click the toolbar that you want to copy and convert to a ribbon panel. Click Copy to Ribbon Panels.
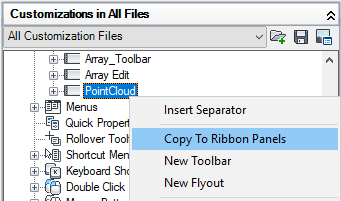
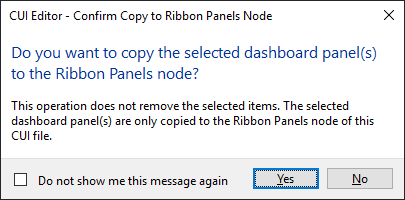
- In the CUI Editor - Confirm Copy to Ribbon Panels Node dialog box, click Yes.
The copied toolbar is placed under the Ribbon
Panels node.
- Click Apply.
Copy a Dashboard Panel to a Ribbon Panel
- In the Transfer tab, Customizations In <file name> pane on the right side, click the Open Customization File button.
- In the Open dialog box, Files of Type drop-down list, select Legacy Customization Files (*.cui).
- Browse to and select the customization (CUI) file that contains the dashboard panels you want to copy to ribbon panels. Click Open.
- Click the plus sign (+) next to the Dashboard Panels node to expand it.
- Right-click over the dashboard panel you want to copy and convert to a ribbon panel. Click Copy to Ribbon Panels.
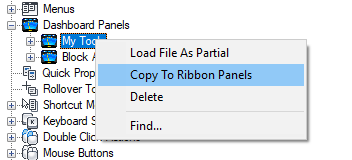
- In the CUI Editor - Confirm Copy to Ribbon Panels Node dialog box, click Yes.
The copied dashboard panel is placed under the Ribbon
Panels node.
- Drag the new ribbon panel from the Customizations In
<file name> pane on the right side to the Panels node of a loaded CUIx file in the Customizations In
<file name> pane on the left side.
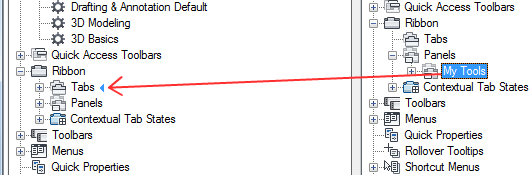
- Click Apply.
Control the Display of Ribbon Panel Titles on the Ribbon
- Right-click a ribbon tab and choose Show Panel Titles.