Have you ever had to do an operation like offset and selected each object one at a time? Or maybe you wanted to turn several objects into a single object to make it easier to modify. I'm sure you have, and in this Have You Tried we'll cover the basics of joining 2D lines to create polylines and joining arcs or closing an arc to create a circle. I'll also cover some of the benefits of joining objects.
There are several combinations of objects that can be joined, each having slightly different requirements. This article will be focused on lines, polylines, and arcs.
For a complete list of objects that can be joined and their requirements, see the JOIN (Command) for more information.
You can also use the Join option of the PEDIT command to combine a series of lines, arcs, and polylines into a single polyline. The PEDIT command is not covered in this article.
Before You Get Started
Make sure the Properties palette is open.
- Click
.
Find
You can also enter PROPERTIES at the Command prompt.
As we join objects, we'll use the Properties palette to view how their properties change.
Two important terms to be familiar with when joining objects are collinear and coplanar.
-
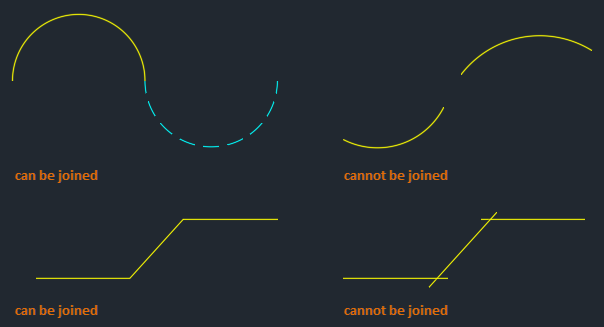
Collinear refers to lines that lay on the same straight line. Lines must be collinear for the gaps between them to be closed.

- Coplanar refers to objects that lay on the same XY plane. Objects must be touching end to end and not overlap to be joined.
Join Line Segments
Objects must be colinear or touching end to end. Join will only extend objects that are collinear.
Example 1
Let's begin by joining lines that have gaps between them.
- Draw a few lines and assign different values to their properties like color and linetype as shown.
Note: When joining lines with gaps between their endpoints, the lines must be collinear.

- Click
.
Find
You can also enter JOIN at the Command prompt.
- Select the source object.
Objects selected after the source object will inherit the properties of the source object.

- Select the objects to join.
Multiple lines can be selected. If the objects are not touching end to end, or are not collinear, JOIN will ignore the objects.
In this example, I'll select the remaining two lines.

- When you are done selecting objects, press Enter.

That's great. The gaps are closed between the lines creating a single line from the previous three collinear lines.
Example 2
Let's try this again, but this time select a different line as the source object.
-
From the Quick Access toolbar, click Undo. Find

You can also enter U at the Command prompt.
-
Restart the JOIN command but select the middle line with the Hidden linetype as the source object and the other two lines to join.
 Notice that the joined line now has the same property values as the selected source object.
Join Stacked Lines

Let's look at this example in more detail.
- Click
.
Find
You can also enter JOIN at the Command prompt.
- Select the hidden line as the source object.

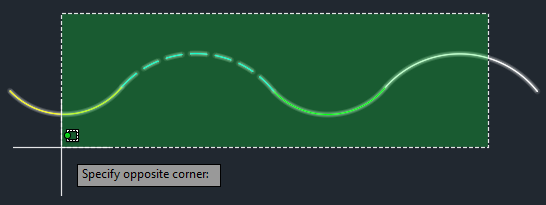
- Use a crossing window to select the rest of the lines to join.
Notice the hidden line was also included in the selection set. This is not a problem because the hidden line will be ignored.
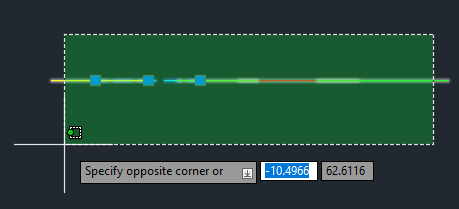
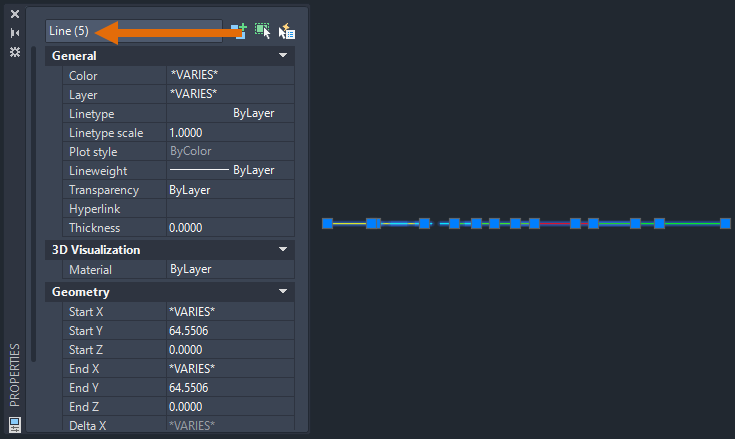
The Properties palette shows five lines have been selected.
- When you are done selecting objects, press Enter.
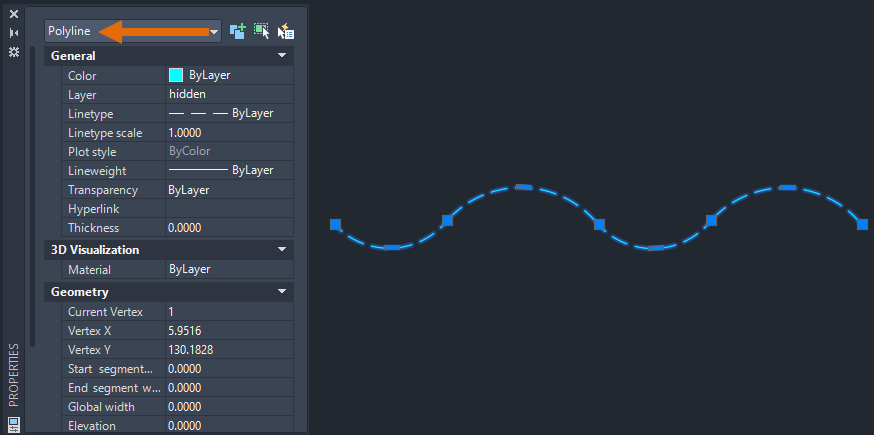
The five lines are joined into a single line using the property values of the source object, in this case the hidden line.

The above technique is a nice way to remove overlapping lines from a drawing. As long as the lines are collinear, they can be joined into a single line.
Join Arcs
Up to now, we have been joining lines. Now let's look at joining arcs. The process is very similar to joining lines but with some differences.
Unlike joining lines, when joining arcs, they must touch end to end and be coplanar.

Let's begin by joining a few arcs.
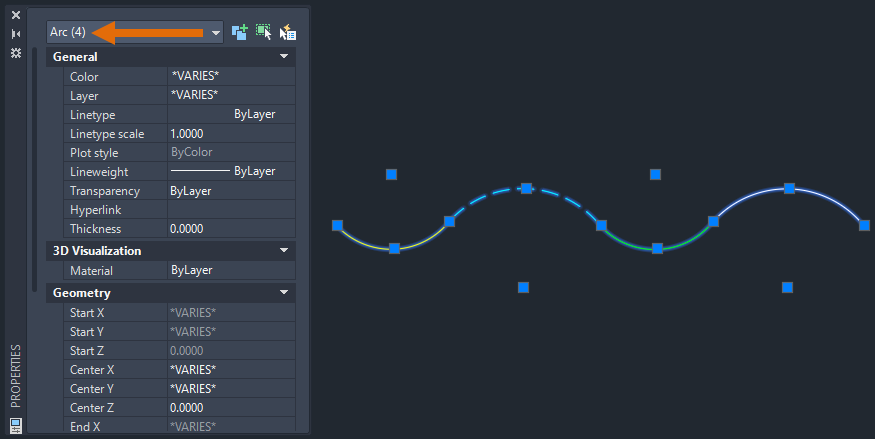
- Draw a few arcs and assign different values to their properties like color and linetype as shown. In this example, I'm starting with four arcs.
- Click
.
Find
You can also enter JOIN at the Command prompt.
- Select the source object.
Objects selected after the source object inherit the properties of the source object.

- Select the objects to join.
Multiple objects can be selected. If the objects are not touching end to end, JOIN will ignore the objects.
In this example, I use a crossing window to select the remaining arcs.
To learn more about object selection methods, see Have You Tried: Window, Fence, Lasso, and More.
- When you are done selecting objects, press Enter.
The four separate arcs are joined into a single polyline object. This polyline can be modified using grips. To learn more about working with grips, see Have You Tried: Just Grip It!.
To learn more about object polylines, see About Polylines.
Join Arcs with the Same Center Point and Radius
So far, we've joined collinear lines and coplanar arcs that touch end to end.
Now, let's say you have a circle that was broken into several arc segments. Because these arcs share the same center point and radius they can be joined, even if they have a gap between them.

When joining arcs that share a common center point and radius, you must have at least two arcs to join. You can't join multiple arcs to create a closed circle.
Let's begin by joining these arcs with a gap between their endpoints.
- Draw a few arcs and assign different values to their properties like color and linetype as shown.

- Click
.
Find
You can also enter JOIN at the Command prompt.
- Select the source object.
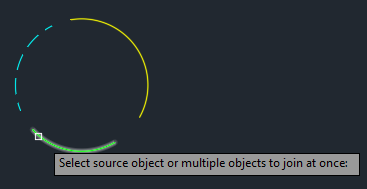
- Select the objects to join.
Multiple arcs can be selected even if they are not touching as long as they share the same center point and radius.

- When you are done selecting objects, press Enter.

The order in which you select the arcs determines the direction of the join; clockwise vs counterclockwise.
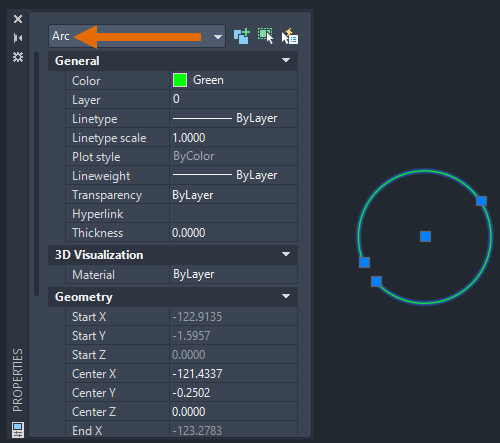
The three arcs have been joined into a single arc object.
Close an Arc to Create a Circle
Selecting all arcs will not create a circle. To create a circle from an arc, use the Close option.
- To close the arc and create a circle object, click
.
Find
You can also enter JOIN at the Command prompt.
- Select the arc and press Enter.

- At the command prompt, enter
L to use the Close option or right-click and select cLose from the shortcut menu.
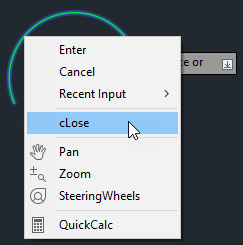
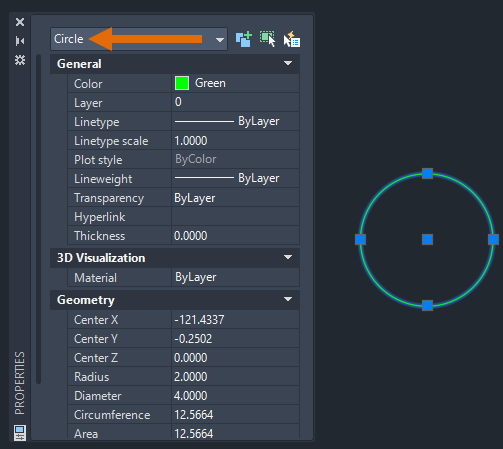
The arc is converted to a circle object.
Join Lines to Create a Polyline
Now that we've covered the basics of joining lines and arcs along with closing an arc to create a circle, let's create a closed polyline from several lines and show how it can be used.
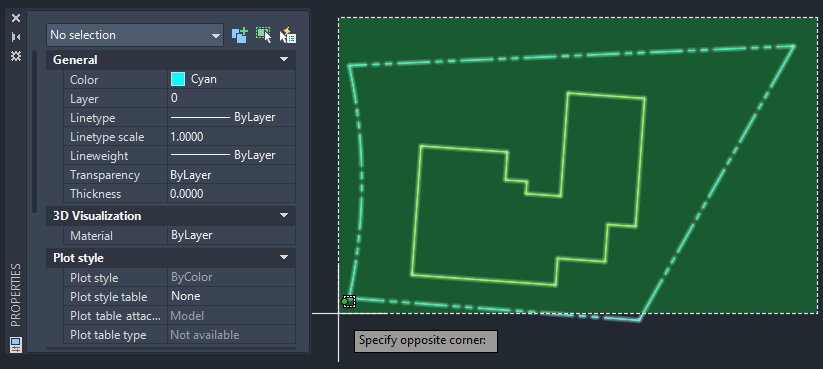
The example below is made up of several individual line and arc objects.
Let's select the Continuous lines and turn them into a closed polyline.
- Click
.
Find
You can also enter JOIN at the Command prompt.
- Select the objects to join. Here I'll use a crossing window to select the Continuous lines. Notice that one of the Phantom lines was included in the selection set. The Phantom line is automatically filtered out of the join operation because it can't be joined to any of the other selected lines.
- When you are done selecting objects, press Enter.
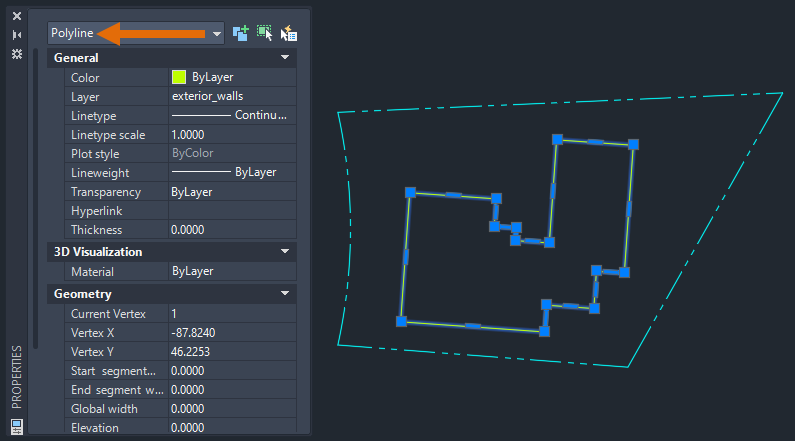
Now when I select the Continuous line, it displays in the Properties palette as a polyline object.
In the previous example, I was careful to only select the Continuous lines and one of the Phantom lines. This showed the Phantom line being ignored as part of the selection.
Let's try this again, but this time I'll select all the lines in the drawing using a crossing window.
-
From the Quick Access toolbar, click Undo. Find
You can also enter U at the Command prompt.
- Click
.
Find
You can also enter JOIN at the Command prompt.
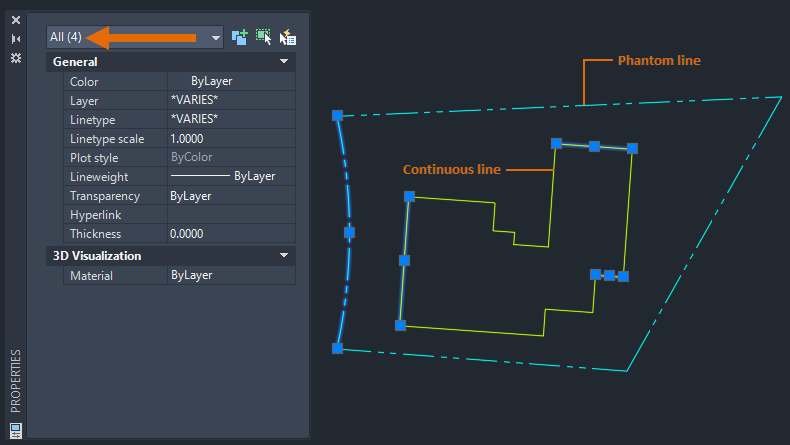
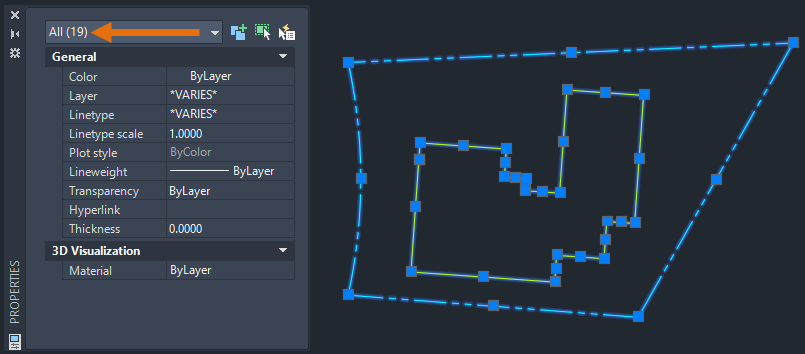
- Select the objects to join. I'll use a crossing window to select all lines and arcs in the drawing.
- When you are done selecting objects, press Enter.
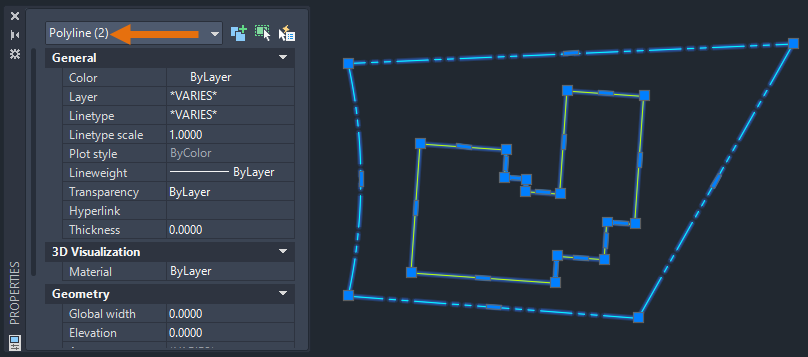
Now when I select the Continuous line and the Phantom line, the Properties palette lists two separate polyline objects are selected. In one instance of the JOIN command, I was able to join many lines and arcs into multiple polylines.
Using Offset with a Closed Polyline
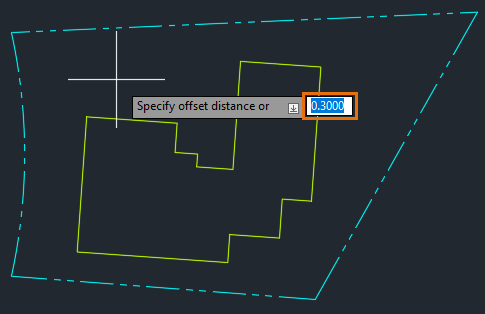
In the example below, I'll use OFFSET to create a new polyline with a specific distance from the original polyline.
- Click
.
Find
You can also enter OFFSET at the Command prompt.
- When prompted to specify an offset distance, type
.3 and press Enter.
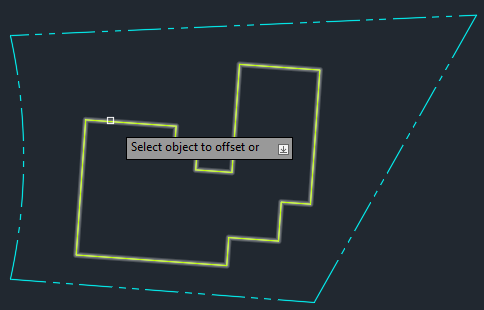
- Select the continuous polyline.
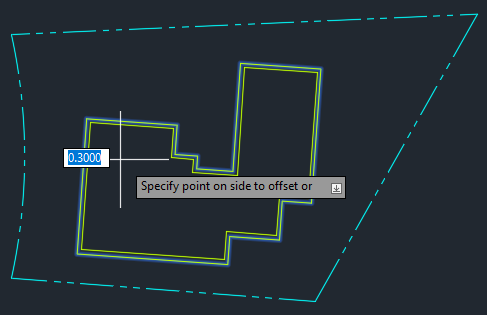
- Specify a point on the side to offset. I'll select inside of the polyline.
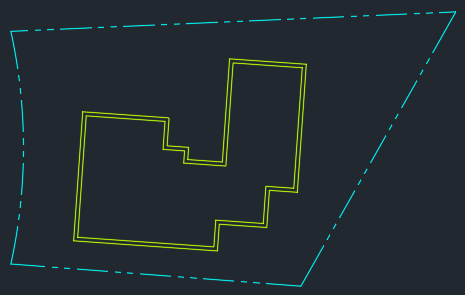
Selecting the closed polyline and using OFFSET, I was able to create a new polyline inside of the original polyline.
To learn more about OFFSET, see About Offsetting Objects.
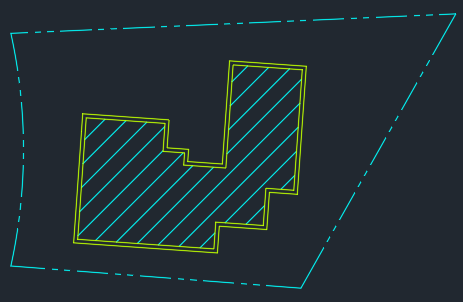
Using Hatch with a Closed Polyline
In the following example, I'll use the closed polyline as a hatch boundary and hatch inside the polyline.
- Click
.
Find
You can also enter HATCH at the Command prompt.
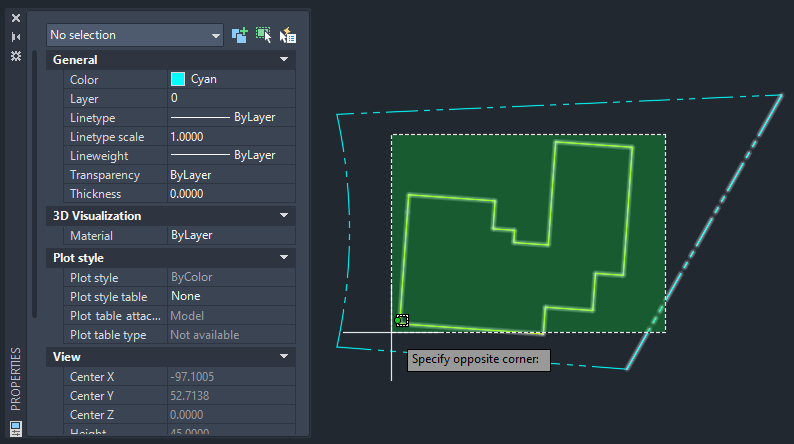
- Click inside the closed polyline and press Enter.
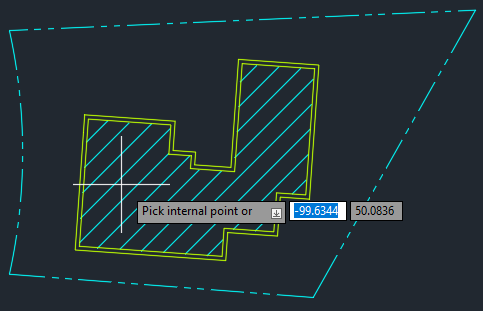
I used the closed polyline from the previous example as the boundary for the hatch.
To learn more about HATCH, see Have You Tried: Hatch and Hatch Editing.
The EXPLODE command can be used to convert the polyline back into individual objects.
To learn more about EXPLODE, see EXPLODE (Command) for more information.
Summary
I hope this helped give you a better understanding of the JOIN command and what you can do with it. Being able to join multiple objects to create a polyline or a closed polyline can be a time saver when working on complex drawings.
Related Have You Tried Articles
- Have You Tried: Just Grip It! - Stretch, move, copy, rotate, scale, and mirror objects using grips.
- Have You Tried Breaking Objects - Use BREAK and BREAKATPOINT to break linear and curved objects at a specified location to create and modify objects.
- Have You Tried: Hatch and Hatch Editing - Fill an enclosed area or selected objects with a hatch pattern, solid fill, or gradient fill.
- Have You Tried: Window, Fence, Lasso, and More - Various techniques for selecting many objects at the same time.
Join 2D Objects Related Commands
Here are some frequently used commands related to joining linear and curved objects.
| Command | Description |
|---|---|
| BREAK | Breaks the selected object between two points. |
| BREAKATPOINT | Breaks the selected object into two objects at a specified point.
Note: The BREAKATPOINT command is available in AutoCAD and AutoCAD LT 2021 and later. If you are using an earlier release, entering @ for the second point of the BREAK command will give you the same result.
|
| EXPLODE | Breaks the selected object into two objects at a specified point. |
| JOIN | Joins the endpoints of linear and curved objects to create a single object. |
| OFFSET | Creates concentric circles, parallel lines, and parallel curves. |
| U | Reverses the most recent operation. |