Scoot Wire Numbers
-
Click
 . Find
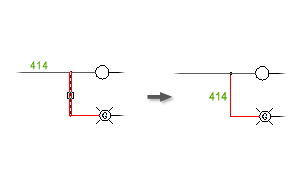
- Select the wire number to slide along its connected wires or select the wire segment itself to scoot the entire wire, including the components, along the bus. You can scoot an entire rung up or down. A rectangle drawn in temporary graphics indicates the selected items.
- Move your cursor to the appropriate position and click your mouse button.
The items scoot and reconnect.
Move a Wire Number
Moves an existing wire number to a selected location on the same wire network.
Select a location on the wire segment to define a new position for the wire number.
-
Click . Find
- Select the wire segment where you want the wire number repositioned. It is not required that you pick on the existing wire number first.
The wire number automatically moves to the selected position.
Rotate a Wire Number
-
Click . Find
- Select the wire number text to rotate 90 degrees from its current orientation.
Each click the wire number text rotates it another 90 degrees counter-clockwise.
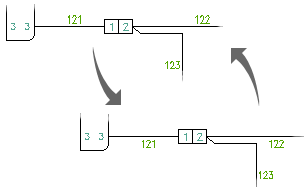
Move the Wire Number Text With an Attached Leader
Inserts, modifies, or collapses a leader on a selected wire number.
Pick directly on the wire number text, and then identify the new position. Right click or press Enter to exit the command.
-
Click . Find
- Select the wire number text.
- Select the new position for the wire number. Right-click or press Enter to position the wire number. Note: You can type "C" at the command prompt to collapse the wire leader back to the wire number block. You can do it immediately after inserting a leader if you determine that you do not want the leader. Or, rerun the command if you want to remove the leader from existing wire numbers.
Move the Wire Number Text Without Use of a Leader
-
Click . Find
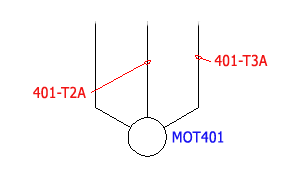
- Select the attributes to move and press Enter.
You can pick the components individually or by windowing. Each attribute highlights with a rectangular box drawn around it.
- Select the base and insertion points for the move. The attribute follows your cursor and is automatically moved to the selected position.
The attributes remain tied to the parent block inserts.
Swap Wire Numbers
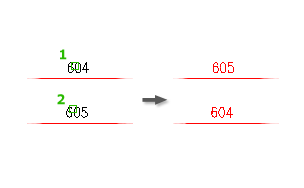
Swaps two wire numbers on separate wire networks.
Select the two wire networks, or pick the existing wire number text.
-
Click . Find
- Select the first wire or number and then select the second wire or number.
The wire numbers automatically switch positions.
Flip a Wire Number
Moves a selected wire number to the same position on the other side of the wire.
Select each wire number to flip.
-
Click . Find
- Select the wire number to mirror.
Each wire number selected is mirrored across its associated wire.
Toggle Wire Number Position
Switches a wire number between drawing properties above or below and in-line.
If the wire number you select is in-line, it switches to above or below based on the drawing properties. If it starts as above or below, the selected wire number switches to in-line.

-
Click . Find
- Select the wire number to toggle. You can select on the wire number or on the wire itself.
- Right-click to exit the command.