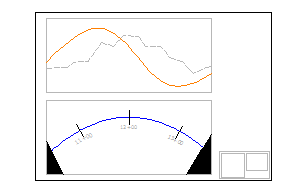
The match line mask area is the area that exists between the outside of a match line and the inside border or boundary of the view frame. On the Display tab of the Match Line Style dialog box, there is an option to set the hatch pattern for this match line mask area.
The mask is displayed in paper space in the area between the outside of a match line and the inside boundary of the view frame, indicated by the dark shaded areas in the following illustration:

- In the Settings tree, expand the Match Line collection, and then expand the Match Line Style collection.
- Double-click a match line style to open the Match Line Style dialog box.
- Click the Display tab.
- Select a View Direction (2D or 3D). You can set different hatch patterns for 2D and 3D.
- In the Component Hatch Display section at the bottom, click the current value for Pattern. The Hatch Pattern dialog box is displayed.
- Select a hatch type from the list. Optionally, you may browse to another hatch pattern palette.
- Click OK in the Hatch Pattern dialog box.
- Optionally, you may specify Angle and/or Scale.
- Click either Apply or OK on the Display tab of the Match Line Style dialog box.