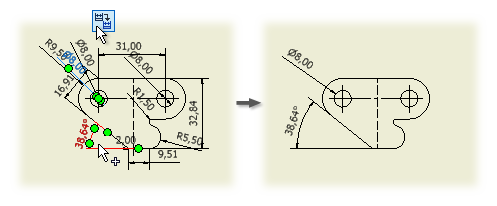
What's New: 2023.2

- On the ribbon, click
Annotate tab
 Retrieve panel
 Retrieve Model Annotations.

- Select the view you want to retrieve annotations for.
- To retrieve sketch, feature, or part dimensions, click the Sketch and Feature Dimension tab and then do any of the following:
- Click Select Source to preview and select only dimensions from the selected feature or part source.
- Click Select Features to preview and select feature, sketch, or view dimensions.
- Click Select Parts to preview and select part dimensions.
- To retrieve 3D model annotations, click the 3D Annotations tab and then do any of the following:
- Select a Design View to preview and select only 3D annotations visible in the view representation.
- Enable or disable any of the following filters:
- General Dimensions
- Tolerance Feature
- Leader Text
- Hole and Thread Note
- Surface Texture
- General Note
Note: Single component 3D model annotations can be retrieved in drawing views of assemblies. - Select the displayed annotations to keep in the drawing view. Selected annotations are highlighted.
- Click Apply to retrieve selected annotations, and then Cancel to close the dialog box. Click OK to apply and close the dialog box.
Note: A single model annotation cannot be displayed in multiple views on the same sheet.
Automatically retrieve dimensions when you create views

- Click File
 Options to access the Application Options dialog box.
- On the Drawing tab, locate the Retrieve all model dimensions on view placement option. Select the check box to retrieve model dimensions automatically when you place views.
Retrieve model dimensions as you create a base view
When you add a base view to a drawing, select All Model Dimensions on the Display Options tab of the Drawing View dialog box.
Remove retrieved annotations from a view
- Select each annotation to remove.
- Press Delete or right-click, and then select Delete from the menu.
Note: Use Retrieve Model Annotations to display the annotation in a different view or to redisplay it in the view it was removed from.
Add model dimensions to views containing derived part features
- Select a view that contains derived part features.
- Right-click the view, and then select Retrieve Dimensions.
- With Select Source active, expand the view in the browser and select the derived body.
- Select the derived part feature.
- Click Select Dimensions and then select dimensions to keep in the drawing view. Selected dimensions are highlighted.
Note: When you add dimensions for derived part features, only those dimensions that still have geometric references present in the derived part feature are added from the original part. Dimensions for a derived sketch cannot be retrieved.