Important: The Freeform panel is converted to a ribbon tab when you are working in the freeform environment.
Edit freeform geometry
Use the Edit Form command to directly manipulate and modify a freeform shape.
- Click Freeform tab
 Edit panel Edit Form
  .
. - In the Edit Form dialog box, choose a Filter to select a specific type of geometry:
- Point. Only points are available for selection. Points are displayed on the model.
- Edge. Only edges are available for selection.
- Face. Only faces are available for selection.
- All. Points, edges, and faces are available for selection.
- Body. A body is available for selection.
- Optionally in the Edit Form dialog box, choose Selection Options.
- Select Loop after you select an edge to select the entire chain.
- Select Display to toggle between blocky and smooth mode without canceling the edit command.
- Click in the graphics window to select geometry.
- To make multiple selections, press Shift while selecting.
- To select an entire loop, double-click an edge or select Loop in the dialog box after selecting an edge.
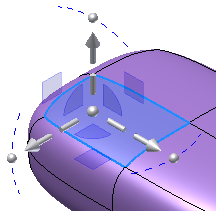
- In the Edit Form dialog box, select a Transform mode:
- All. All manipulators are available.
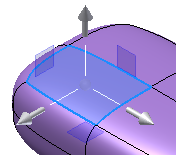
- Translation. Only translation manipulators are available.
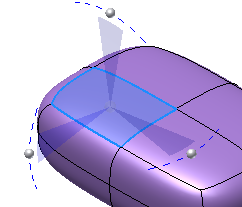
- Rotation. Only rotation manipulators are available.
- Scale. Only scale manipulators are available.
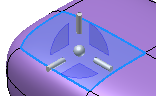 Tip: Select the sphere at the center of the manipulators to enable a global scale operation.
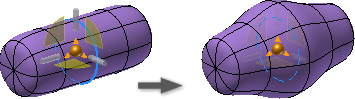
- All. All manipulators are available.
- Select the Space to control the orientation of the transform manipulator:
- Space: World Orients the manipulator with the model origin.
- Space: View Orients the manipulator relative to the current view of the model.
- Space: Local Orients the manipulator relative to the selected objects. Examples of locally oriented transform manipulators are shown in the previous images.
- Optionally, do any of the following:
- Select Locate to relocate the triad to a new location.
- Select Extrude to add a column of new faces around the original face. You can also press the ALT key when you drag faces to temporarily enable Extrude.
Note: Soft Modification is disabled when Extrude is selected. - Select Soft Modification to enable controls to perform edits with a more gradual impact on neighboring surfaces. When Soft Modification is enabled you can set the modification Type and Falloff. Do any of the following:
- Type: Specify Circular, Rectangle, or Grow and then select the radius or face value.
- Falloff: Specify Smooth, Linear, or Sphere and then set the Gradient scale.
Note: Extrude is disabled when Soft Modification is selected. - Do any of the following:
- Drag the manipulators in the graphics window to transform the geometry in the x, y, or z direction.
- Enter transform values in the mini-toolbar.
- Press Alt while transforming a face to insert an edge and extrude new faces.
- Click Locate to relocate the triad to new location.
- Click Undo to remove the last change.
- Click Reset to discard all changes and restore the component to the point it was before beginning the command.
- Click Redo to restore the last undo.
- Click Display to toggle between smooth and blocky graphical representation.
- Click Done to apply the transformation.
- Click Finish Freeform to exit the editing environment.
Align Freeform Geometry
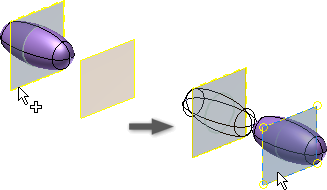
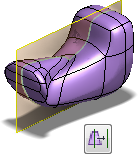
Use Align Form to precisely reposition the model from a source symmetry plane or vertex to a target plane.
- Click Freeform tab Edit Panel Align Form
 .
. - Do one of the following before you select the origin geometry:
- Enable the Symmetry Plane option if the body contains defined symmetry and you want to select a symmetry plane as the origin.
- Enable the Vertex option if the body has no defined symmetry or you want to use a vertex as the origin.
- Enable the Symmetry Plane option if the body contains defined symmetry and you want to select a symmetry plane as the origin.
- Select the origin vertex or plane.
- Select the target plane or planar face and flip the direction if necessary.
- Click OK.
Delete Freeform Geometry
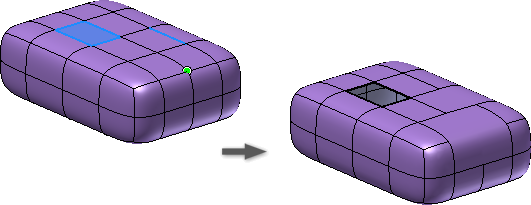
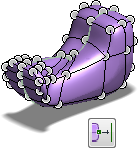
Use Delete to refine the model to get the shape you are looking for. For example, the more you subdivide the freeform body the more square it gets. If you want a more rounded shape, delete points and edges. You can also delete one or more faces to create an open sheet body.
- Click Freeform tab Edit Panel Delete
 .
. - In the Delete dialog box, choose a selection filter:
- Point, Edge, or Face. Selects points, edges, or faces.
- Body. Selects the body.
- Loop. Selects a loop of edges or faces.
- All. Selects all points, edges, or faces.
- In the graphics window, select the geometry to delete. Tip: Shift-click to make multiple selections.
- Click OK. Tip: If you’ve already selected edges and points in the graphics window, right-click and choose Delete.
Move a Freeform Body
Tip: The following workflow is not a precise move. Use Align Form to precisely move a body.
- Click Freeform tab Edit panel Edit Form .
- In the Edit Form dialog box, select the Body filter
 .
. - In the graphics window, select a body.
- Drag a manipulator handle to move the body in the graphics window.
 Note: You can use the Copy command to copy a freeform body. When you Paste the copied geometry in the freeform environment, it is pasted on top of the source geometry. The new geometry is selected and the move manipulator handles are active. Move the copied geometry to separate the copied geometry from the source.Tip: You can also use the 3D Model tabModify panel Move Body command to move a freeform body after you exit the freeform environment.