Top Vertical Priority
With exceptions, at any given point in a timeline with multiple layers, the top shot in a vertical stack of layers is the shot that is displayed, rendered, or played out to tape. This is the Top Vertical Priority rule and it is the default behaviour of the multi-layer timeline when Solo mode is disabled (See Solo Mode).
When there is a gap in the top layer, this gap is transparent when looking down on the timeline; Lustre looks in progressively deeper layers (going from top to bottom in a vertical stack) until it finds the top vertical shot to display. To visualize this, it may help to imagine looking down on the multi-layer timeline so that you would have to see through the top layers in order to see the bottom layers. Your view from the top is a 'flattened' view of the timeline.
The only exception to the Top Vertical Priority rule is layer soloing (see Solo Mode). There are a couple of features which alter the way the Top Vertical Priority rule works; layer muting (see Top Vertical Priority), and shot priority (see Top Vertical Priority).
The following example illustrates how top vertical priority determines which shots are displayed, played out to tape, and rendered. It also illustrates how the displayed shots come from various layers throughout the course of the timeline. For simplicity's sake, in this example, there are no muted layers and no shots assigned with shot priority.

(a) Shot 1 (L3) (b) Shot 2 (L2) (c) Shot 3 (L3) (d) Shot 4 (L2) (e) Shot 5 (L3)
You can use the timeline information field to verify the layer and shot being displayed at any given point in the timeline. See Monitoring the Location of the Current Frame. For example, in the following screen capture, the shot being displayed is shot 3 on Layer 2, and the current frame is frame 183.

Muted Layers
When a layer is muted, Lustre ignores this layer when applying Top Vertical Priority. That is, at a given point in the timeline, if a muted layer has Top Vertical Priority, Lustre looks at progressively lower layers in the vertical stack until it finds a shot in an unmuted layer, and then displays that shot.
The following example illustrates how a muted layer is used within a multi-layer timeline to determine what shots are displayed in the Storyboard and Player when the Top Vertical Priority rule is applied.

(a) Muted layer (b) Shot 1 (L3) (c) Shot 2 (L1) (d) Shot 3 (L3) (e) Shot 4 (L1) (f) Shot 5 (L3)
In this example, Layer 2 is muted. Therefore, only the shots in Layer 1 and Layer 3 are active.
To mute a layer:
Do one of the following:
- Ctrl-click the name of the layer you want to mute (e.g., V1.L1).
- Shift+M to mute the layer with focus.
The layer name indicator turns yellow.
To unmute a layer:
- Do one of the following:
- Ctrl-click the name of the layer you want to unmute (e.g., V1.L1).
- Shift+M to unmute the layer with focus.
Shot Priority
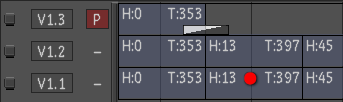
When you work in the Top Vertical Priority mode (Solo is disabled), you can assign priority on a shot-by-shot basis. A 'priority shot' in a given layer is displayed even if there are shots in the layers above it in the timeline. In the case where there are multiple priority shots in a vertical stack, the priority shot with Top Vertical Priority is displayed or updated accordingly in the Player. Furthermore, the Storyboard thumbnails are updated according to priority after an initial refresh. Lustre represents a priority shot in the multi-layer timeline as a shot with a red dot.
The following behaviours are expected when using the shot priority function:
Shot priority information is saved to the cut file.
A priority shot survives trimming, slipping, and sliding operations.
When using the New button to create a new layer, the reproduced shot in the new layer preserves shot priority.
When using the Copy button to copy a shot, the reproduced shot does not preserve shot priority.
You can assign shot priority to a virtual black clip.
You cannot assign shot priority to a gap.
When performing a change cut operation with a cut that contains multiple versions of the same shot but with different grades, the shot priority feature allows you to designate the version of grading you would like to be transferred to the same shot in the new cut. However, if a muted layer has a priority shot, the grading metadata for this shot is not transferred to the new cut.
In the case where a shot dissolves into another priority shot on a different layer within the vertical stack of shots, then the first shot does not dissolve seamlessly into the priority shot. For a seamless dissolve into a priority shot, you must create a dissolve on the layer of the priority shot.
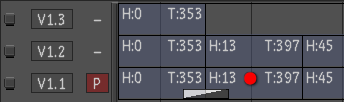
In the following example, there is a dissolve on Layer 3 between shot 1 and shot 2. The dissolve begins near the end of shot 1, but once shot 2 on Layer 1 begins, the dissolve does not continue. Instead, shot 2 begins without showing the second half of the dissolve effect.
In the following example, the dissolve works as expected because the dissolve is on the same layer as the priority shot.
When one priority shot overlaps another in a different layer, the priority shot with Top Vertical Priority is displayed. In overlap situations, this means that one or more shots are displayed that begin part way through or end part way through the shot.
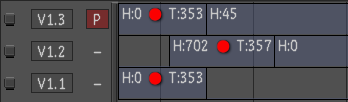
In the following example, the first Layer 3 shot is displayed completely and then the Layer 2 shot is displayed starting somewhere in the middle of the shot.
The following example illustrates shot priority in the multi-layer timeline.

(a) Muted layer (b) Shot 1 (L3) (c) Shot 2 (L1) (d) Shot 3 (L1) (e) Shot 4 (L1) (f) Shot 5 (L3)
In this example, Layer 2 is muted and Shot 3 in Layer 1 is a priority shot.
To assign shot priority to a shot:
In the multi-layer timeline, Shift+right-click the shot (in the desired layer) to which you would like to assign priority.
A red dot appears on the shot.
To assign shot priority to the shot in focus:
In the multi-layer timeline, make sure the positioner and its focus point are focused on the shot to which you apply priority.
Press Shift+.
A red dot appears on the shot in focus.
To assign shot priority to several selected shots with the Shot Priority flag:
In the multi-layer timeline, select all the shots to which you wish to assign shot priority. See Selecting Elements.
Shift+right-click one of the selected shots to assign shot priority to that shot.
The Shot Priority flag is enabled.
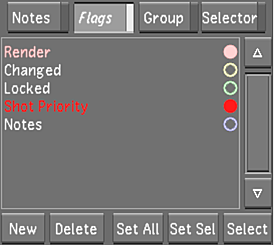
In the Flags menu, left-click the Shot Priority flag.
The Shot Priority flag is highlighted.
 Note:The indicator is enabled only if the positioner and focus point is over a priority shot.
Click Set Sel.
All the selected shots are assigned shot priority.
To assign shot priority to the current shot of the currently active layer:
In the Timeline menu, enable the Flags button.
Right-click the Shot Priority flag.
A red dot appears on the current shot of the currently active layer.
To remove shot priority from a shot:
In the multi-layer timeline, Shift+right-click the shot with priority.
The red dot is removed from the shot.
To select all shots that are assigned shot priority:
In the Timeline menu, enable the Flags button.
In the Flags menu, left-click the Shot Priority flag.
The Shot Priority flag is highlighted.
Click Select.
All priority shots are selected.