Capture Menu Options
Use the Capture menu to perform your VTR capture operations.
In order to perform VTR capture operations, you must enable the VTR Control button, in the Editing / Playout menu.
The following three graphics represent the Capture menu.
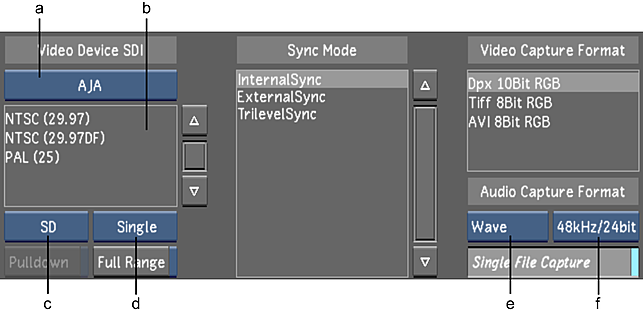
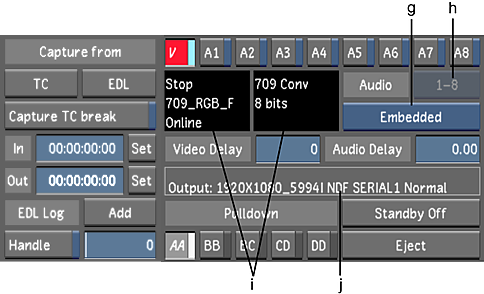
(a) Video/Graphics option box (b) Raster list (c) Format option box (d) Link Type option box (e) Audio File Type option box (f) Sampling Rate/Bit Depth option box (g) Audio Input button (h) Audio Track Selection option box(i) VTR Status panel (j) Capture Error status
Video/Graphics option box
Toggle between the video card (AJA or DVS) and the graphics card (GFX/SDI). The Raster list is then populated with rasters for the selected card.
Raster list
With a video card selected in the Video option box (AVIO), select one of the listed rasters to set the resolution and timing for capture.
Format option box
Toggle to display only rasters belonging to a particular footage format in the Raster list.
| Select: | To display: |
|---|---|
| SD | Standard definition rasters. |
| HD | High definition rasters. |
| Film | Film rasters. |
| Audio | Audio rasters (only applicable to GFX/SDI). |
Link Type option box
Toggle to display only rasters belonging to a particular link type in the Raster list.
| Select: | To display: |
|---|---|
| Single | The single link rasters. |
| Dual | The dual link rasters. |
| Stereo | The stereoscopy rasters (only applicable to GFX / SDI). |
Pulldown button
Enable to remove 3:2 pulldown from Film-to-video transferred material. See Removing Pulldown when Capturing.
Full Range button
Enable to configure Lustre to capture the full video signal from the video board. If disabled, Lustre captures only the legal portion of the video signal.
Sync Mode list
Select one of the sync modes.
| Select: | To: |
|---|---|
| InternalSync | Set the sync mode to a free running internal sync (SD and HD). |
| ExternalSync | Genlock to an analog sync connected to the sync input (SD only). |
| TrilevelSync | Genlock to a trilevel sync connected to the sync input (HD only). |
Video Capture Format list
Select a video capture format to set file type, colour space, and bit depth of the captured material.
| Select: | To capture only: |
|---|---|
| Dpx 10Bit RGB | DPX files with an RGB colour space at a bit depth of 10-bit. |
| Tiff 8Bit RGB | TIFF files with an RGB colour space at a bit depth of 8-bit. |
| AVI 8Bit RGB | AVI files with an RGB colour space at a bit depth of 8-bit (available only on Windows workstations.) |
Audio File Type option box
Choose whether to save audio captured from a VTR/ATR, or imported from Wiretap as a Wave (.WAV) or AIFF (.AIF) file.
Audio Sampling Rate/Bit Depth option box
Select to capture the audio tracks at a sampling rate of 48 kilohertz (kHz) and a bit depth of 16-bit, or 48 kHz and a bit depth of 24-bit.
Single File Capture button
When enabled, all the selected audio tracks are saved in a single file. When disabled, each audio track is saved as an individual file. This option is enabled by default.
Log panel
Displays status messages during capture.
TC button
Initiates a capture from VTR using timecode in and out points. See Capturing from Timecode.
EDL button
Initiates a capture from VTR using an EDL. See Auto-conforming an EDL.
Capture TC Break button
Initiates a capture from VTR using the timecode in and out points, regardless of the number of timecode breaks. See Capturing Media with Timecode Breaks.
Timecode In Point field
Enter the start timecode. Press Set next to the field to set the current timecode (read from the VTR) as the in point.
Timecode Out Point field
Enter the end timecode. Press Set next to the field to set the current timecode (read from the VTR) as the out point.
EDL Log Add button
Logs the In and Out timecode points as an EDL for capture. See Logging and Batch Digitizing.
Handle button
Enable to capture heads and tails. This feature is used when capturing from an EDL or from timecode.
Handle slider
Set the number of head and tail frames to capture.
V button
Enable to capture the video track when capturing from a video source. Disable to capture audio only.
A1 - A16 buttons
Enable the audio track(s) (A1-A16) to capture from an audio source.
VTR Status panel
Displays the VTR status messages when Lustre is connected to a VTR.
Audio Track Selection option box
Used in correlation with the A1-A16 buttons. Toggle to determine whether tracks 1-8 or 9-16 are visible. Tracks 9-16 are only available with embedded AJA audio. If only eight audio tracks are available, this option is disabled (greyed out).
Audio Input option box
Toggle to specify the source of the captured audio.
| Select: | To specify the connection to the audio source: |
|---|---|
| Embedded | The SDI connection. |
| AES | The XLR connections on the DVS/AJA breakout box. |
Video Delay field
Enter a frame number to delay the video capture for that number of fields. For example, if you set the field to 10, the capture begins 10 frames after the In point. If you set the field to -10, capture begins 10 frames before the In point.
Audio Delay field
Enter a frame number to delay the audio capture for that number of fields. For example, if you set the field to 10, the audio capture begins 10 frames after the In point.
Capture Error status
Displays a message when an error has occured while capturing from a VTR.
Pulldown Field buttons
Enable a Pulldown Field button to select the frame used for the 3:2 pulldown. Only available when Pulldown is enabled. See About 3:2 Pulldown.
Standby Off button
Removes the VTR heads from the tape.
Eject button
Ejects the tape in the VTR.
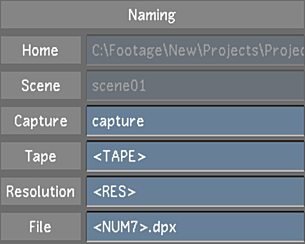
Home field
Displays the project home directory. This is the destination path for captured footage. You cannot change this value without modifying your project settings.
Scene field
Displays the current scene you are working in during capture. You cannot change this value without modifying your project settings.
Capture field
Enter the name of the folder where video media is saved.
Tape field
Displays the tape name. When capturing in TC mode, enter a tape name. When capturing from an EDL, the default tape name is determined by that EDL. If you capture an EDL with multiple tapes, a folder structure (
Resolution field
Defaults to the resolution of the captured files, and is used in the folder structure. Do not change this field.
File field
Displays the filename, which is the frame offset value based on the source timecode (e.g., 84600.dpx is 1:00:00:00 at 24 fps).