The command causes an object to conform to the curves in the motion path, bending and twisting as it travels. The deformation is created by a lattice around either the object, or along the length of the path.
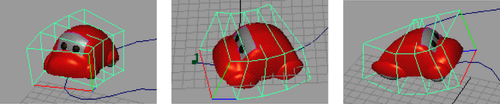
Example of a lattice around an object
Note: The lattice created by the Flow Path Object command around an object ignores effects introduced by any motion path orientation markers.
For best results, orient the object correctly to the axes before attaching it to the path, without using Twist settings after attachment. For information, see
Attach an object to a motion path.
- Select the object that is attached to the motion path, and then select
Constrain > Motion Paths > Flow Path Object >
 .
.
- Choose whether to apply the lattice to the Object or Curve. See Flow Path Object Options for information on other settings.
- Click Play to view the animation.
Attention: If a transform object with several pieces of geometry grouped under it is animated with path animation, and then flow is applied with the lattice around the object option, occasionally some of the geometry may “pop out” of the flow lattice.
To avoid this problem, do one of the following:
- In the Attribute Editor, ffd tab, expand the Freeform Deformation Attributes, and set the Outside Lattice setting to All so that all the geometry grouped under the transform object is affected by the flow lattice.
- Select the base lattice of the flow’s FFD and scale it a little larger until the geometry “pops back” inside the flow lattice.
To delete a lattice, select it and press Delete.